Using the Google Distance Matrix API for taxi dispatch
How to use the new Google Distance Matrix API to build an efficient taxi dispatch system.

In this blog post, I'll tell you all about the new Google Distance Matrix API - the Compute Route Matrix endpoint of the Routes API. I'll explain how it can be used to get the travel time (considering real time traffic) and distance for a matrix of origins and destinations, and how you can use it to build a basic taxi dispatch system (demo / source code) that matches passengers to the nearest driver.
Part 1: A developer's guide to the Google Routes API
Part 2: Plan a route with multiple stops using the Routes API
Part 3: Using the Google Distance Matrix API for taxi dispatch (this article)
Part 4: Google Maps Search Along Route
Part 5: How to draw a route on Google Maps for Android with the Routes API
What is the Google distance matrix API?
A distance matrix API is a web service that returns travel times and distances for multiple locations. A good distance matrix API will allow you to efficiently check the reachability of coordinates from each other, filter points by travel time, or run your own algorithms for solving optimization problems.
It typically returns a matrix where each row represents an origin, each column represents a destination, and the values in the matrix contain the travel time and/or distance between them. The Google Distance Matrix API is called Compute Route Matrix. It's part of the Routes API, a collection of APIs that help with navigation, ETA (Estimated Arrival Time) calculation and route finding.
In this blog post, I'll be using the terms Distance Matrix API and Compute Route Matrix interchangeably throughout, because they essentially mean the same thing. Compute Route Matrix is the updated version of the original Google Distance Matrix API, which will be deprecated on March 1, 2025.
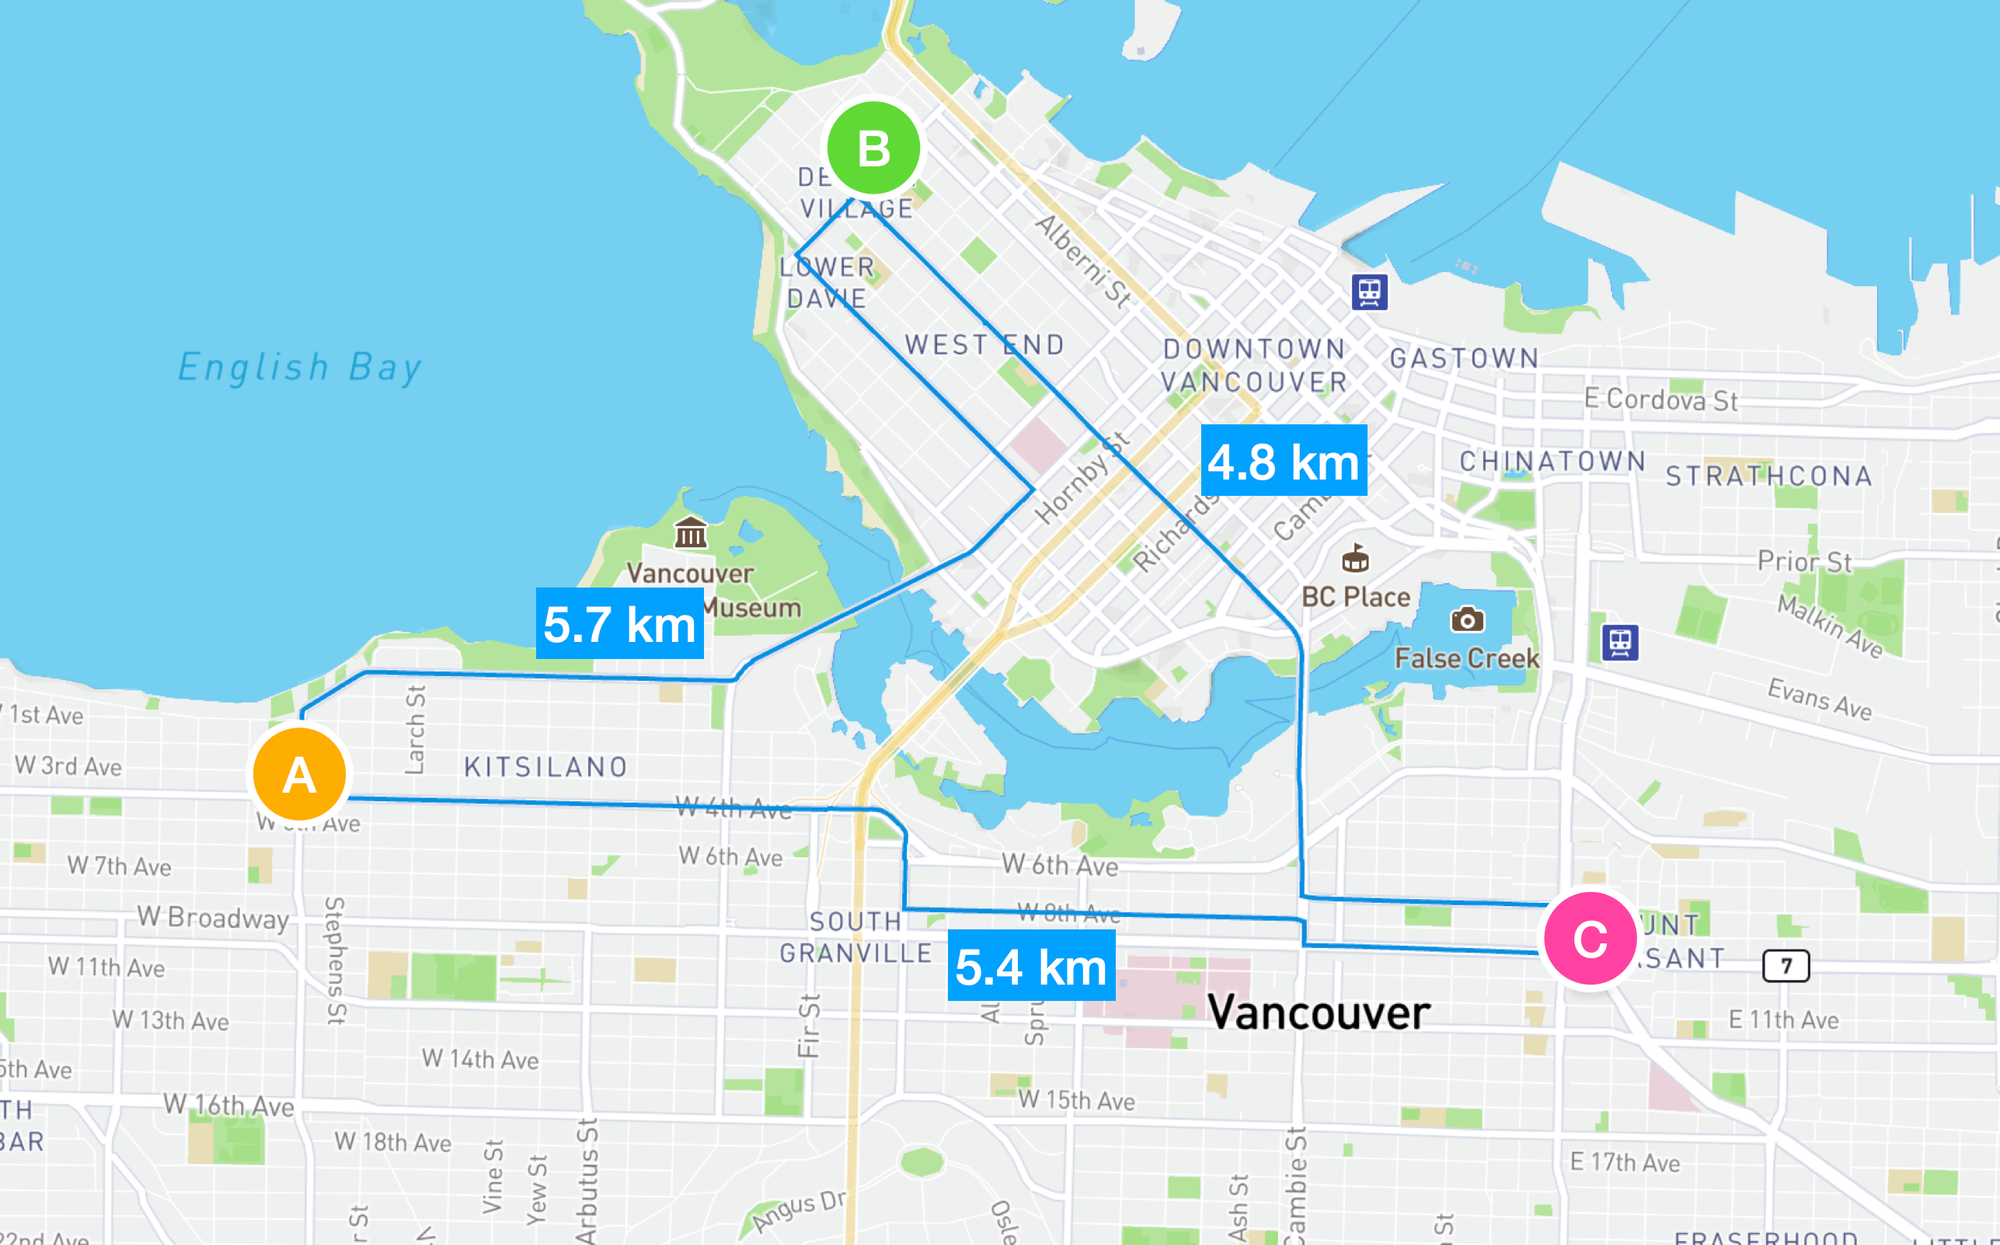
Suppose you have three locations, A, B and C in Vancouver, Canada, and you want to get the distance from each point to every other point. Compute Route Matrix will make 9 Compute Routes calls in parallel to get the distance from A to B, A to C, ..., C to C, and present the results in a table like this:
| A | B | C | |
|---|---|---|---|
| A | A → A (0 km) | A → B (5.7 km) | A → C (5.4 km) |
| B | B → A (5.7 km) | B → B (0 km) | B → C (4.8 km) |
| C | C → A (5.4 km) | C → B (4.8 km) | C → C (0 km) |
This table is called a distance matrix (let's call it matrix), and it allows us to easily look up distances between two points e.g. the distance between A and B is simply matrix[A][B] which is 5.7 km. The number of elements in a distance matrix of 3 origins and 3 destinations is 3 x 3 = 9.
Compute Route Matrix always returns the travel time and distance for the fastest route between each origin-destination pair in the matrix, considering real time traffic. The Compute Route Matrix endpoint is highly efficient, providing results for multiple routes in approximately the same time it takes the Compute Routes endpoint to return data for a single route. However, it does not provide route geometries. If you need to draw a route polyline, you'll need to make a separate call to the Compute Routes endpoint of the Routes API.
Google Distance Matrix API use cases
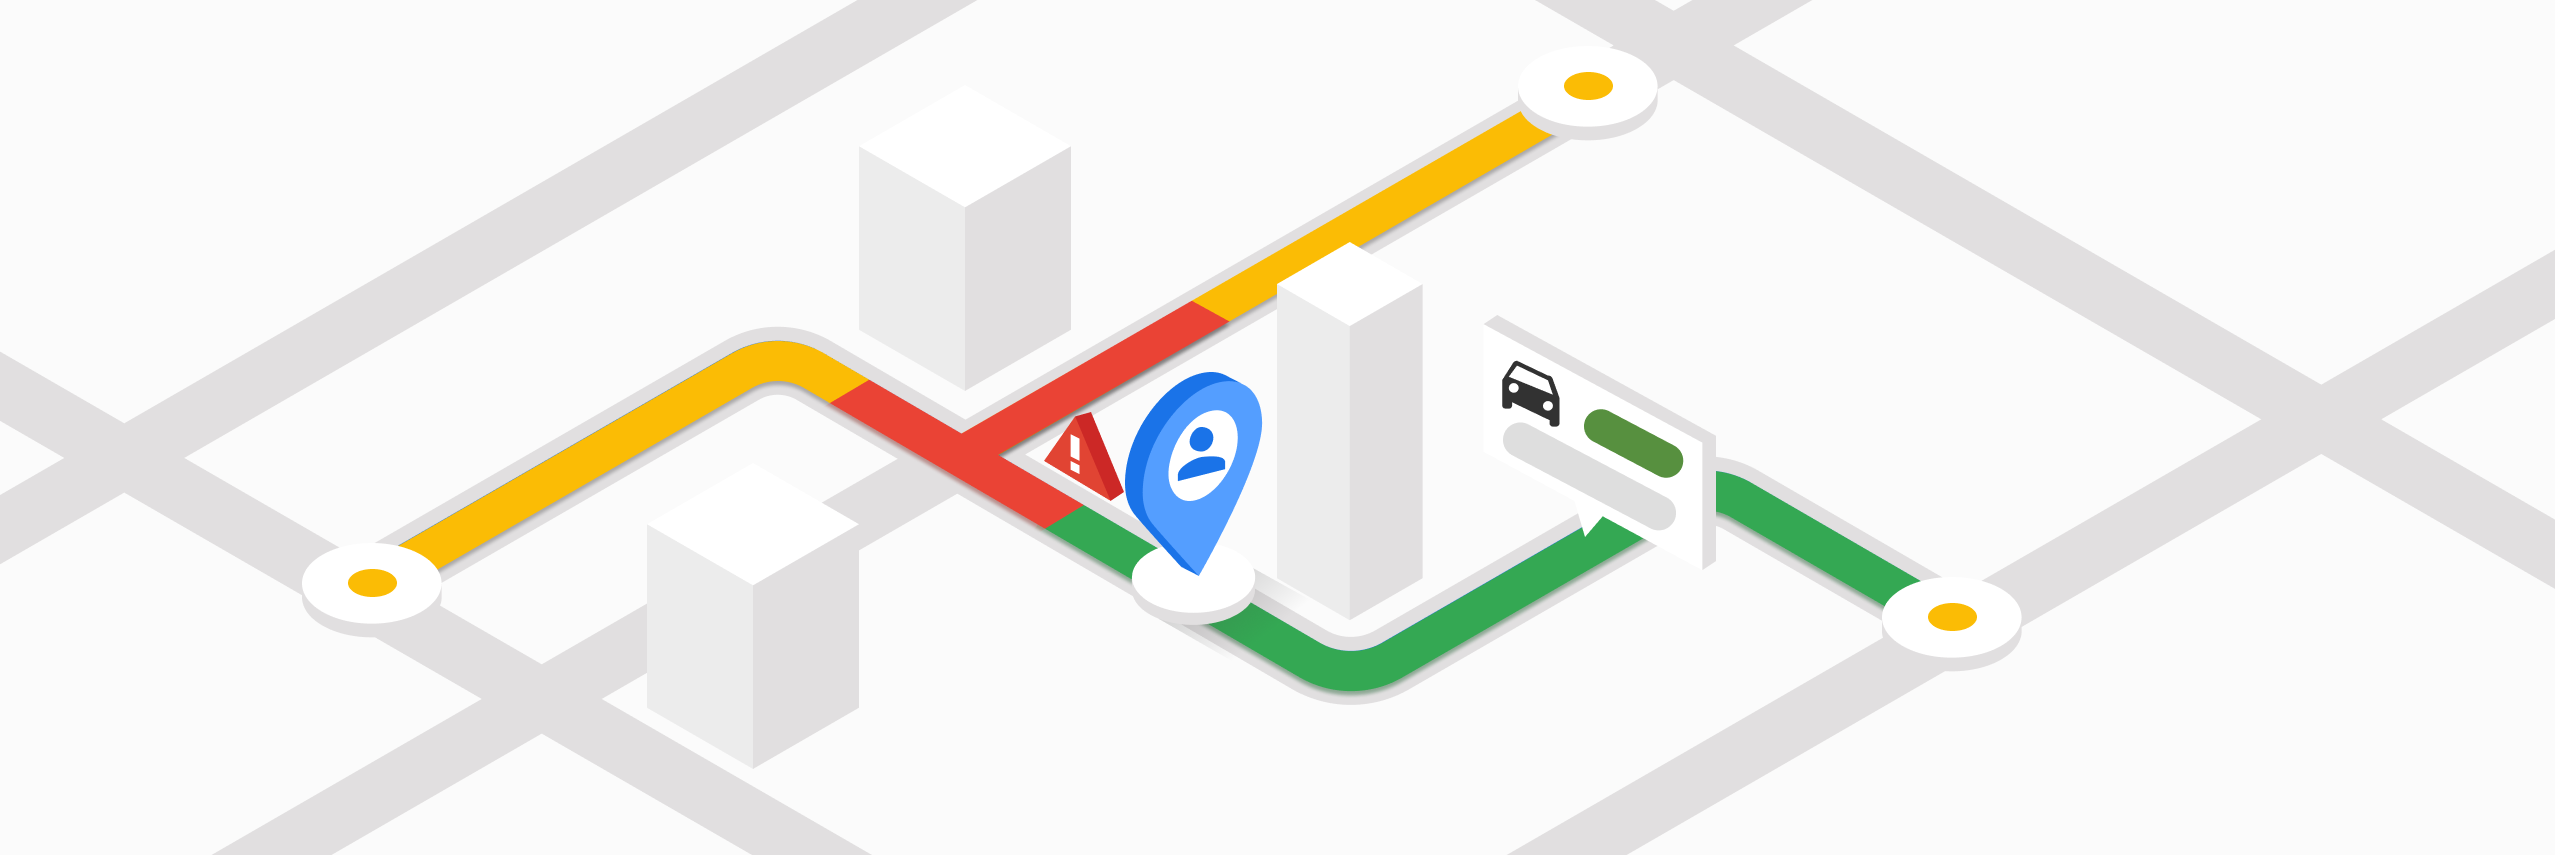
The Google Distance Matrix API is commonly used to find the nearest store, locate the closest available vehicle, and serve as a lookup table for route optimization algorithms.
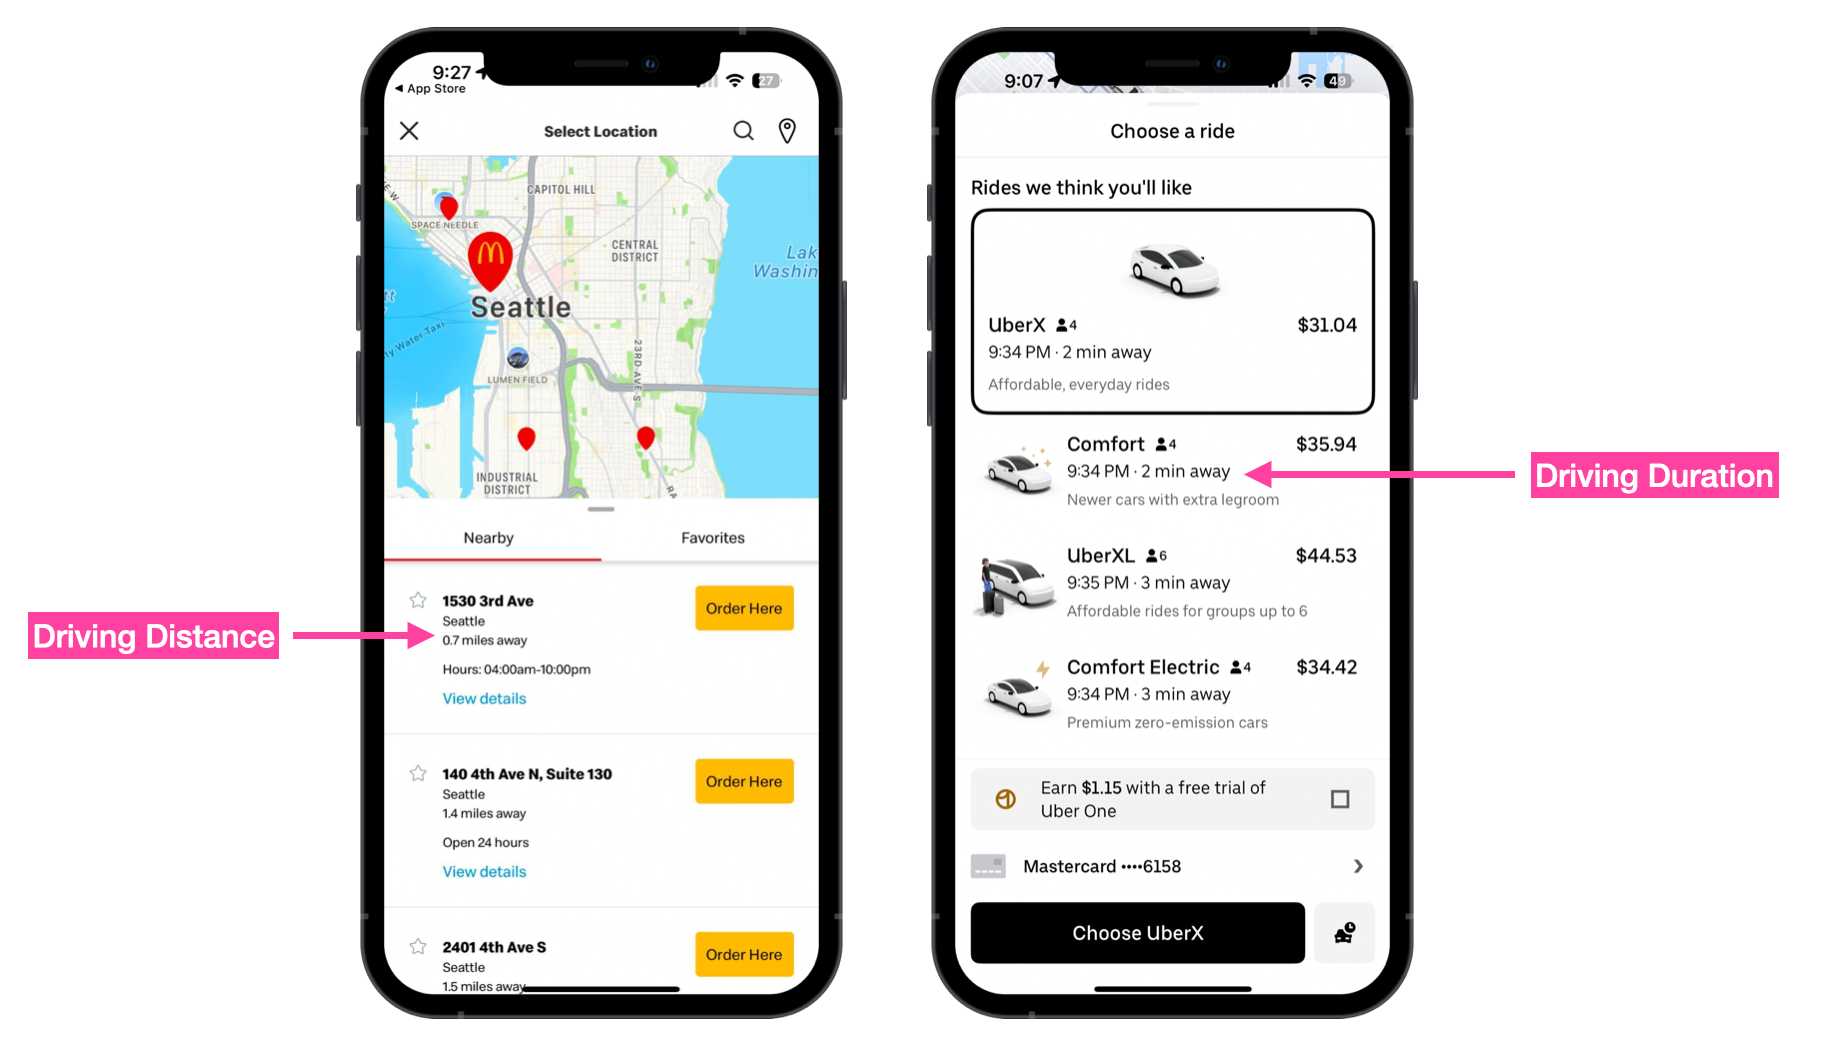
Nearest store or restaurant Many chain stores or restaurants such as MacDonald's have an app that you can download to place online orders, access discounts, and find the nearest open location based on your current position.
Nearest available vehicle Ride-sharing platforms like Uber and Lyft typically display a list of available vehicles, sorted by travel time from the user's location. This allows passengers to choose the best option based on their preferences. For example, a rider might select a cheaper ride that's farther away, even if it means waiting longer.
Lookup table Route optimization solvers like Google OR Tools and jsprit use distance matrices to calculate the most efficient travel routes between multiple locations. Once the matrix data is provided, the solver runs an algorithm to optimize routes for a fleet of vehicles, ensuring efficient delivery of goods or services to customers.
Google Distance Matrix API example
The Compute Route Matrix endpoint can return a duration matrix, a distance matrix, or both, and provide travel times and distances between multiple locations.
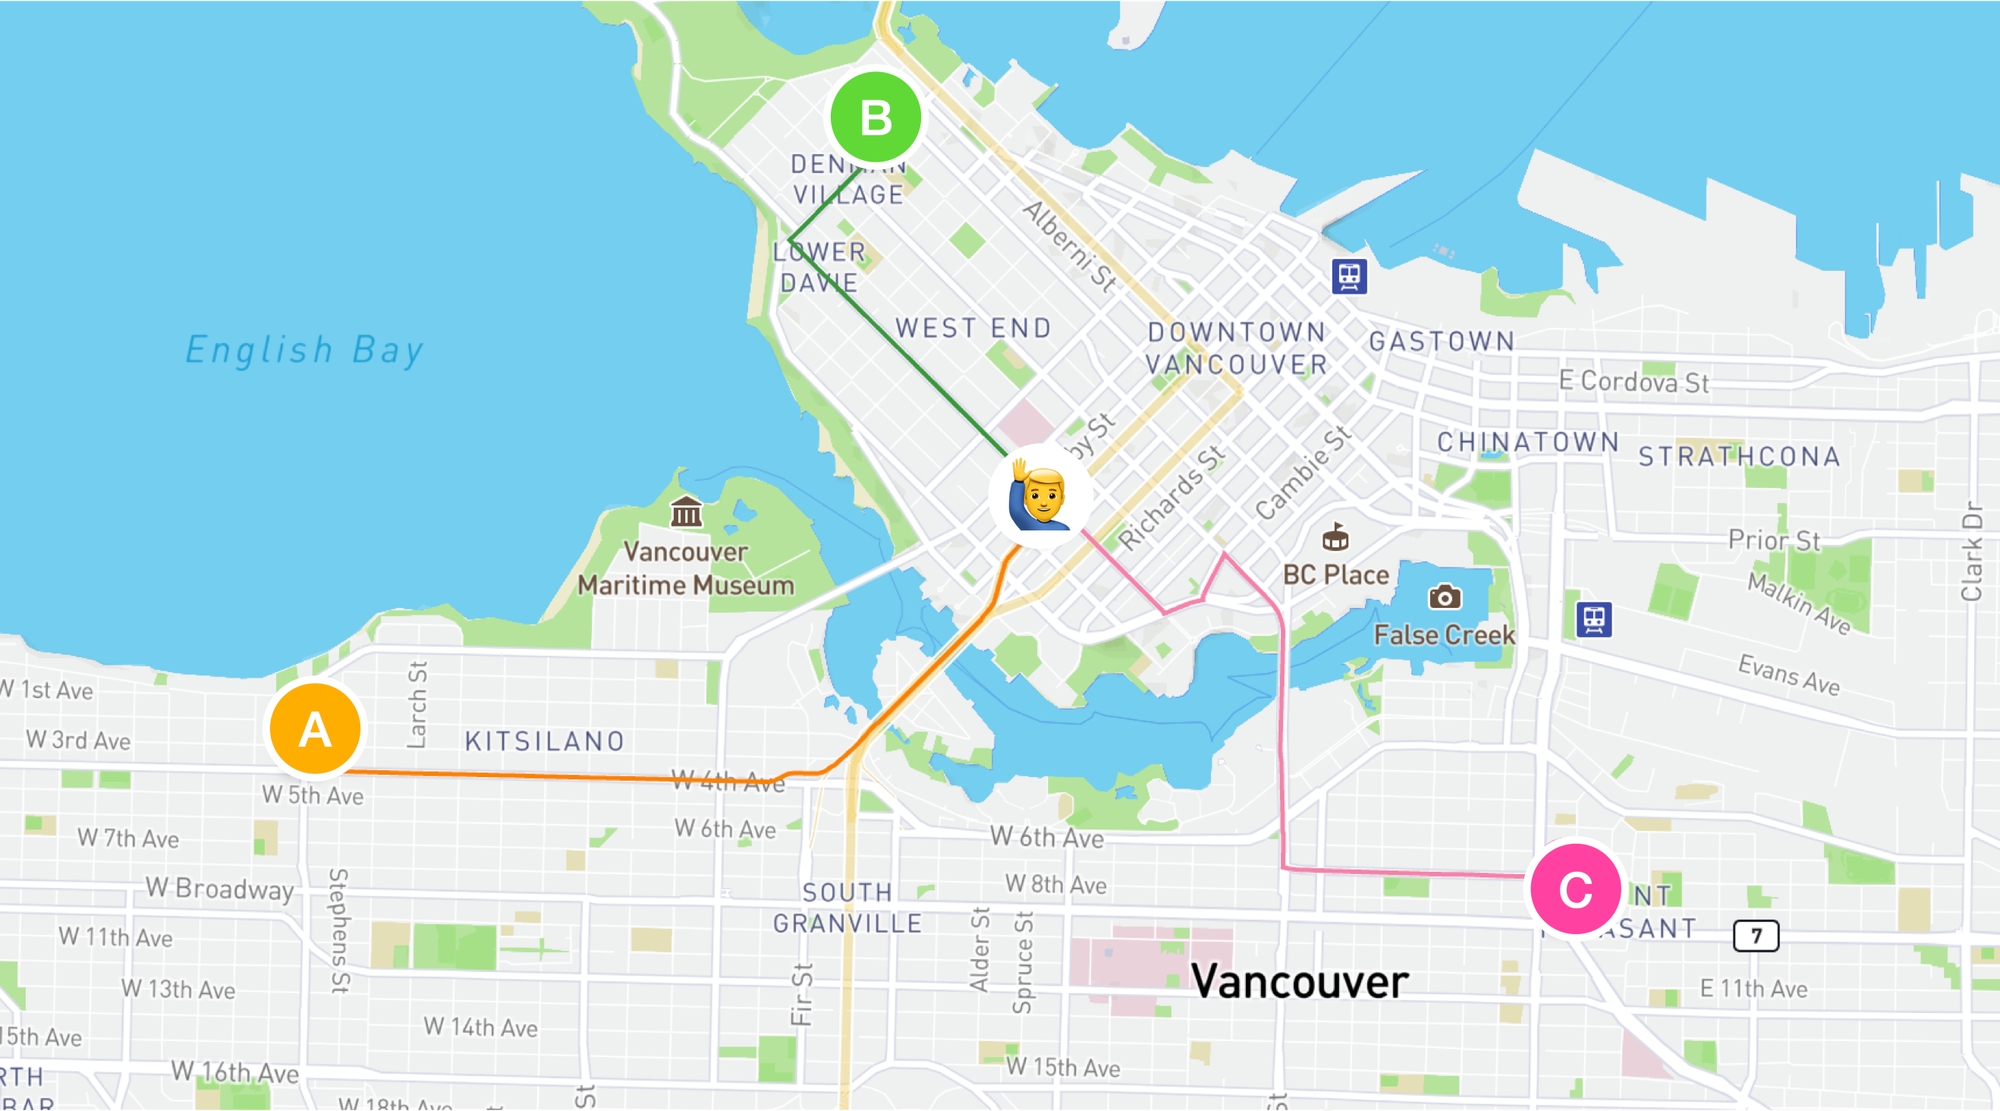
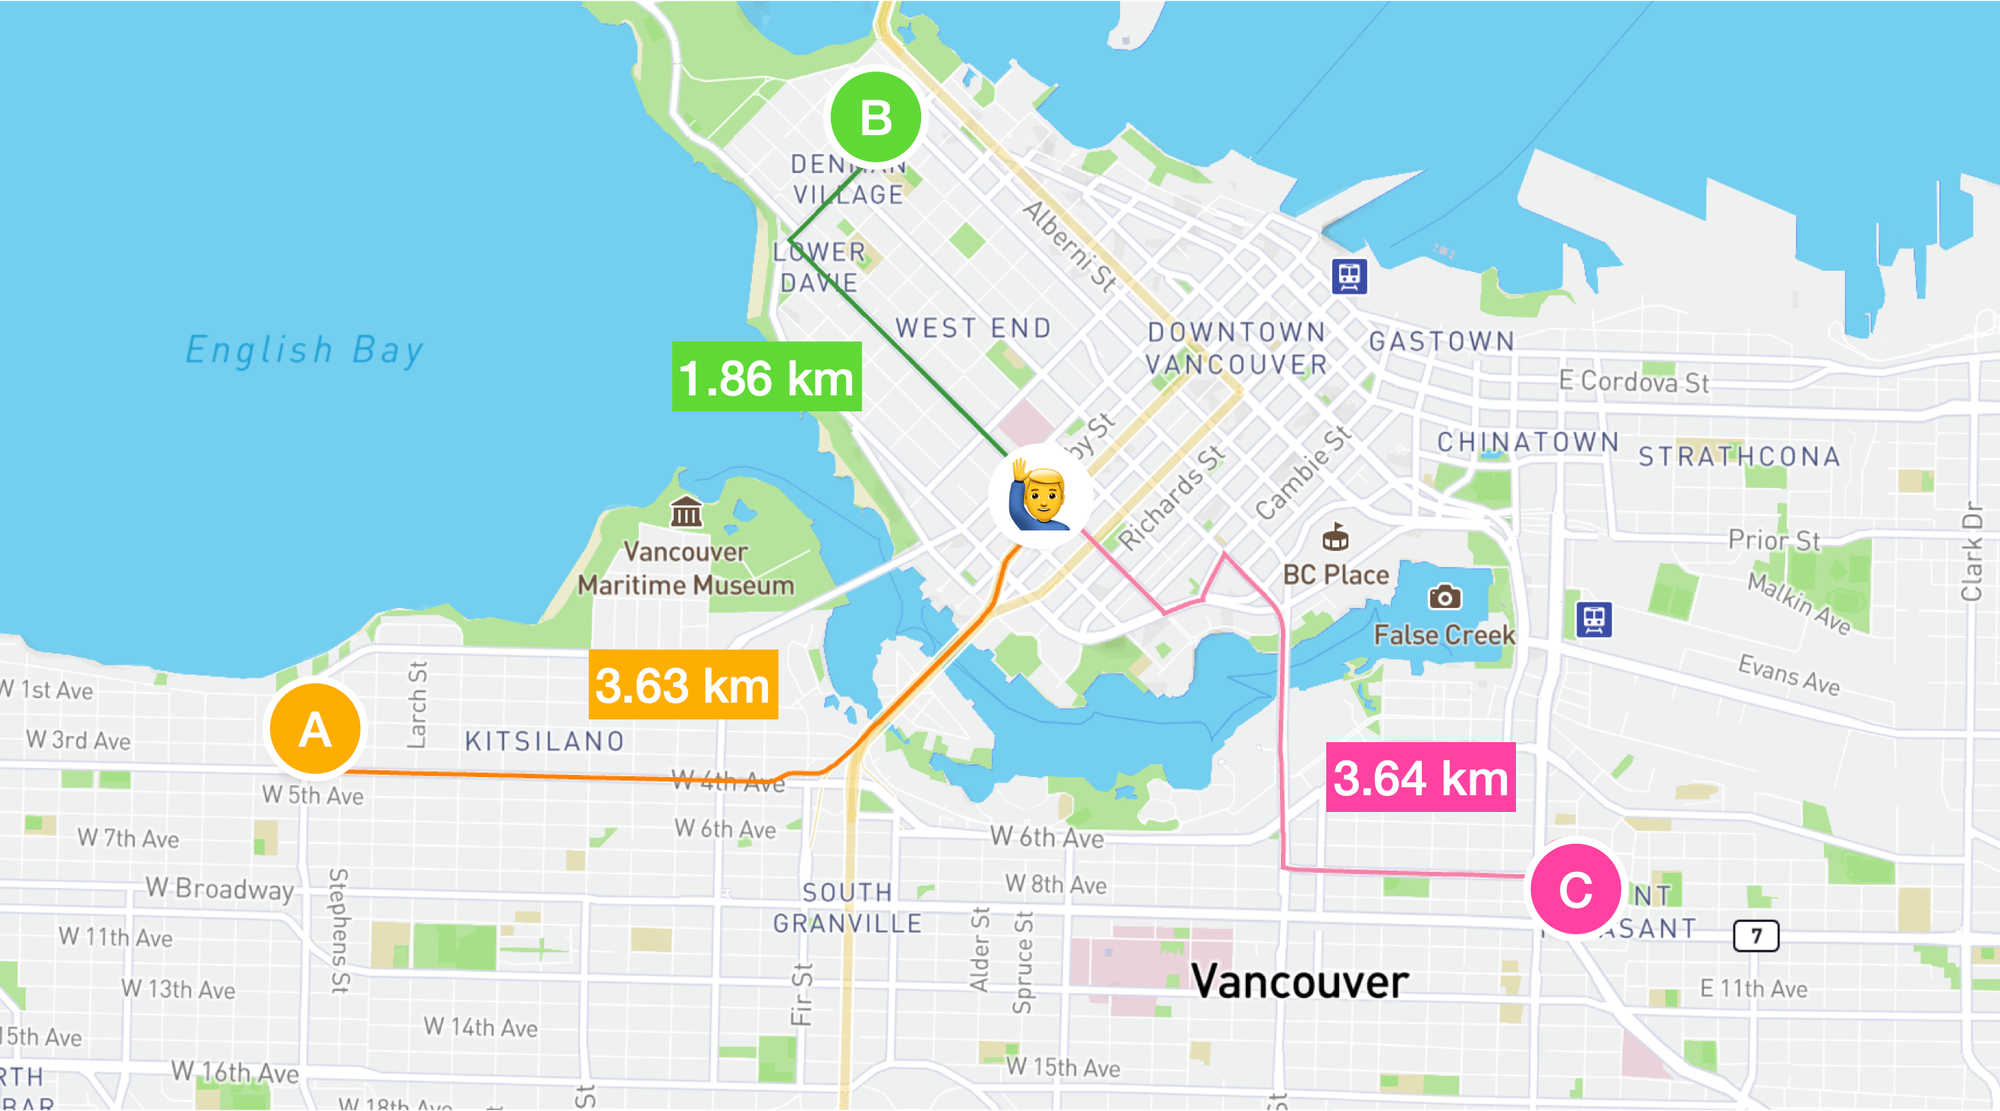
Here's a simple example with one origin and three destinations. Suppose you use a taxi app to book a ride from your hotel to Vancouver International Airport. The origin is your location at the "Residence Inn" in downtown Vancouver, while the destinations are three taxis located in the "West End", "Kitsilano", and "Mount Pleasant".
Endpoint POST https://routes.googleapis.com/distanceMatrix/v2:computeRouteMatrix
Headers
Content-Type: application/json
X-Goog-Api-Key: YOUR_API_KEY
X-Goog-FieldMask: originIndex,destinationIndex,duration,distanceMeters
Request
{
    "origins": [
        {
            "waypoint": {
                "address": "Residence Inn Vancouver Downtown, Vancouver, BC Canada"
            }
        }
    ],
    "destinations": [
        {
            "waypoint": {
                "address": "Kitsalano, Vancouver, BC Canada"
            }
        },
        {
            "waypoint": {
                "address": "West End, Vancouver, BC Canada"
            }
        },
        {
            "waypoint": {
                "address": "Mount Pleasant, Vancouver, BC Canada"
            }
        }
    ],
    "travelMode": "DRIVE",
    "routingPreference": "TRAFFIC_AWARE",
    "departureTime": "2025-10-23T15:00:00Z"
}
origins is an array of RouteMatrixOrigin objects. Just like with the Routes API Compute Routes method, there are several ways you can define an origin object:
- Address string
{
    "waypoint": {
        "address": "Residence Inn Vancouver Downtown, Vancouver, BC Canada"
    }
}- Google Maps Place ID
{
    "waypoint": {
        "placeId": "ChIJgXOcgNRzhlQRYaYJ-NfFCzg"
    }
}locationobject with coordinates
{
    "waypoint": {
        "location": {
            "latLng": {
                "latitude": 49.277871,
                "longitude": -123.128413
            }
        }
    }
}
You can also add Route Modifiers to avoid certain routes. For example, to avoid toll roads, you should include routeModifiers": {"avoidTolls": true} to the origin object like so:
{
    "waypoint": {
        "address": "Residence Inn Vancouver Downtown, Vancouver, BC Canada"
    },
    "routeModifiers": {
        "avoidTolls": true
    }
}
The destinations parameter is an array of RouteMatrixDestinations objects, representing the endpoints of the routes. Its structure and available options are identical to those of origins.
travelMode refers to the mode of transport ("DRIVE", "WALK", "TRANSIT" or "BICYCLE"). Right now, truck routing is not supported by the Routes API but this might change in the future.
The routingPreference parameter lets you choose between:
- "TRAFFIC_UNAWARE",
- "TRAFFIC_AWARE", and
- "TRAFFIC_AWARE_OPTIMAL".
Choosing "TRAFFIC_AWARE" enables the routing algorithm to account for real time traffic conditions when calculating routes. This is ideal for urban areas, where traffic congestion during peak hours can lead to significant delays.
Selecting "TRAFFIC_UNAWARE" means the Routes API will base its calculations solely on posted speed limits, without considering live traffic data.
For the most accurate and efficient routes in traffic-heavy areas, "TRAFFIC_AWARE" is the recommended option.
The departureTime field, specified in RFC3339 UTC "Zulu" format (e.g., "2025-02-24T15:00:00Z"), ensures that the API accounts for predicted real time traffic conditions when calculating travel time or drive time. If departureTime is left empty, it defaults to the time that the request was made.
Response
[
    {
        "originIndex": 0,
        "destinationIndex": 1,
        "status": {},
        "distanceMeters": 1861,
        "duration": "379s"
    },
    {
        "originIndex": 0,
        "destinationIndex": 0,
        "status": {},
        "distanceMeters": 3630,
        "duration": "521s"
    },
    {
        "originIndex": 0,
        "destinationIndex": 2,
        "status": {},
        "distanceMeters": 3640,
        "duration": "637s"
    }
]
Compute Route Matrix returns the three possible routes for each origin-destination pair, sorted in no particular order.
The response is an array, where each array element corresponds to the route from one origin waypoint to one destination waypoint. You can identify each route in the response by using the originIndex and destinationIndex response fields.
For example, an originIndex of 0 (passenger pickup location) in the response corresponds to a route calculated from the waypoint at index 1 (West End) of the origins array in the request.
{
    "originIndex": 0,
    "destinationIndex": 1,
    "status": {},
    "distanceMeters": 1861,
    "duration": "379s"
}
distanceMeters is the total distance in meters that the taxi will need to drive to pick up the passenger while duration is his driving time in seconds.
Using the response from the Distance Matrix API, a taxi company can offer customers multiple route options and allow them to choose the best taxi based on their needs. For example, a passenger might opt for a cheaper taxi that’s farther away, even if it means a longer wait time.
Google Distance Matrix API limits
The Compute Route Matrix endpoint is very computational intensive (each cell in the distance matrix requires the equivalent of a Routes API Compute Routes call), so there are some necessary limits in place to prevent abuse.
- Origins & Destinations: Maximum of 25 origins or 25 destinations per request.
- Rate Limit: Up to 3,000 elements per minute (EPM), calculated as:
Number of origins × Number of destinations. - Place ID or Address: Maximum of 50 origins and destinations when using a Place ID or address.
- Traffic-Aware Routing: When
"routingPreference": "TRAFFIC_AWARE_OPTIMAL", the request can only include up to 100 elements. - Transit Mode: When
"travelMode": "TRANSIT", the request can include up to 100 elements. - General Limit: For all other cases, the request can include up to 625 elements.
However, the 625 element limit does make it challenging to use Compute Route Matrix for optimization problems involving a large number of origins and destinations. To work around this, you can either:
- Split the matrix into smaller ones, each with a maximum size of 25 × 25.
- Use a different distance matrix API provider that supports larger matrices.
Google Distance Matrix API Pricing
Since the Compute Route Matrix endpoint handles requests of widely varying sizes, billing is tracked by the number of elements returned instead of the number of requests made. The number of elements is equal to the number of origins multiplied by the number of destinations. If a request contain one origin and three destinations (as shown in our example), then the single request is billed for three elements.
The Compute Route Matrix endpoint has three pricing tiers based on the cost per element - Basic ($5), Advanced ($10 CPM) and Preferred ($15 CPM).
Basic: Supports up to 25 origins and 25 destinations. No real time traffic.
Advanced: Enabled when you use "TRAFFIC_AWARE" or "TRAFFIC_AWARE_OPTIMAL" routing options set in the routingPreference property, and side of the road, heading and vehicle stopover location modifiers.
Preferred: Any request that uses two wheeled vehicle routing, toll calculation or route modifiers e.g. "avoid tolls".
If you work with a Google Maps Partner, you can access discounted Routes API pricing based on the following price schedule.
| 0 - 100k | 100k - 500k | 500k - 1M | 1M - 5M | 5M - 10M | 10M - 20M | 20M + | |
|---|---|---|---|---|---|---|---|
| Compute Route Matrix (Basic) | $5.00 | $4.00 | $3.00 | $1.50 | $0.38 | $0.11 | $0.04 |
| Compute Route Matrix (Advanced) | $10.00 | $8.00 | $6.00 | $3.00 | $0.75 | $0.23 | $0.08 |
| Compute Route Matrix (Preferred) | $15.00 | $12.00 | $9.00 | $4.50 | $1.14 | $0.33 | $0.12 |
As you can imagine, the Google Distance Matrix API can get very expensive, quickly. A maxed out 25 x 25 matrix will cost you $5 CPM x 625 elements = $3.125 per request. In real world applications such as ride sharing or restaurant search, thousands of origins and destinations often need to be processed at once, making the Google Distance Matrix API too expensive to use.
For this reason, it is important to prune the search space before calling the Google Distance Matrix API. One approach is to pre-filter destinations using K-nearest neighbor (k-NN) search to find the closest locations. After this initial filtering, you can then use Compute Route Matrix to get precise driving distances and travel times.
Google Distance Matrix API alternatives
The two main drawbacks of the Google Distance Matrix API are its high cost and size limitations. If you don't care about real time traffic, using an open source distance matrix API such as the OSRM Table API solves both these problems. OSRM, or the Open Source Routing Machine, is a free and open source alternative to Google Maps. It gets data from OpenStreetMap (OSM), a geographic database updated and maintained by a community of volunteers.
OSM data is generally OK, but it does not include the real time traffic updates that Google Maps is known for. However, if you host OSRM yourself, it is free to use, and you can work with large distance matrices by allocating additional memory and compute to the OSRM server as needed.
If you prefer not to host your own distance matrix API, you should opt for a service that includes real time traffic data. The HERE Matrix Routing Service supports up to 10,000 origins and destinations, with a cost of $4.60 CPM per element. The Tom Tom Matrix Routing service is more affordable at $2.60 CPM per element, but comes with a limit of 2,500 elements.
Building a taxi dispatch system with the Google Distance Matrix API
Since the Google Distance Matrix API is mainly used for taxi dispatch, I’ll show you how to build a simple taxi dispatch system that finds the nearest available driver for a passenger. If you don't want to pull the code from GitHub and run the app locally, you can play around with a live demo at https://google-distance-matrix.afi.dev/.
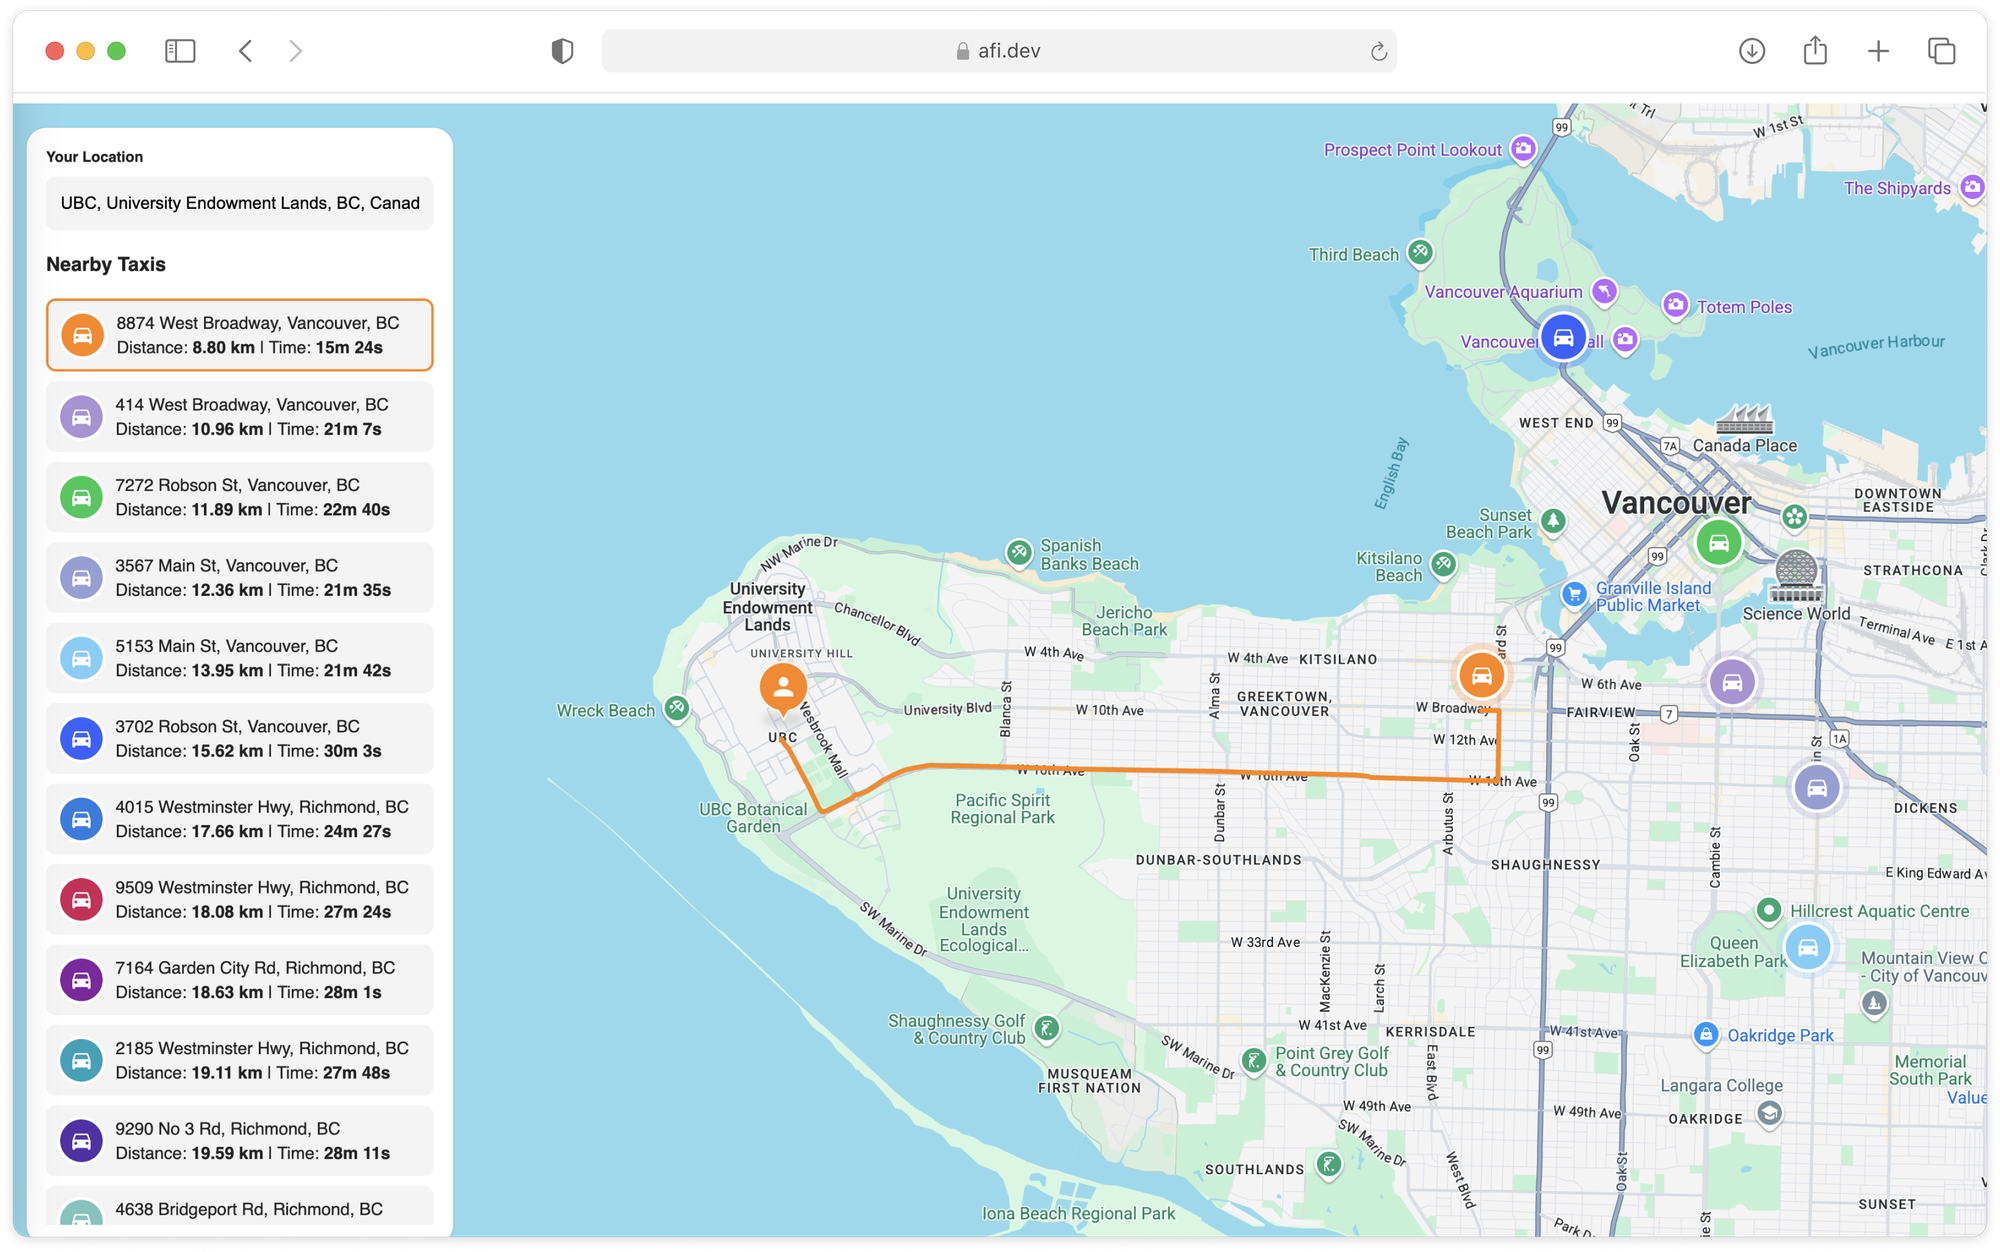
google_distance_matrix_demo is a single page React app that uses Vite as the build tool and development server. It simulates the taxi dispatch process by allowing a user to select a location anywhere in Vancouver, Canada, and match him with the nearest available taxi using the Google Distance Matrix API. Just like ride sharing apps such as Uber and Lyft, we display the driver’s route to him (thanks Routes API!), along with his estimated travel time and distance.
App.jsx
App.jsx does more than act as the main entry point into the app. In addition to managing the overall structure, routing, and layout, it also makes API calls to the Routes API's Compute Route Matrix and Compute Routes endpoints to locate the nearest taxi and generate the route polyline to your location.
In App.jsx, the useEffect hook is triggered whenever the value of myLocation (the user's current location) changes. This happens whenever you enter a new address into the Places Autocomplete search box.
/*** App.jsx ***/
useEffect(() => {
  if (!myLocation) return;
  resetData();
  computeRouteMatrix();
}, [myLocation]);
Compute Route Matrix API call
If myLocation is not null, we make a call to computeRouteMatrix() which recalculates new routes based on the updated myLocation.
- For each
taxi, we create an array oforiginsby extracting thetaxi.latandtaxi.lngcoordinates and saving them to thelatitudeandlongitudefields of eachoriginobject. - We then create a single
destinationand set itsplaceIdtomyLocation.placeId. - Finally, we tell the Compute Routes endpoint that we are only interested in four wheel vehicle routes by specifying
travelMode: "DRIVE".
/*** App.jsx ***/
const computeRouteMatrix = async () => {
  const requestBody = {
    origins: taxis.map((taxi) => ({
      waypoint: {
        sideOfRoad: true,
        location: {
          latLng: {
            latitude: taxi.lat,
            longitude: taxi.lng,
          },
        },
      },
    })),
    destinations: [
      {
        waypoint: {
          sideOfRoad: true,
          placeId: myLocation.placeId,
        },
      },
    ],

    travelMode: "DRIVE",
  };

  try {
    const { response } = await request(
      "https://routes.googleapis.com/distanceMatrix/v2:computeRouteMatrix",
      {
        headers: {
          "X-Goog-FieldMask": "originIndex,distanceMeters,duration",
        },
        method: "POST",
        data: requestBody,
      },
    );

    if (response) {
      const newList = taxis
        .map((taxi, index) => {
          const route = response.find((r) => r.originIndex === index);
          return {
            ...taxi,
            duration: route.duration,
            distance: route ? route.distanceMeters : undefined,
          };
        })
        .sort((x, y) => x.distance - y.distance);

      setTaxis(newList);
      fetchRoute(newList[0], 0);
    }
  } catch (error) {
    console.error(error);
  }
};
As explained earlier, the response from the Compute Route Matrix endpoint is an array (unsorted and seemingly random, which is annoying), where each array element defines the route from one origin waypoint to one destination waypoint.
/*** response[] ***/
[
    {
        "originIndex": 2,
        "destinationIndex": 0,
        "status": {},
        "distanceMeters": 4146,
        "duration": "924s"
    },
    // ... 2 more entries
]
We also have an array of taxi data objects, each with an address, lat and lng.
/*** constant/index.js ***/
export const DATA = [
   {
      address: '7272 Robson St, Vancouver, BC',
      lat: 49.275794,
      lng: -123.114735,
   },
   {
      address: '3702 Robson St, Vancouver, BC',
      lat: 49.294657,
      lng: -123.13668,
   }
	// ... 10 more taxi objects
]
Once we get a valid response from Compute Route Matrix, we need to sort the list of taxis by distance (we could also use duration) from the our pickup location. Here's how to do it.
- Initialize a new array,
newList, and use the map function to iterate over eachtaxiintaxis.
const newList = taxis.map((taxi, index) => {

});
- Next, use the
indexof eachtaxiin the array to find a corresponding route in theresponsearray.
const route = response.find((r) => r.originIndex === index);
- If a matching route is found, copy the
taxiobject over tonewListwith two new fields,duration(fromroute.duration) anddistance(fromroute.distanceMeters).
return {
  ...taxi,
  duration: route.duration,
  distance: route ? route.distanceMeters : undefined,
};- Finally, sort the taxis in ascending order of
distance(smallest to nearest).
sort((x, y) => x.distance - y.distance);
We can get the nearest taxi to the the user's location by accessing the first element of the newList array with newList[0].
Compute Routes API Call
Once we get the nearest taxi, the fetchRoute() method uses the Compute Routes endpoint of the Routes API to display the driver's driving route to the user's pickup location.
/*** App.jsx ***/
const fetchRoute = async (taxi, index) => {
  const requestBody = {
    origin: {
      sideOfRoad: true,
      location: {
        latLng: {
          latitude: taxi.lat,
          longitude: taxi.lng,
        },
      },
    },
    destination: {
      sideOfRoad: true,
      placeId: myLocation.placeId,
    },
    travelMode: "DRIVE",
  };

  try {
    const { response } = await request(
      "https://routes.googleapis.com/directions/v2:computeRoutes",
      {
        headers: {
          "X-Goog-FieldMask": "routes.polyline.encodedPolyline",
        },
        method: "POST",
        data: requestBody,
      },
    );

    if (response) {
      const route = response.routes[0].polyline.encodedPolyline;
      setActiveTaxi(index);
      console.log(taxi);
      setPolyline({
        color: taxi.color,
        encodedPath: route,
      });
    }
  } catch (error) {
    console.error(error);
  }
};
As detailed in our last post on the Routes API, the response from the Compute Routes endpoint is a route with a polyline.encodedPolyline.
/*** response ***/
{
    "routes": [
        {
            "polyline": {
                "encodedPolyline": "ivukHbiwnVsQ[UQcFoPUkAE}@@kBNua@BkCDcCB}KX}u@@sCAs@@s@cAeAc@o@y@oBsCoMmCqLGa@wHe]cCcKbCeEyAcCoBuDiCkE"
            }
        }
    ]
}
The encoded polyline, along with the taxi's color, is passed to the setPolyline state update function. This data is then used in the <Map/> component to render the route polyline.
PlaceSearch.jsx
PlaceSearch.jsx is a container component that passes location and place information from the autocomplete widget in its child component, <PlaceAutocompleteInput/>, to the parent <App/>. The <Map/> component listens for changes to the value of myLocation, and updates itself accordingly.
/*** components/PlaceSearch.jsx ***/
import { useEffect, useState, useCallback, memo } from 'react'
import './PlaceSearch.scss'
import PlaceAutocompleteInput from './PlaceAutocompleteInput'

const PlaceSearch = ({ onSelectPlace }) => {

   const handlePlaceSelect = (place) => {
      if (!place) return;

      onSelectPlace({
        placeId: place.place_id,
        lat: place.geometry.location.lat(),
        lng: place.geometry.location.lng(),
      });
    };

   return (
      <div className="PlaceSearch">
         <PlaceAutocompleteInput onPlaceSelect={handlePlaceSelect} />
      </div>
   )
}

export default memo(PlaceSearch)
When the user selects an address from the autocomplete widget in <PlaceAutocompleteInput/>, the handlePlaceSelect() function is triggered. This function extracts the place_id, geometry.location.lat(), and geometry.location.lng() values and passes them to the onSelectPlace prop, which then stores the data in myLocation within App.jsx.
PlaceAutocompleteInput.jsx
PlaceAutocompleteInput.jsx contains the text input field and submit button that allows users to search Google Maps using free-form text. Here's how it works.
- In the return statement of
PlaceAutocomplete.jsx, add a text input field and give it theid="inputRef". - Second, in a
useEffecthook, create a new Google Places Autocomplete instance with the line:new places.Autocomplete(inputRef.current, options)and bind it to the text input field. - Third, set up an event listener on the
placeAutocompleteobject which listens for the"place_changed"event that is triggered whenever the user selects a place from the list of autocomplete suggestions. The result is passed to theonPlaceSelect()prop, which eventually bubbles up toApp.jsx.
/*** components/PlaceAutocompleteInput.jsx **/
import { useRef, useEffect, useState } from 'react'
import { useMapsLibrary } from '@vis.gl/react-google-maps'

const PlaceAutocompleteInput = ({ onPlaceSelect }) => {
   const [placeAutocomplete, setPlaceAutocomplete] = useState(null)
   const inputRef = useRef(null)
   const places = useMapsLibrary('places')

   useEffect(() => {
      if (!places || !inputRef.current) return

      const sw = new window.google.maps.LatLng(49.19883, -123.224621)
      const ne = new window.google.maps.LatLng(49.314075, -123.023068)
      const vancouverBounds = new window.google.maps.LatLngBounds(sw, ne)

      const options = {
         strictBounds: true,
         bounds: vancouverBounds,
         componentRestrictions: { country: 'ca' },
         fields: ['place_id', 'geometry', 'name', 'formatted_address'],
      }

      setPlaceAutocomplete(new places.Autocomplete(inputRef.current, options))
   }, [places])

   useEffect(() => {
      if (!placeAutocomplete) return

      placeAutocomplete.addListener('place_changed', () => {
         onPlaceSelect(placeAutocomplete.getPlace())
      })
   }, [onPlaceSelect, placeAutocomplete])

   return (
      <div className="autocomplete-container">
         <input ref={inputRef} />
      </div>
   )
}

export default PlaceAutocompleteInput
To ensure that every selected location is reachable, we restrict the address autocomplete search to locations within the Greater Vancouver area. This is achieved by setting search boundaries within a rectangular region, defined by the coordinates (49.314075, -123.023068) in the northeast and (49.19883, -123.224621) in the southwest.
TaxiList.jsx
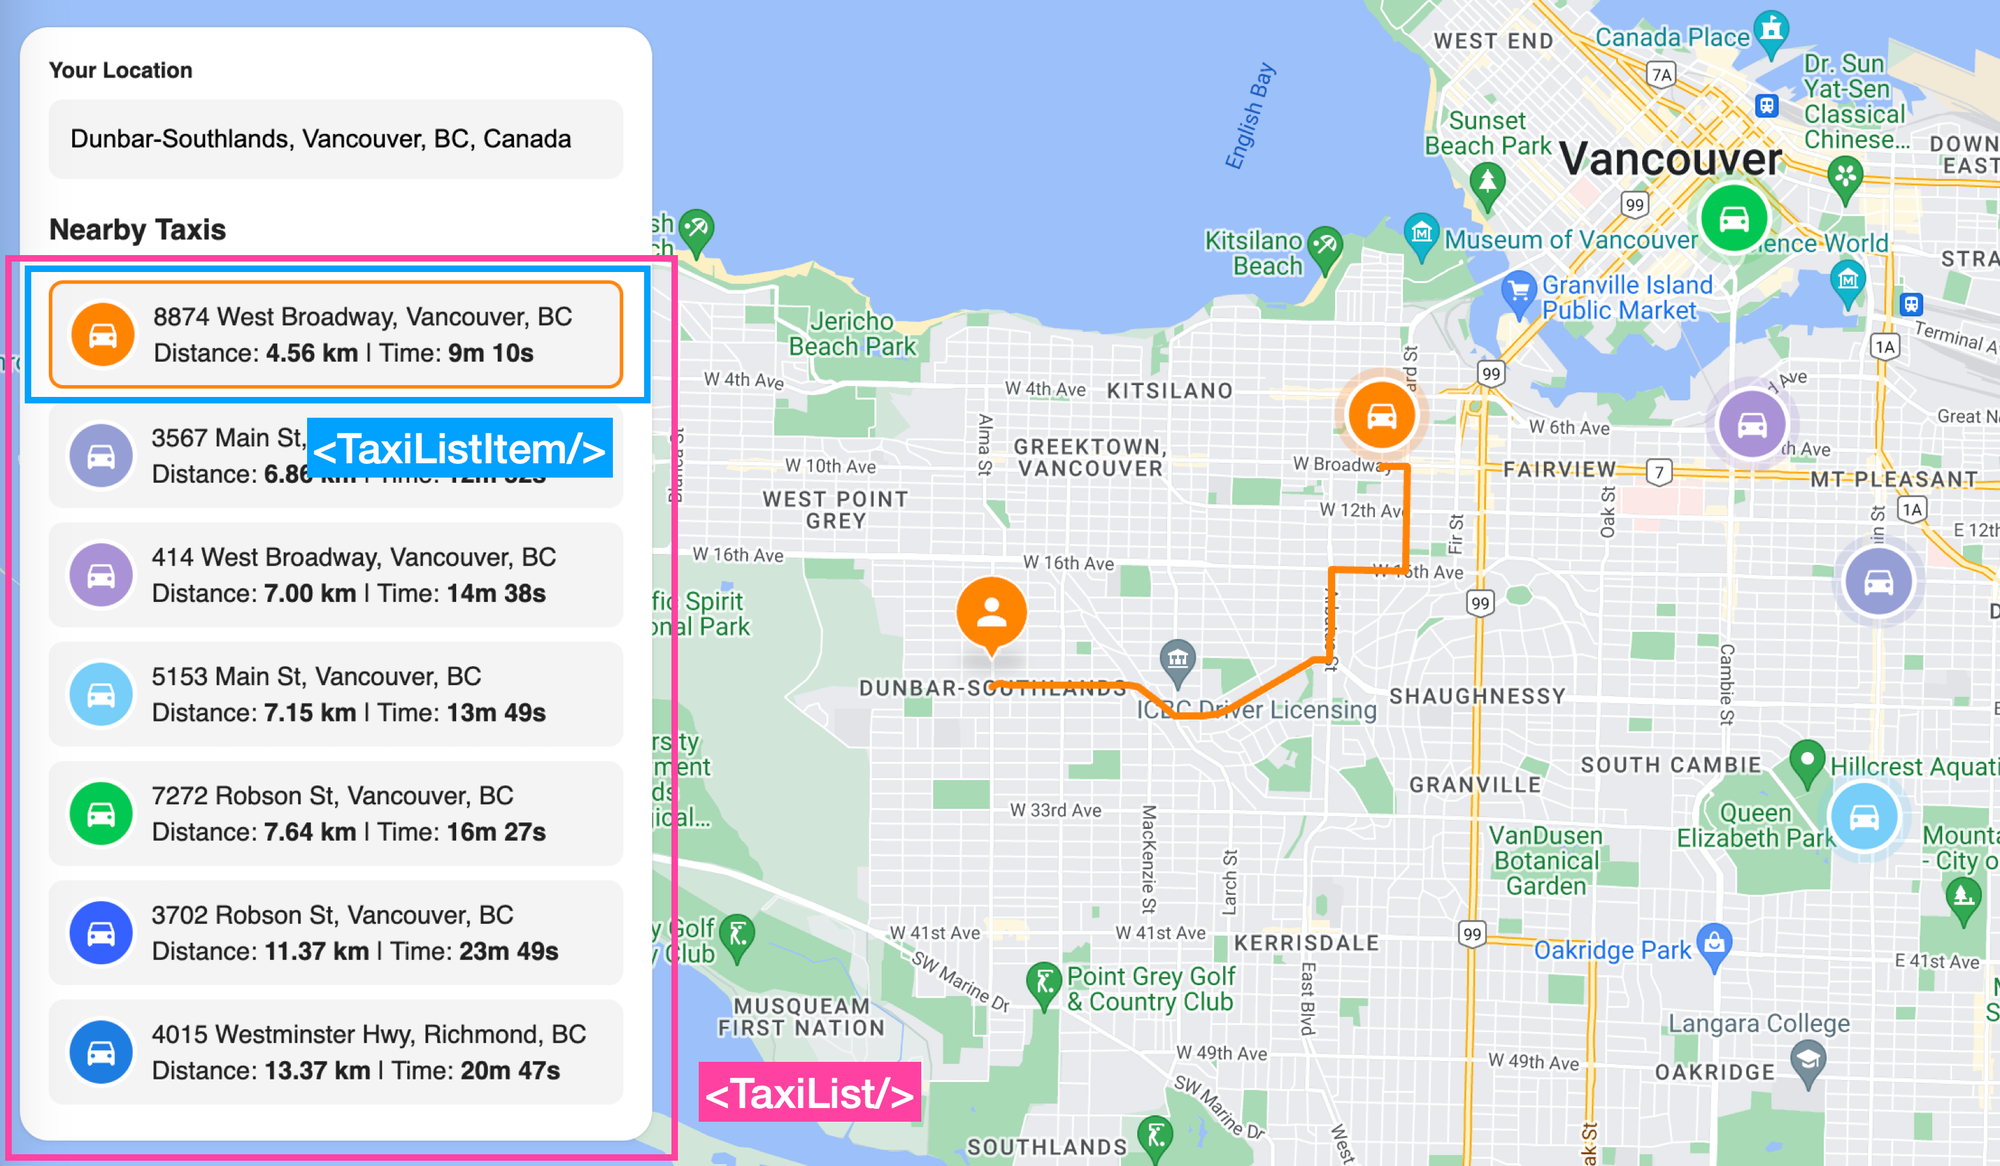
TaxiList.jsx is responsible for rendering the list of taxis (ranked by distance from your current location). The <TaxiList/> component accepts the following props:
taxis: an array of taxi objectsactiveTaxi: the index of the nearest taxi to our locationonMarkerClick: a method that calls fetchRoute() to draw the route from a selected taxi to your location
/*** components/TaxiList.jsx ***/
import { memo, useEffect, useRef } from 'react'
import TaxiListItem from './TaxiListItem'
import './TaxiList.scss'

const TaxiList = ({ taxis = [], activeTaxi, onMarkerClick }) => {
   const itemRefs = useRef({})

   useEffect(() => {
      if (activeTaxi && itemRefs.current[activeTaxi]) {
         itemRefs.current[activeTaxi].scrollIntoView({
            behavior: 'smooth',
            block: 'center',
         })
      }
   }, [activeTaxi])

   return (
      <div className="TaxiList">
         {taxis.map((taxi, index) => (
            <TaxiListItem
               key={index}
               ref={(el) => (itemRefs.current[index] = el)}
               {...taxi}
               active={activeTaxi === index}
               onClick={() => onMarkerClick(index)}
            />
         ))}
      </div>
   )
}

export default memo(TaxiList)
Whenever the taxis array in App.jsx is updated, e.g. when the user selects a new location in the address autocomplete text box, the <TaxiList/> component loops through the taxis array and renders a <TaxiListItem/> for each taxi. duration and distance metrics are passed in with the deconstructed {...taxi} object as props into <TaxiListItem/>.
TaxiListItem.jsx
<TaxiListItem/> is a simple presentational component that displays the taxi icon, address, color, distance and duration. The address and color properties for each taxi are fixed, and can be found in /constants/index.js.
/*** components/TaxiListItem.jsx ***/
import { forwardRef, memo } from 'react'
import Icon from '~/assets/stop.svg?react'
import './TaxiListItem.scss'
import { convertMetersToKilometers, formatSeconds } from '~/utils'

const TaxiListItem = forwardRef(
   ({ active, address, color, distance = 0, duration = 0, onClick }, ref) => {
      return (
         <div
            ref={ref}
            style={{ borderColor: active ? `#${color}` : undefined }}
            className={`TaxiListItem ${active ? 'active' : ''}`}
            onClick={onClick}
         >
            <Icon style={{ color }} />

            <div className="details">
               <p>{address}</p>
               {!!distance && (
                  <>
                     Distance: <b>{convertMetersToKilometers(distance)} km</b> | Time:{' '}
                     <b>{formatSeconds(duration)}</b>
                  </>
               )}
            </div>
         </div>
      )
   },
)

TaxiListItem.displayName = 'TaxiListItem'

export default memo(TaxiListItem)
In the <TaxiListItem/> component in App.jsx, the line active={activeTaxi === index} sets the active prop based on whether activeTaxi matches the current index. Then, in the return statement of TaxiListItem.jsx, we add className={TaxiListItem ${active ? 'active' : ''}} so that the component gets the class "TaxiListItem active" when active.
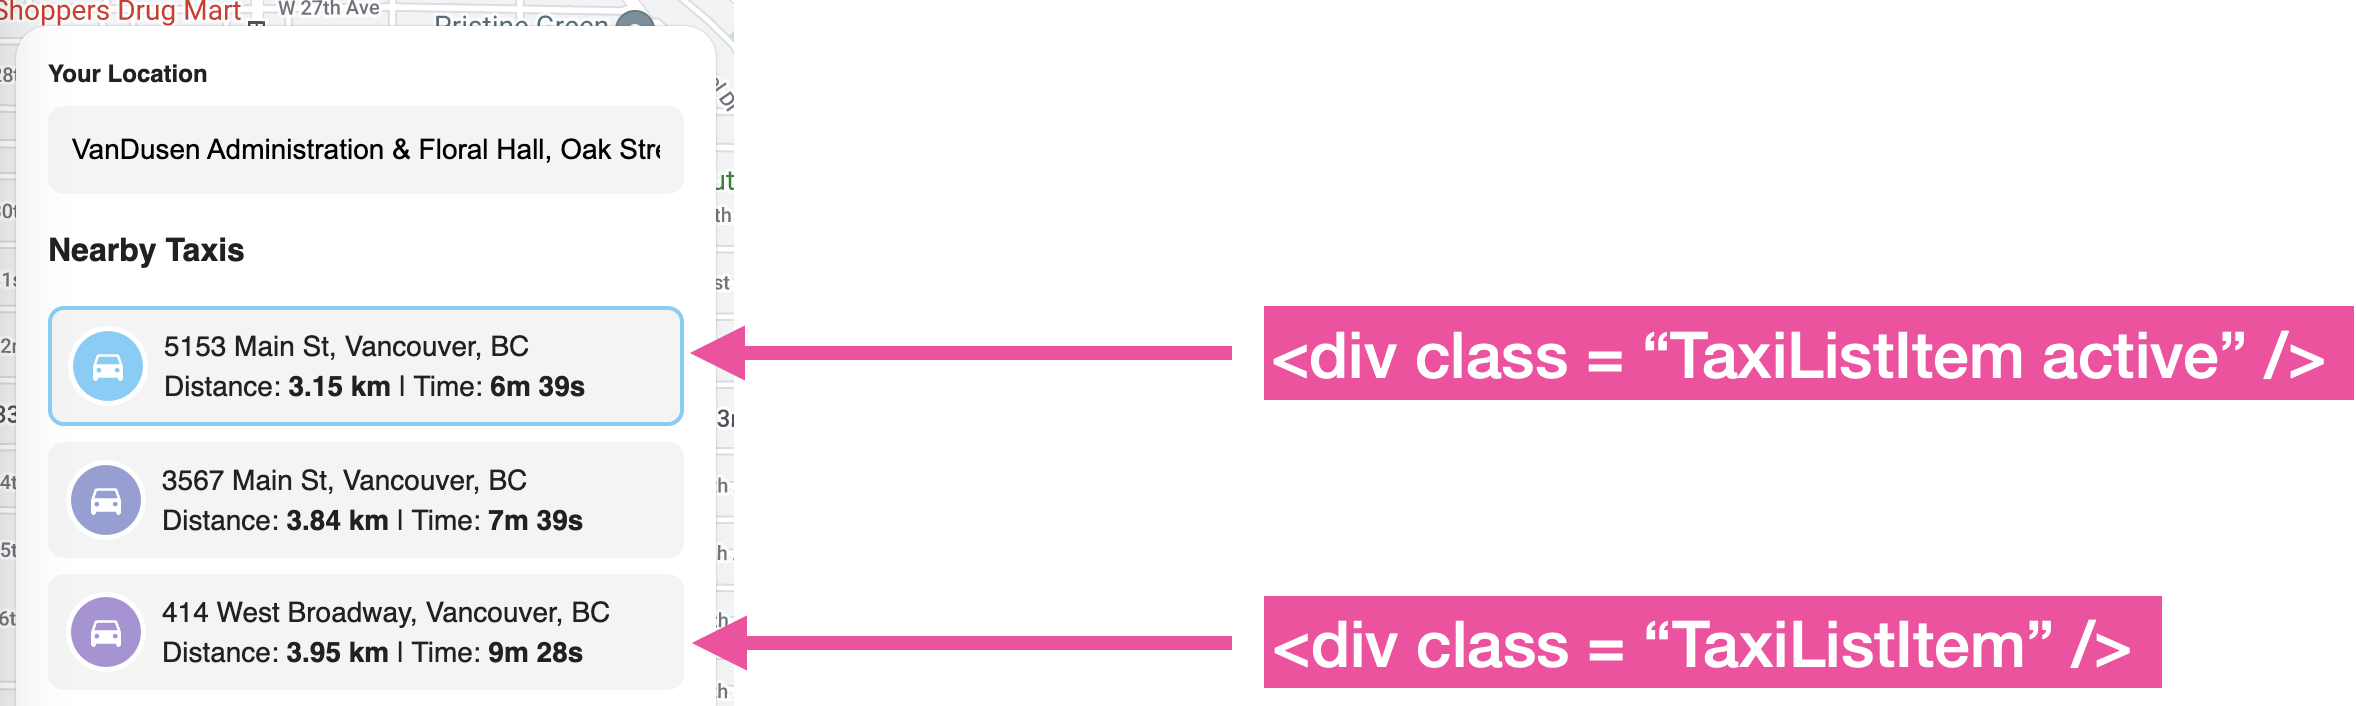
This lets us add a simple border to style the active taxi (either the nearest taxi to your location or the taxi you clicked on) with some simple CSS code:
/*** components/TaxiListItem.scss ***/
.TaxiListItem {
	&.active {
		border: 2px solid;
	}
}
GoogleMap.jsx

GoogleMap.jsx initializes a <Map/> component (courtesy of the excellent @vis.gl/react-google-maps library), centered on Vancouver, Canada. It is responsible for displaying the locations of all taxis, the user's location, and the route <polyline/> from the nearest taxi to the user.
/*** components/GoogleMap.jsx ***/
import { useEffect } from 'react'
import { Map, useMap } from '@vis.gl/react-google-maps'

import Marker from './Marker'
import { Polyline } from './External/Polyline'
import MyLocationMarker from '~/assets/markers/my-location.svg?react'
import TaxiMarker from '~/assets/markers/taxi.svg?react'

import './GoogleMap.scss'
const DEFAULT_CENTER = { lat: 49.25307278849622, lng: -123.12095840000302 }

const MapHandler = ({ myLocation, activePlace }) => {
   const map = useMap()

   const moveTo = (location) => {
      if (!location) {
         return
      }
      map.setCenter({
         lat: location.lat,
         lng: location.lng,
      })
   }

   useEffect(() => {
      moveTo(myLocation)
   }, [myLocation])

   useEffect(() => {
      moveTo(activePlace)
   }, [activePlace])
}

const GoogleMap = ({ myLocation, taxis, activePlace, onMarkerClick, polyline }) => {
   return (
      <div className="GoogleMap">
         <Map
            mapId={import.meta.env.VITE_APP_GOOGLE_MAP_ID}
            defaultZoom={12}
            defaultCenter={DEFAULT_CENTER}
            gestureHandling="greedy"
            disableDefaultUI
         >
            {polyline && (
               <Polyline
                  strokeWeight={4}
                  strokeColor={`#${polyline.color}`}
                  encodedPath={polyline.encodedPath}
               />
            )}

            {myLocation && (
               <Marker position={myLocation} color={polyline?.color} icon={MyLocationMarker} />
            )}
            {taxis.map((taxi, index) => (
               <Marker
                  key={index}
                  id={index}
                  position={{ lat: taxi.lat, lng: taxi.lng }}
                  color={taxi.color}
                  active={activePlace === index}
                  onToggle={() => onMarkerClick(index)}
                  icon={TaxiMarker}
               />
            ))}
            <MapHandler myLocation={myLocation} activePlace={taxis[activePlace]} />
         </Map>
      </div>
   )
}

export default GoogleMap
Marker.jsx
<Marker/> is a React wrapper for Google's AdvancedMarkerElement, which enables the creation of customizable, interactive markers on Google Maps using SVG files. It is used for displaying the taxi and passenger icons, which are rendered as inline SVGs by way of the <Icon/> component.
/*** components/Marker.jsx ***/
import { AdvancedMarker } from '@vis.gl/react-google-maps'

const Marker = ({ id, color, position, active, onToggle, icon }) => {
   const Icon = icon
   return (
      <AdvancedMarker
         key={id}
         position={position}
         className={`Marker ${active ? 'active' : ''}`}
         zIndex={active ? 2 : 1}
         onClick={onToggle}
      >
         <Icon style={{ color }} />
      </AdvancedMarker>
   )
}

export default Marker
<Icon/> was added to the app from Map.jsx with the line import TaxiMarker from ~/assets/markers/taxi.svg?react. The ?react appended at the end tells the build system to load the SVG as a React component, instead of a URL or an image file.
To render the icon in a particular color (the taxi color), we use the style prop <Icon style={{ color }}/> to dynamically set the color of the icon using React inline styles. This is because many SVG-based icons inherit their color property via currentColor e.g. this is what taxi.svg looks like:
/*** assets/markers/taxi.svg ***/
<svg width="54" height="54" viewBox="0 0 54 54" fill="none" xmlns="http://www.w3.org/2000/svg">
<circle opacity="0.24" cx="27" cy="27" r="26.25" fill="currentColor"/>
<circle cx="27" cy="27" r="19.6667" fill="currentColor" stroke="white" stroke-width="2.66667"/>
<g clip-path="url(#clip0_2242_963)">
<path d="M33.055 21.7588C32.88 21.2425 32.39 20.875 31.8125 20.875H22.1875C21.61 20.875 21.1287 21.2425 20.945 21.7588L19.2212 26.72C19.16 26.9038 19.125 27.0963 19.125 27.2975V33.5625C19.125 34.2887 19.7113 34.875 20.4375 34.875C21.1637 34.875 21.75 34.2887 21.75 33.5625V33.125H32.25V33.5625C32.25 34.28 32.8363 34.875 33.5625 34.875C34.28 34.875 34.875 34.2887 34.875 33.5625V27.2975C34.875 27.105 34.84 26.9038 34.7787 26.72L33.055 21.7588ZM22.1875 30.5C21.4613 30.5 20.875 29.9137 20.875 29.1875C20.875 28.4612 21.4613 27.875 22.1875 27.875C22.9137 27.875 23.5 28.4612 23.5 29.1875C23.5 29.9137 22.9137 30.5 22.1875 30.5ZM31.8125 30.5C31.0863 30.5 30.5 29.9137 30.5 29.1875C30.5 28.4612 31.0863 27.875 31.8125 27.875C32.5387 27.875 33.125 28.4612 33.125 29.1875C33.125 29.9137 32.5387 30.5 31.8125 30.5ZM20.875 26.125L21.9862 22.7825C22.1087 22.4325 22.4412 22.1875 22.8175 22.1875H31.1825C31.5588 22.1875 31.8912 22.4325 32.0138 22.7825L33.125 26.125H20.875Z" fill="white"/>
</g>
<defs>
<clipPath id="clip0_2242_963">
<rect width="21" height="21" fill="white" transform="translate(16.5 16.5)"/>
</clipPath>
</defs>
</svg>
The final result is a nicely rendered icon that looks good at all zoom levels.
Polyline.jsx
Once the nearest taxi is identified, a route <Polyline/> is drawn to connect the user location with his assigned taxi. <Polyline /> accepts three props: strokeWeight, strokeColor, and encodedPath. The key prop is encodedPath, which takes the polyline.encodedPolyline value returned by the Routes API to render the route on the map.
The code for Polyline.jsx can be found in /Map/external/polyline.jsx, which was shamelessly copied from the Geometry Example of the react-google-maps library.
Deploy and run
To run the app locally, clone the google_distance_matrix_demo repository, update the .env file with your Google Maps API key and Map ID, and then run the following commands:
npm install– Installs dependenciesnpm run– Starts the app
Alternatively, you can view the Google Distance Matrix demo online at: https://google-distance-matrix.afi.dev/.
Coming up in the Routes API tutorial series
So far I've demonstrated how to use the two main endpoints of the Routes API - Compute Routes, which generates a route between two points, and Compute Route Matrix, which calculates routes between multiple origins and destinations. In the remainder of this tutorial series, I'll explain how to integrate the Routes API with the Places API to search for points of interest along a route, as well as how to draw a route on Google Maps for Android.
👋 As always, if you have any questions or suggestions for me, please reach out or say hello on LinkedIn.