Plan a route with multiple stops using the Routes API
Using the Google Maps Routes API to create routes, get travel times, find alternate routes, avoid tolls and draw routes between multiple points.

In this blog post, I'll show you how to use the Google Routes API to build a traffic aware navigation app (demo / source code) that displays traffic conditions using color coded polylines. I’ll also provide an in depth look at the Compute Routes endpoint of the Routes API, explaining how you can use it to not only get the most efficient route between two points, but also retrieve traffic aware polylines, alternative route options, turn by turn directions, toll details, and must have metrics such as trip distances and estimated travel times.
Part 1: A developer's guide to the Google Routes API
Part 2: Plan a route with multiple stops using the Routes API (this article)
Part 3: Using the Google Distance Matrix API for taxi dispatch
Part 4: Google Maps Search Along Route
Part 5: How to draw a route on Google Maps for Android with the Routes API
What is the Compute Routes endpoint of the Routes API?
The Compute Routes endpoint of the Routes API is the Google Maps Get Route API. It receives as input an origin and a destination, and returns the ideal route between these two locations.
The route returned is expressed as an encoded polyline that looks like this:
iggkHlrynVr@j@h@L~C`@b@ERKRYt@iBR{@Hw@FgBHcCRkCt@qNAuAe@mG{BoWW{FEkFDsp@@aTIcHU{Gi@uJESW}C[oCuFag@gBwPe@oCi@eBi@wAsA_Cq@y@o@m@}When properly decoded using a polyline decoder or the Google Maps Geometry Library, the polyline converts into a list of latitude and longitude coordinate pairs, which can then be used to draw the route on a map (more on this later).
Routes API Field Masks
In addition to the route polyline, the Routes API can return all kinds of useful information about the route. What's included in the response depend on the fields specified in the X-Goog-FieldMask header in your request.
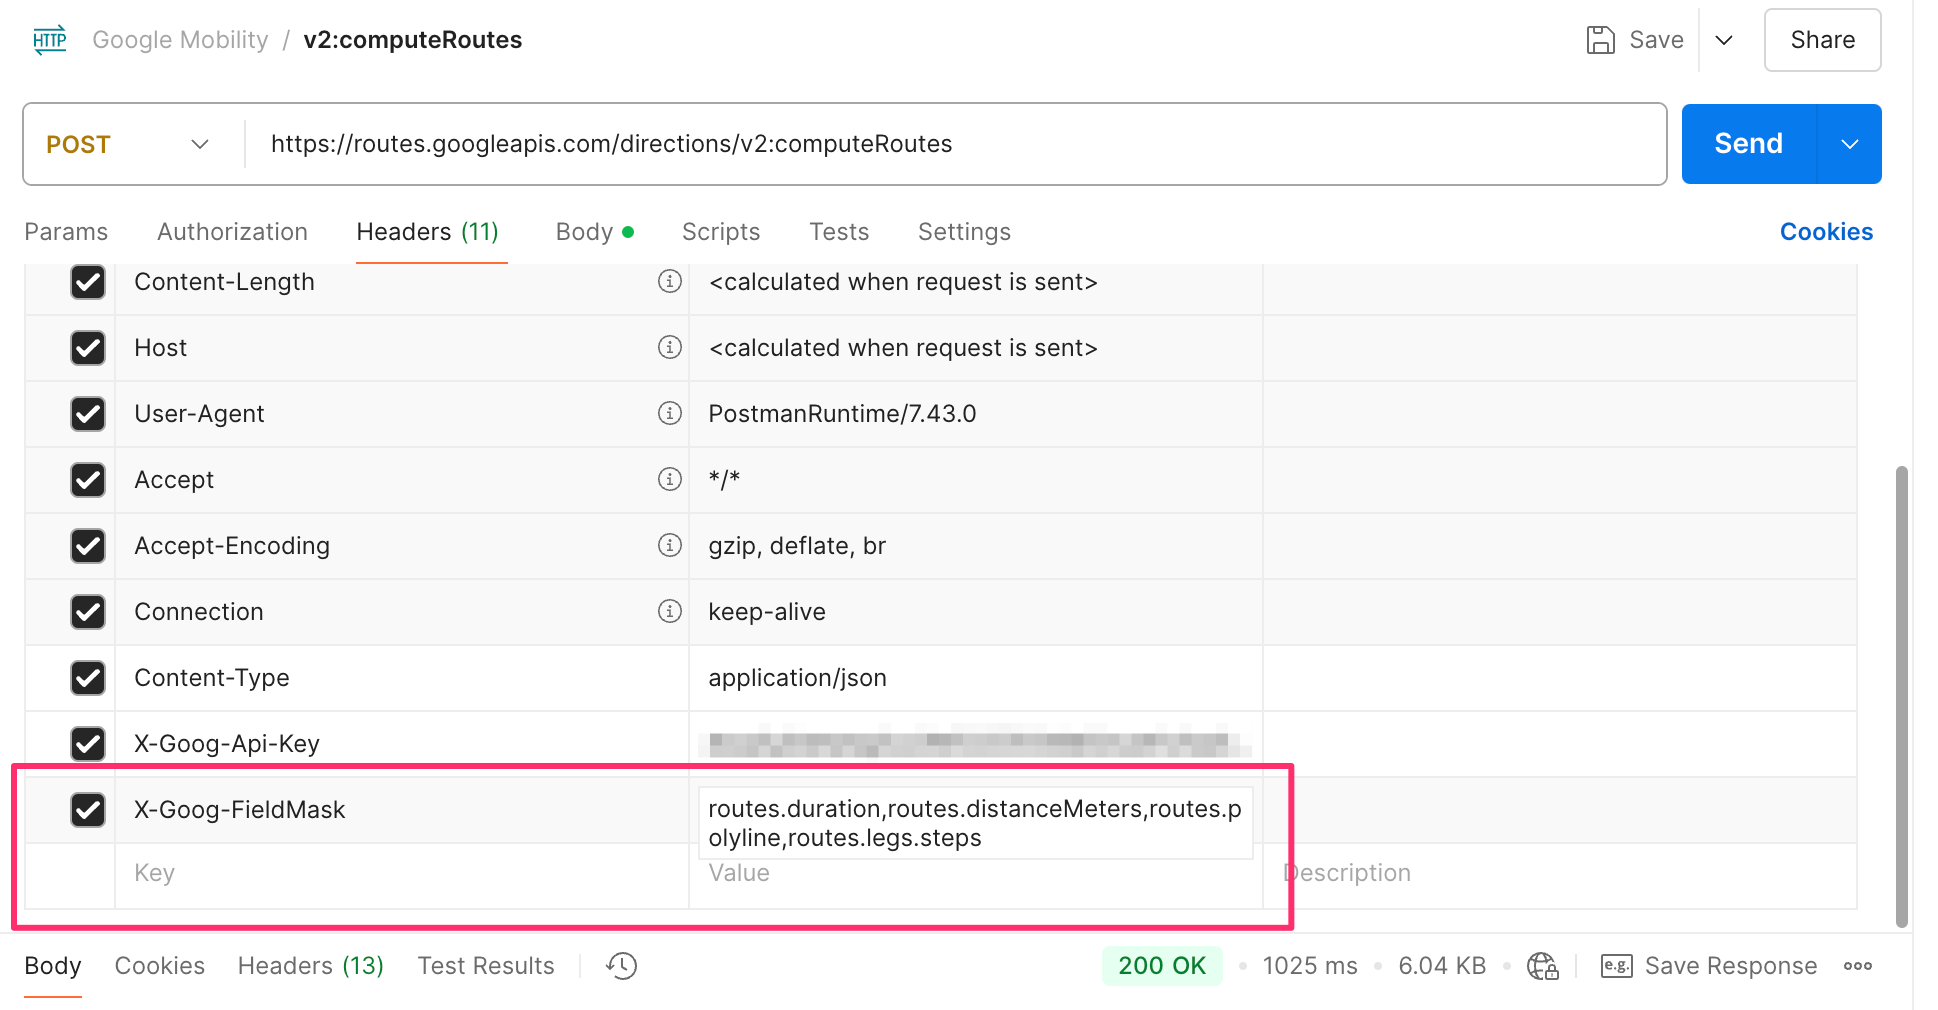
The response field mask is a comma-separated list of strings, where each string specifies a unique field in the response message. The list must not include any spaces.
routes.duration is the total time in seconds needed to complete the route (drive time). You can add this value to the departureTime from the request body to get the ETA, or Estimated Time of Arrival.
routes.distanceMeters is the total length of the route in meters.
routes.polyline is the route's encoded polyline string.
routes.legs.steps provides a detailed breakdown of the route into individual navigation steps each with a startLocation, endLocation, polyline and turn by turn directions,.
routes.travelAdvisory.tollInfo gives you an estimate of toll fees and other one-off charges incurred when using the route.
routes.travelAdvisory.speedReadingIntervals retrieves real time traffic speed data for different segments of the route.
Routes API example - how to make a route in Google Maps
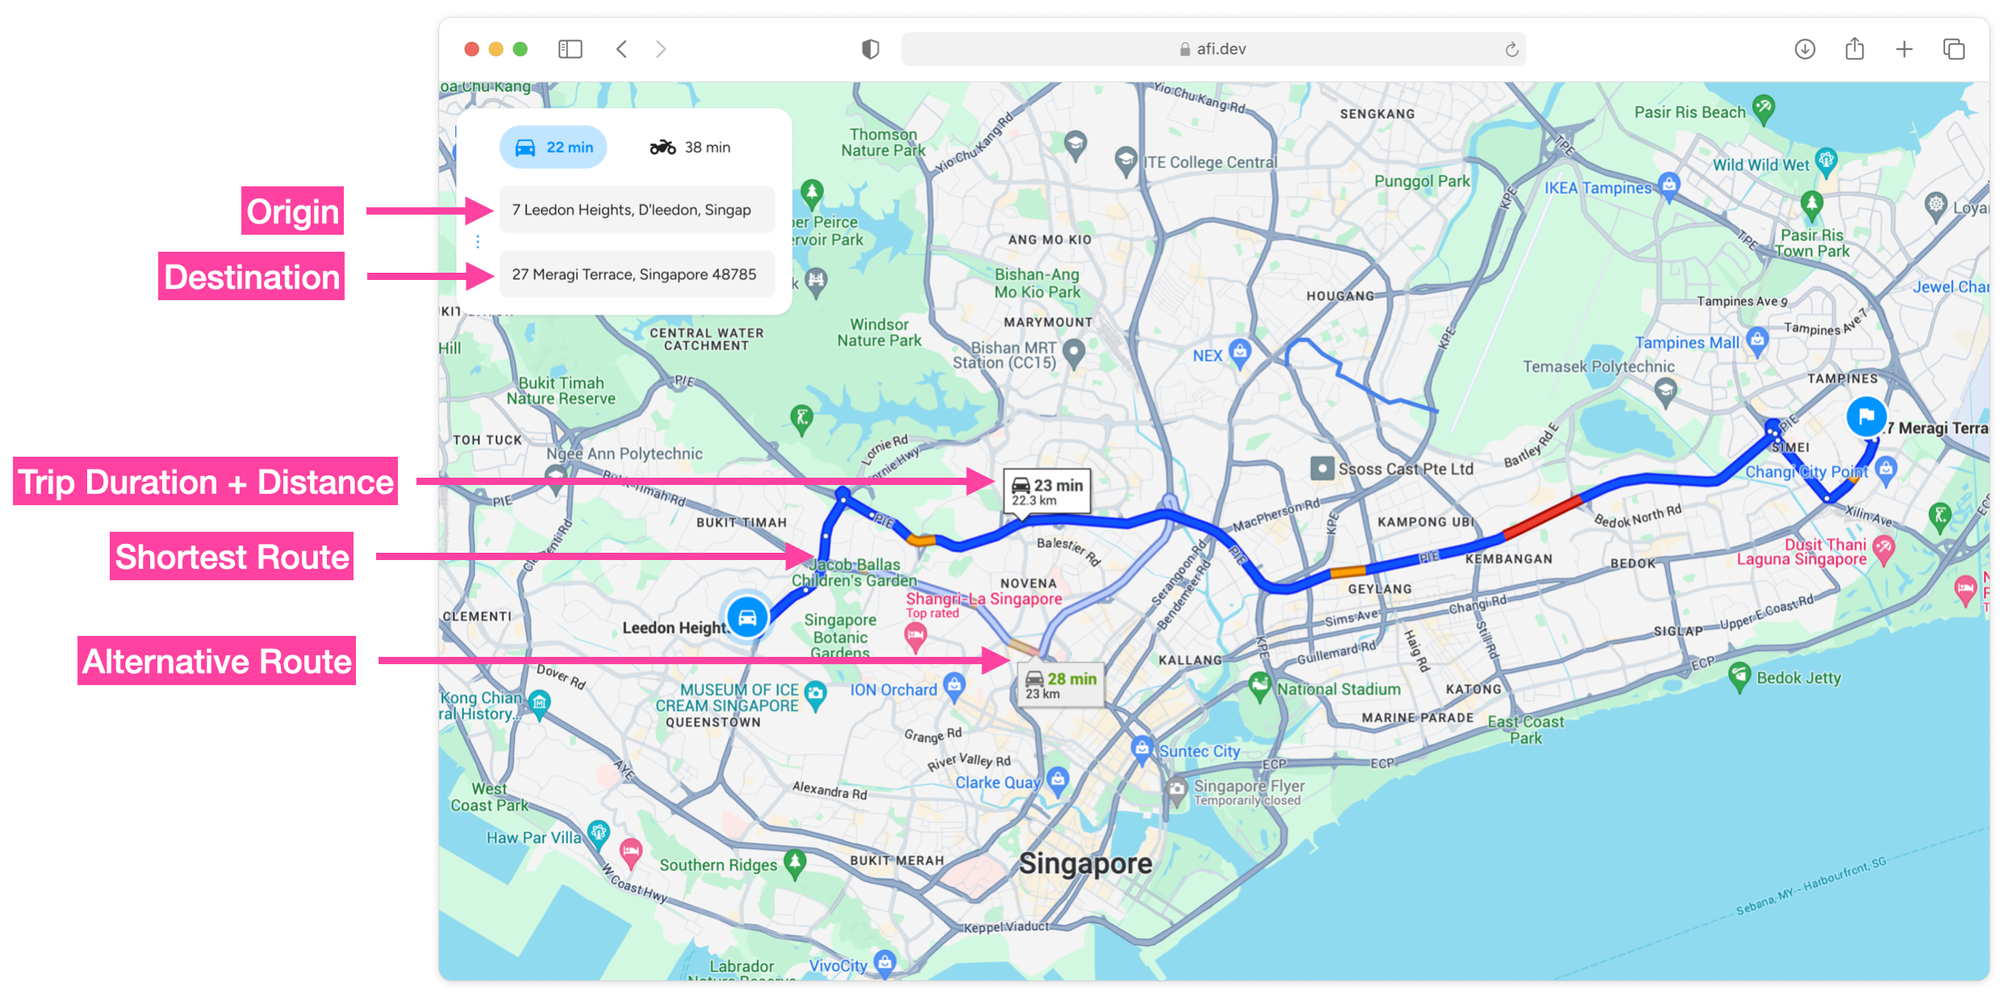
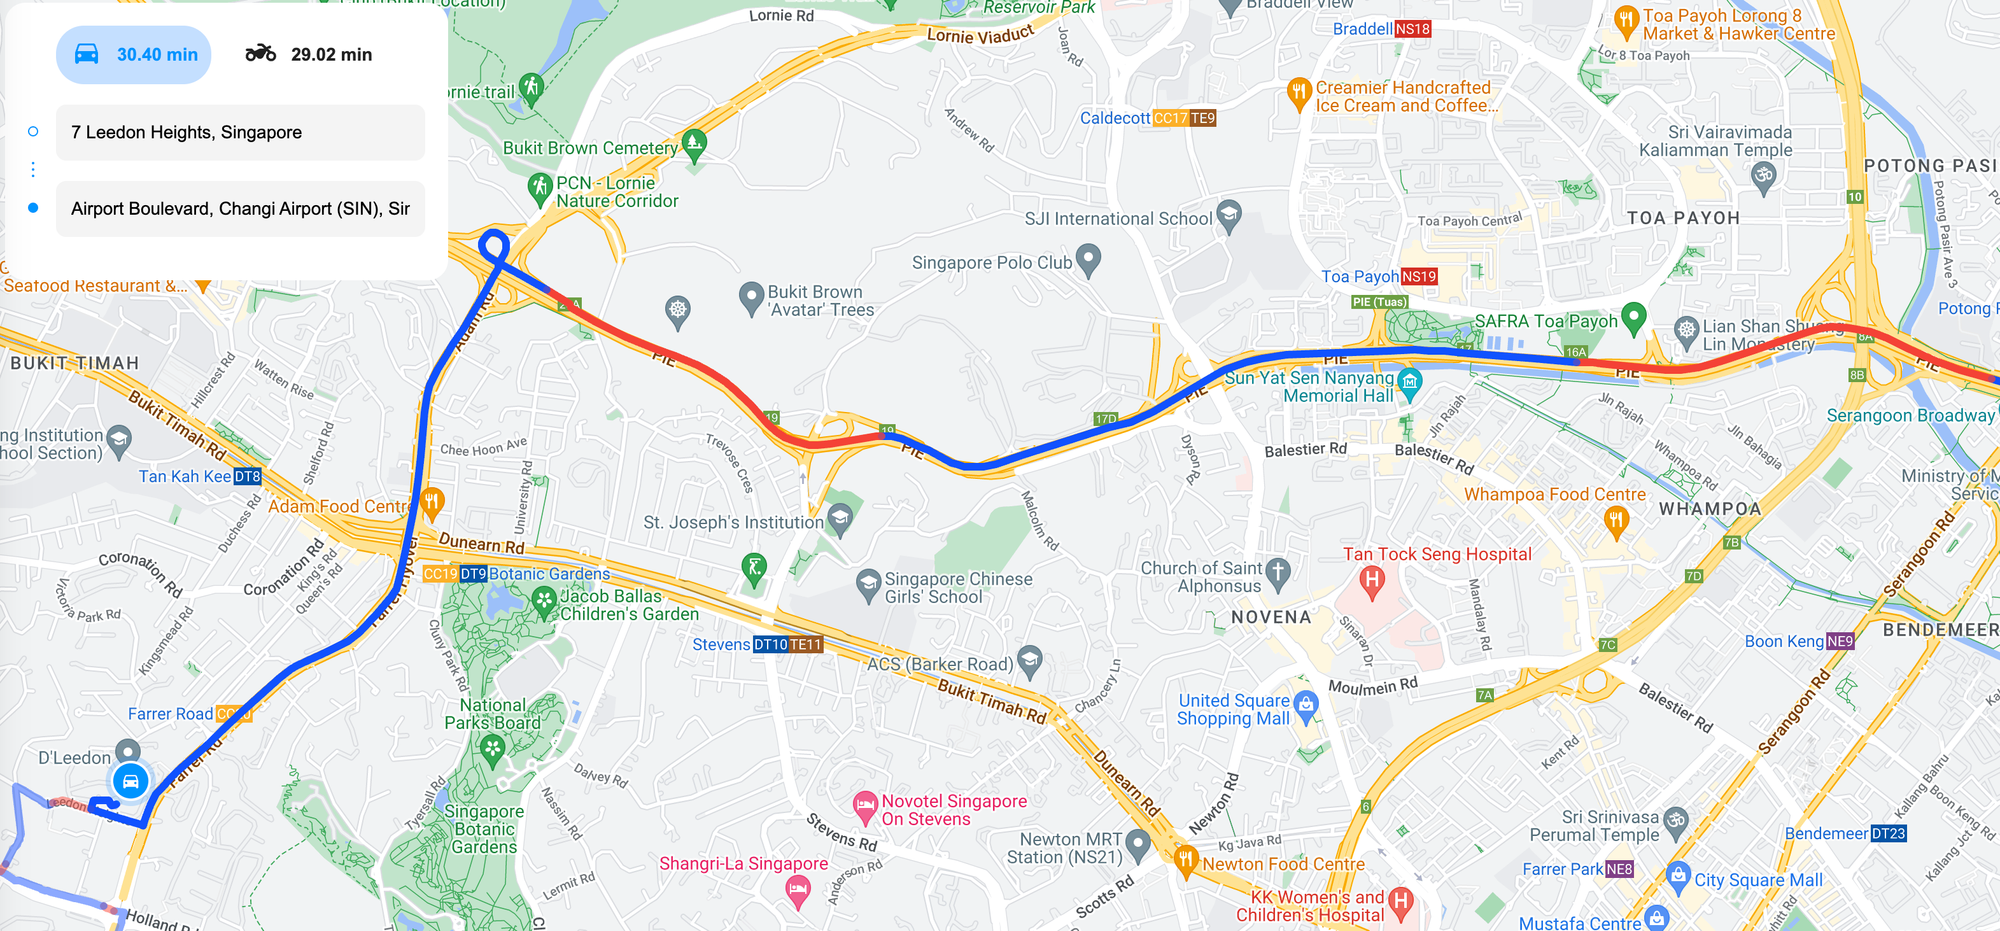
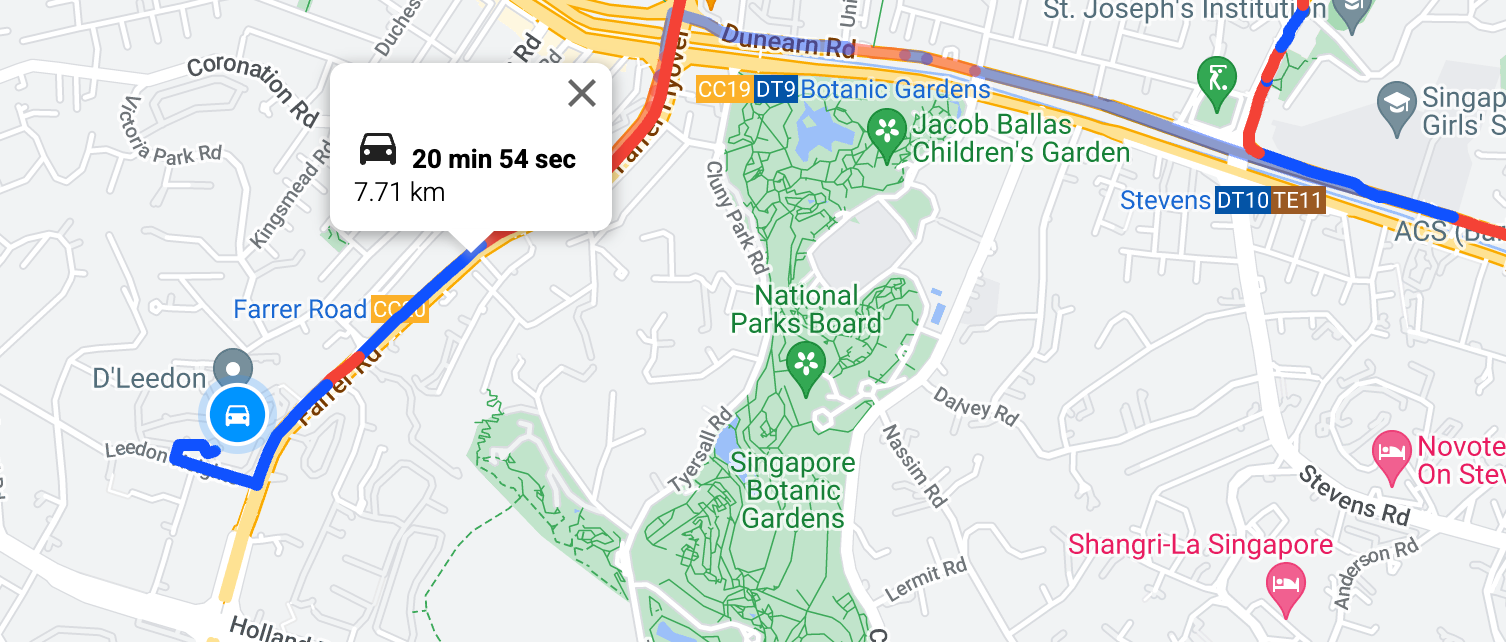
Here's a basic example of how a Compute Routes call in the Routes API is structured. We'll set 7 Leedon Heights, Singapore as the starting point and Singapore Changi Airport as the destination.
Endpoint POST https://routes.googleapis.com/directions/v2:computeRoutes
Headers
Content-Type: application/json
X-Goog-Api-Key: YOUR_API_KEY
X-Goog-FieldMask: routes.duration,routes.distanceMeters,routes.polyline, routes.legs
Request Body
{
    "origin": {
        "location": {
            "latLng": {
                "latitude": 1.3144075,
                "longitude": 103.8013863
            }
        }
    },
    "destination": {
        "location": {
            "latLng": {
                "latitude": 1.3512884,
                "longitude": 103.9762515
            }
        }
    },
    "travelMode": "DRIVE",
    "polylineQuality": "OVERVIEW",
    "routingPreference": "TRAFFIC_AWARE",
    "departureTime": "2025-02-24T15:00:00Z"
}
origin.location.latLng are the coordinates of the route's start location.
destination.location.latLng are the coordinates of the route's end location.
Besides using coordinates, you can also specify locations using Google Place IDs or an address string, like this*:
{
    "origin": {
        "address": "7 Leedon Heights, Singapore 267953"
    },
    "destination": {
        "address": "Singapore Changi Airport"
    }
}
* make sure you are using the /v2:computeRoutes endpoint when using an address string in your Routes API call. If not, you will get a 400 "Request contains an invalid argument" error.
travelMode refers to the mode of transport ("DRIVE", "WALK", "TRANSIT" or "BICYCLE"). Right now, truck routing is not supported by the Routes API but this might change in the future.
The polylineQuality setting lets you choose how detailed the route looks on a map. If you go with "HIGH_QUALITY", you'll get a super detailed polyline with lots of points. On the other hand, "OVERVIEW" uses fewer points, making it load much faster but with less precision. As a result, it returns fewer route segments, which means real-time traffic congestion details are less accurate.
The routingPreference parameter has three options: "TRAFFIC_UNAWARE", "TRAFFIC_AWARE", and "TRAFFIC_AWARE_OPTIMAL".
- Choosing "TRAFFIC_AWARE" enables the routing algorithm to account for real-time traffic conditions when calculating routes. This is ideal for urban areas, where traffic congestion during peak hours can lead to significant delays.
- Selecting "TRAFFIC_UNAWARE" means the Routes API will base its calculations solely on posted speed limits, without considering live traffic data.
For the most accurate and efficient routes in traffic-heavy areas, "TRAFFIC_AWARE" is the recommended option.
The departureTime field, when used with "routingPreference" : "TRAFFIC_AWARE", is arguably the most critical input parameter. It allows you to specify the start time of the route in RFC3339 UTC "Zulu" format (e.g. "2025-02-24T15:00:00Z"), ensuring that the API accounts for predicted real-time traffic conditions when calculating travel time or drive time. The "Z" at the end of the string signifies Zulu time (GMT+0). To get the correct ETA and travel time for your location, you’ll need to convert it to your local timezone.
If departureTime is left empty, it defaults to the time that the request was made. If you you use a date time value in the past, then the request fails.
The above API call returns the following:
Response
{
    "routes": [
        {
            "legs": [
                {
                    "steps": [
                        {
                            "distanceMeters": 20,
                            "staticDuration": "7s",
                            "polyline": {
                                "encodedPolyline": "_w_G_cqxRJXAF"
                            },
                            "startLocation": {
                                "latLng": {
                                    "latitude": 1.3145563999999998,
                                    "longitude": 103.8035189
                                }
                            },
                            "endLocation": {
                                "latLng": {
                                    "latitude": 1.3145083,
                                    "longitude": 103.8033518
                                }
                            },
                            "navigationInstruction": {
                                "maneuver": "DEPART",
                                "instructions": "Head southwest\nRestricted usage road"
                            },
                            "localizedValues": {
                                "distance": {
                                    "text": "20 m"
                                },
                                "staticDuration": {
                                    "text": "1 min"
                                }
                            },
                            "travelMode": "DRIVE"
                        },
                        // ... 5 more entries
                        {
                            "distanceMeters": 632,
                            "staticDuration": "37s",
                            "polyline": {
                                "encodedPolyline": "ygbGqcsxR}BMmASyAc@kBy@eDqB}Ay@eDyAqDmB"
                            },
                            "startLocation": {
                                "latLng": {
                                    "latitude": 1.3274864,
                                    "longitude": 103.8138518
                                }
                            },
                            "endLocation": {
                                "latLng": {
                                    "latitude": 1.3325178,
                                    "longitude": 103.81634620000001
                                }
                            },
                            "navigationInstruction": {
                                "maneuver": "NAME_CHANGE",
                                "instructions": "Continue onto Adam Rd"
                            },
                            "localizedValues": {
                                "distance": {
                                    "text": "0.6 km"
                                },
                                "staticDuration": {
                                    "text": "1 min"
                                }
                            },
                            "travelMode": "DRIVE"
                        },
                        {
                            "distanceMeters": 19870,
                            "staticDuration": "1010s",
                            "polyline": {
                                "encodedPolyline": "ggcGessxR]CwAm@a@Gg@?YFYXIPE\\BPDRTV^PV@^GXO^e@|C_HrAoC|@aBVKfDkH\\aAf@}ApBoHd@uAhAaCvAuBbBiB`DwCh@y@\\u@XcANmA?oA[oD]yDCiAFy@Ry@n@yBvA{CZeAJy@BoAC}@YaB{EuT_AsEm@eBgA}BiEqIm@gB[qAYoBKwAEiA]wTEgDJuFLkCr@mRDyA@gBPgC\\kKAkBKuAqBcJmCgLKaAEgADsAV}BPy@h@cBlCiH`@aBR{@X_B~@uE\\oAz@}BbA}BbAcBhBaC|CaD~AoAp@a@pLcIzAiAtHoFdAaAn@y@^q@h@}@Zw@h@mBNsAFyFAyAKuASyAK]Q[uCcJ_EgNa@mBOcAMmBM_K@SE_B[wD[wCuDqVkAsI{Fmg@yA{Lk@yCw@wD]oBiC{Lc@eBk@yAMQcCeFcBgDc@eAgE_L{KuZ{BsGeImTcAaDY}@oAuF[gBYmBYmCOoBKwBKcD?mEJaB|@a]NsHHyB@kBIgBIo@Oe@u@gBi@w@eM}OaFgG_GqHiS_W}CwD{@mAsLkO_JuK}AwBwAiCSa@{AmDy@{BWkAS_BQ{BEyC@mAtAmIRaAf@mBv@uBdAuBhBcD`CeCtAiAnBqAvDwBTQnE_CnJmFjDuBxAgAr@o@v@y@vAeBjBqC"
                            },
                            "startLocation": {
                                "latLng": {
                                    "latitude": 1.3325178,
                                    "longitude": 103.81634620000001
                                }
                            },
                            "endLocation": {
                                "latLng": {
                                    "latitude": 1.3405361999999998,
                                    "longitude": 103.9721112
                                }
                            },
                            "navigationInstruction": {
                                "maneuver": "RAMP_LEFT",
                                "instructions": "Merge onto PIE via the ramp to Changi Airport\nToll road"
                            },
                            "localizedValues": {
                                "distance": {
                                    "text": "19.9 km"
                                },
                                "staticDuration": {
                                    "text": "17 mins"
                                }
                            },
                            "travelMode": "DRIVE"
                        },
                        {
                            "distanceMeters": 34,
                            "staticDuration": "2s",
                            "polyline": {
                                "encodedPolyline": "kydGu`ryRFWLa@"
                            },
                            "startLocation": {
                                "latLng": {
                                    "latitude": 1.3405361999999998,
                                    "longitude": 103.9721112
                                }
                            },
                            "endLocation": {
                                "latLng": {
                                    "latitude": 1.3404269,
                                    "longitude": 103.9723952
                                }
                            },
                            "navigationInstruction": {
                                "maneuver": "RAMP_LEFT",
                                "instructions": "Take exit 1"
                            },
                            "localizedValues": {
                                "distance": {
                                    "text": "34 m"
                                },
                                "staticDuration": {
                                    "text": "1 min"
                                }
                            },
                            "travelMode": "DRIVE"
                        }
                    ]
                }
            ],
            "distanceMeters": 22843,
            "duration": "1168s",
            "polyline": {
                "encodedPolyline": "_w_G_cqxRJXAFKFWH@jB|@JXkAlA{FBUeCo@uAm@gAy@}CgDq@{@kCwCcCiCmFkGo@eAk@sAkBgF_@y@_AkAwDiD_@]eAo@{@SaC[}Fq@kDc@_COkK_@}BMmASyAc@kBy@eDqB}Ay@eDyAqDmB]CwAm@a@Gg@?YFYXIPE\\BPDRTV^PV@^GXO^e@|C_HrAoC|@aBVKfDkH\\aAf@}ApBoHd@uAhAaCvAuBbBiB`DwCh@y@\\u@XcANmA?oA[oD]yDCiAFy@Ry@n@yBvA{CZeAJy@BoAC}@YaB{EuT_AsEm@eBgA}BiEqIm@gB[qAYoBKwAEiA]wTEgDJuFLkCr@mRDyA@gBPgC\\kKAkBKuAqBcJmCgLKaAEgADsAV}BPy@h@cBlCiH`@aBR{@X_B~@uE\\oAz@}BbA}BbAcBhBaC|CaD~AoAp@a@pLcIzAiAtHoFdAaAn@y@^q@h@}@Zw@h@mBNsAFyFAyAKuASyAK]Q[uCcJ_EgNa@mBOcAMmBM_K@SE_B[wD[wCuDqVkAsI{Fmg@yA{Lk@yCw@wD]oBiC{Lc@eBk@yAMQcCeFcBgDc@eAgE_L{KuZ{BsGeImTcAaDY}@oAuF[gBYmBYmCOoBKwBKcD?mEJaB|@a]NsHHyB@kBIgBIo@Oe@u@gBi@w@eM}OaFgG_GqHiS_W}CwD{@mAsLkO_JuK}AwBwAiCSa@{AmDy@{BWkAS_BQ{BEyC@mAtAmIRaAf@mBv@uBdAuBhBcD`CeCtAiAnBqAvDwBTQnE_CnJmFjDuBxAgAr@o@v@y@vAeBjBqCFWLa@"
            }
        }
    ]
}
The response from the Routes API is straightforward. The routes array contains one or more route objects, each with a distanceMeters field, representing the total distance traveled, and duration, which is the total time in seconds to complete the route. To determine the ETA, add the duration to the departureTime. For example, if departureTime is "2025-02-24T15:00:00Z" (23:00:00 Singapore time) and the duration is 1,168 seconds, the ETA would be 23:19:28 Singapore time.
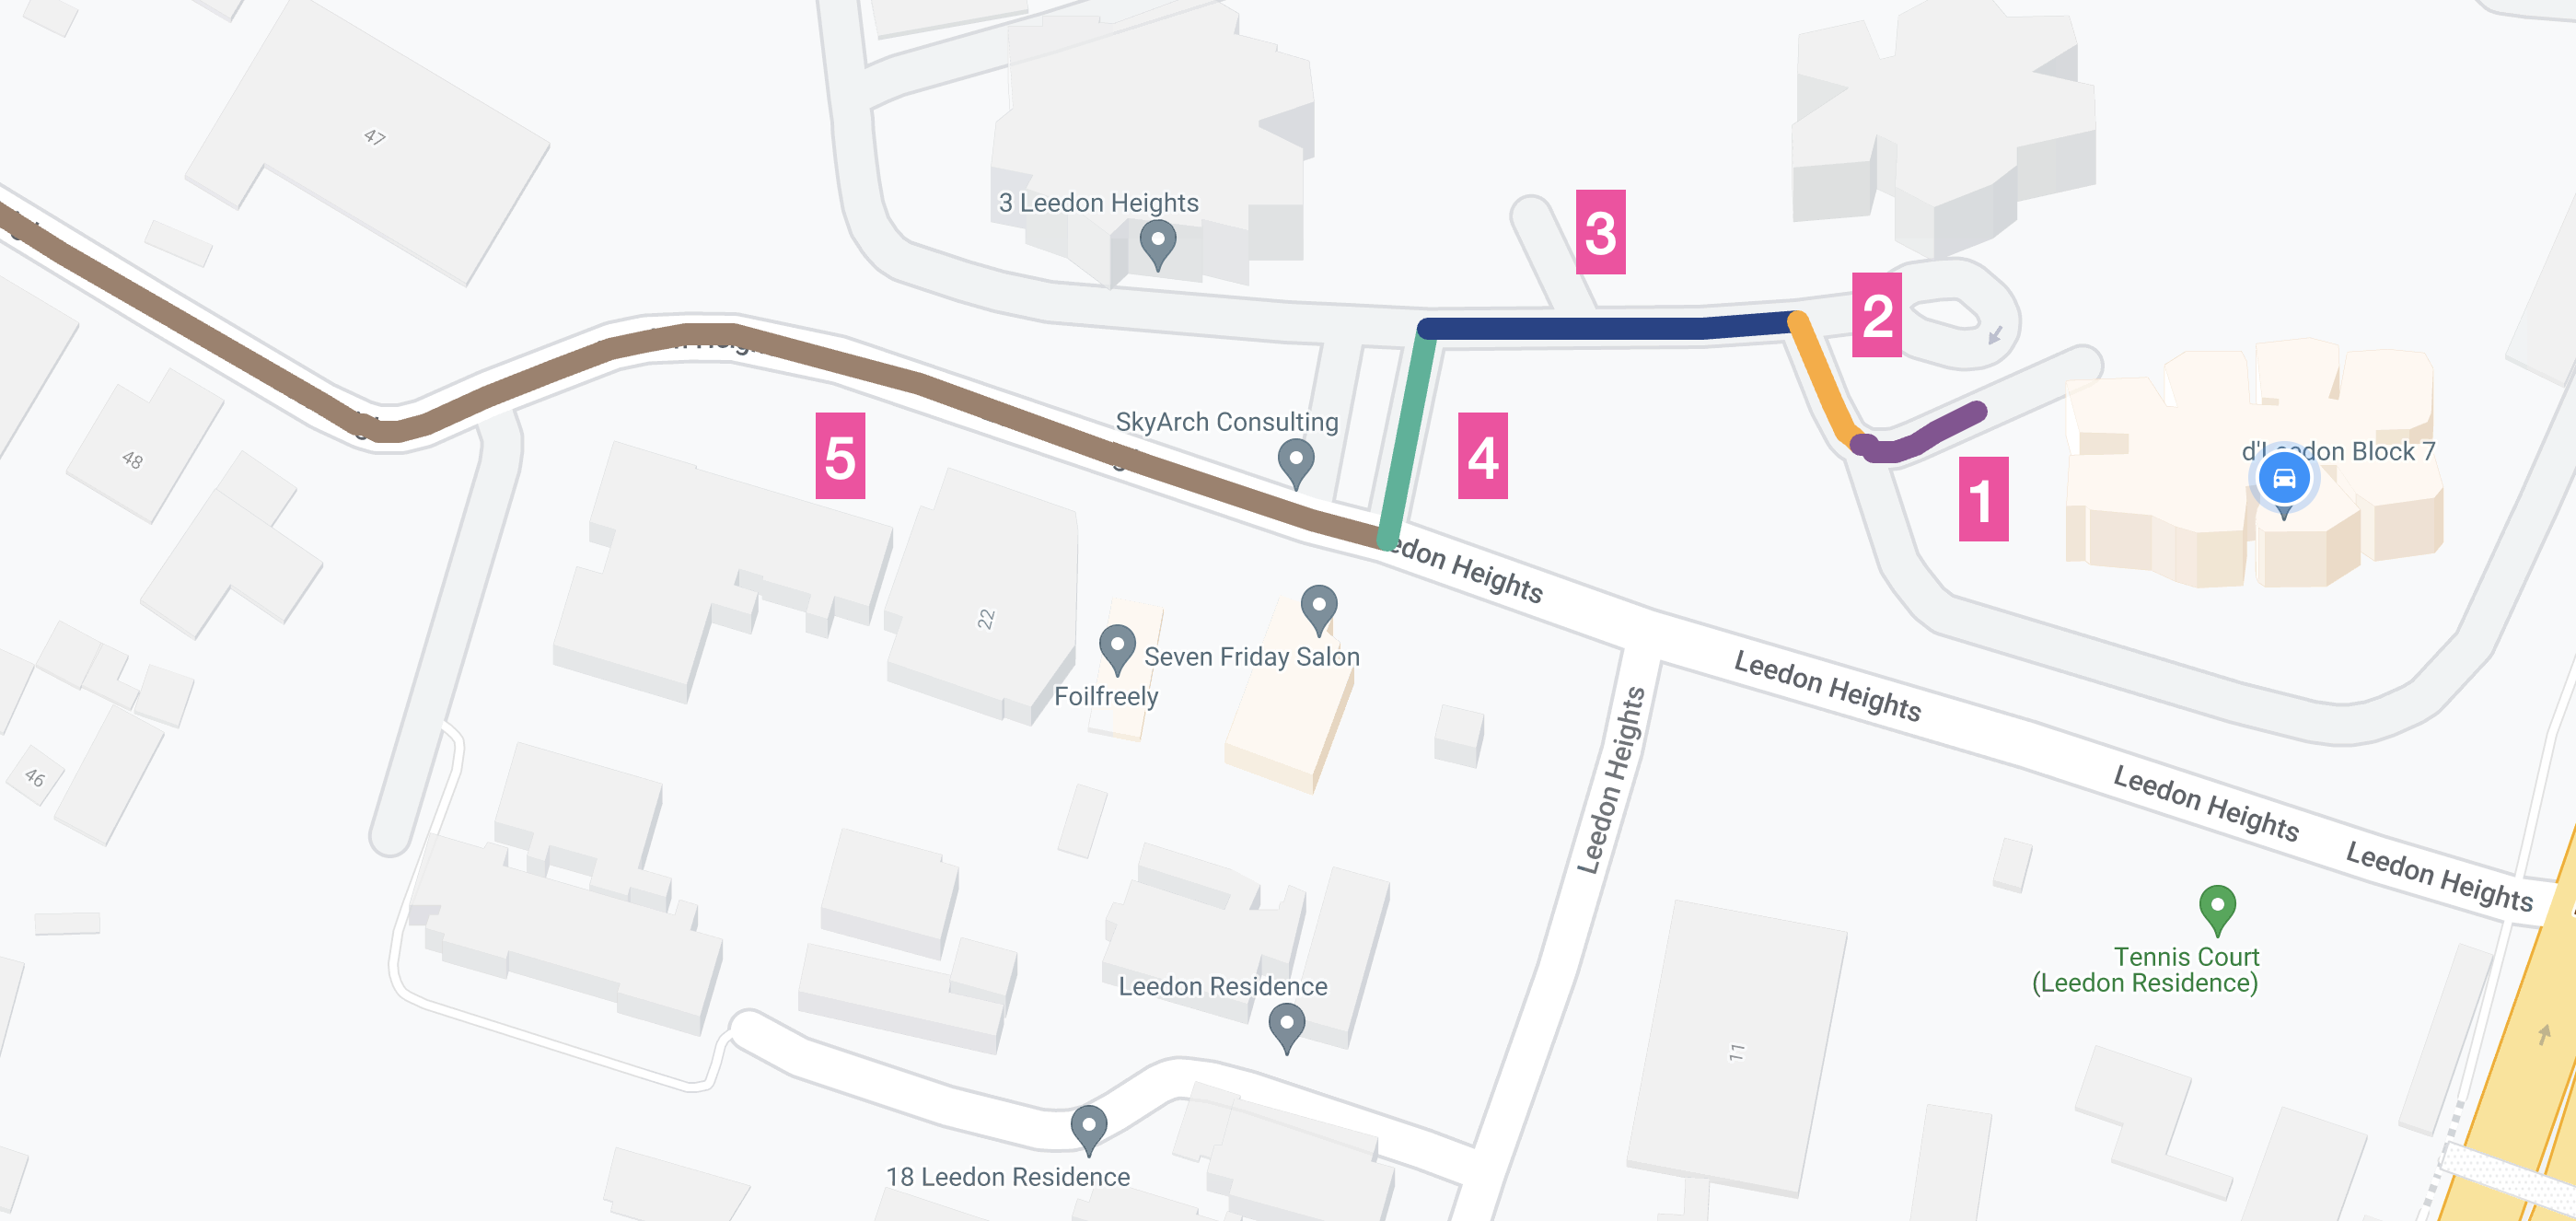
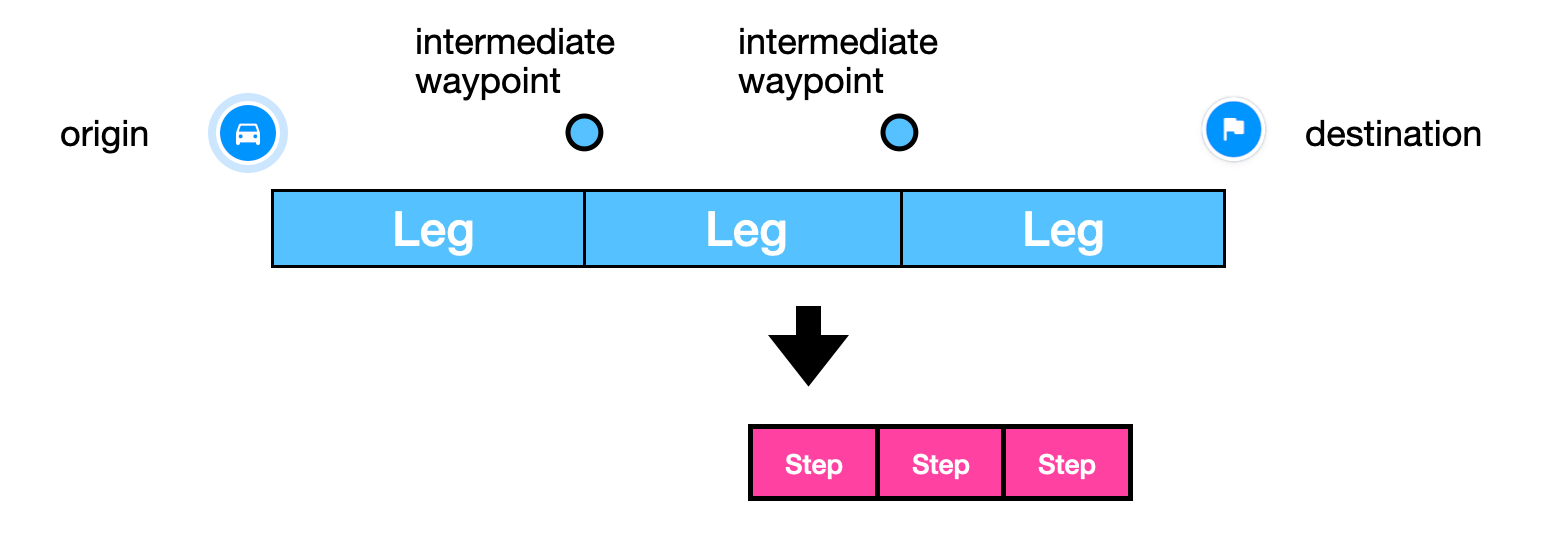
Each route consists of one or more legs (if there are multiple waypoints, there will be multiple legs). Each leg contains steps (numbered in the diagram above), which break down the route into manageable segments, usually corresponding to a specific turn, street, or maneuver.
Routes API Pricing
The Google Maps Routes API uses a pay as you go pricing model, with costs determined by the specific features utilized in your request. The Compute Routes endpoint has three pricing tiers - Basic ($5), Advanced ($10 CPM) and Preferred ($15 CPM).
Basic: This tier functions similarly to the Directions API, offering fundamental routing from a starting point to a destination. It supports up to 10 intermediate waypoints.
Advanced: Expanding on the basic version, this tier allows routing with 11 to 25 waypoints. It also integrates real-time traffic data and enables additional customization with modifiers such as Side of the road, Heading and Vehicle stopover.
Preferred: The most comprehensive option, this tier includes all features from the previous levels while adding support for Two wheeled vehicle routing, Toll calculation and Traffic information on polylines.
If you work with a Google Maps Partner, you can access discounted Routes API pricing based on the following price schedule.
| 0 - 100k | 100k - 500k | 500k - 1M | 1M - 5M | 5M - 10M | 10M - 20M | 20M + | |
|---|---|---|---|---|---|---|---|
| Compute Routes (Basic) | $5.00 | $4.00 | $3.00 | $1.50 | $0.38 | $0.11 | $0.04 |
| Compute Routes (Advanced) | $10.00 | $8.00 | $6.00 | $3.00 | $0.75 | $0.23 | $0.08 |
| Compute Routes (Preferred) | $15.00 | $12.00 | $9.00 | $4.50 | $1.14 | $0.33 | $0.12 |
Draw a route with real time traffic using the Google Routes API
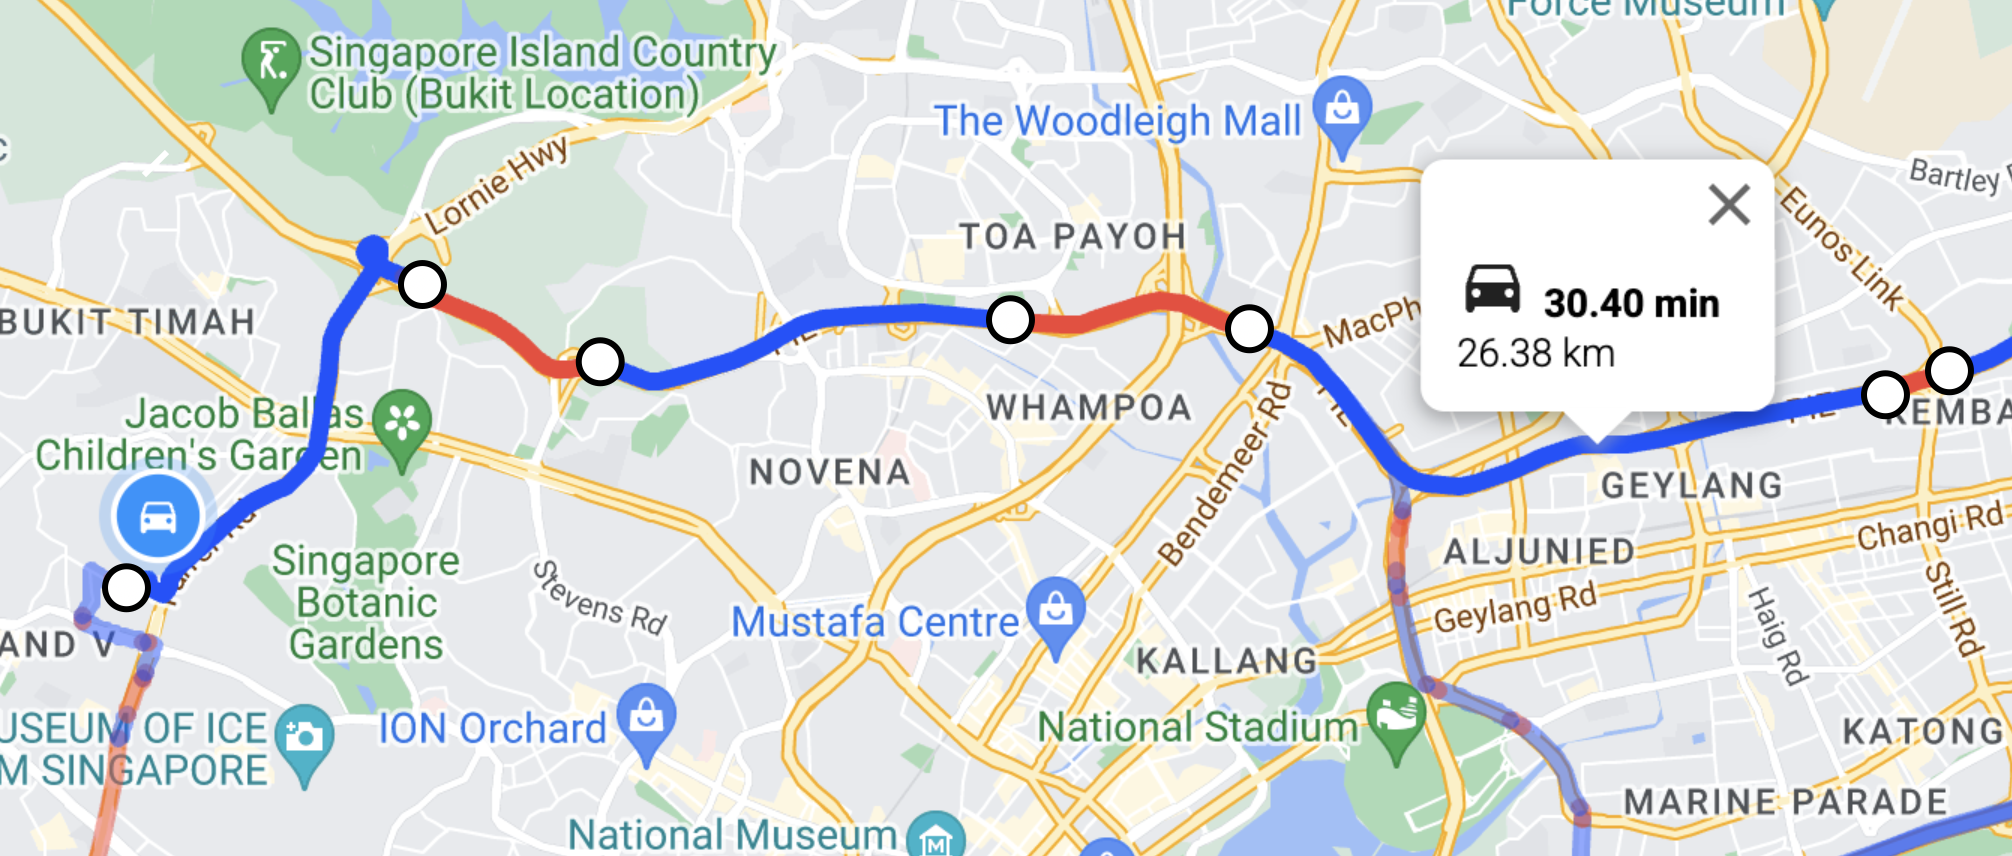
Hands down, the biggest reason to use the Routes API is its ability to generate traffic aware polylines. The colors on these polylines dynamically adjust based on traffic data, allowing developers to display real time congestion levels on a map.
To get the Routes API to return real time traffic information, you need to first, include routes.polyline and routes.travelAdvisory.speedReadingIntervals in the response field mask.
Second, add the following fields to the request body:
{
    "polylineQuality": "HIGH_QUALITY",
    "extraComputations": "TRAFFIC_ON_POLYLINE",
    "routingPreference": "TRAFFIC_AWARE",
    "departureTime": "2025-02-24T01:00:00Z"
}
I previously explained the effects of adding polylineQuality, routingPreference, and departureTime to a Routes API request. Including extraComputations: "TRAFFIC_ON_POLYLINE" means that the response will also include traffic-related information, such as congestion levels along different segments of the route.
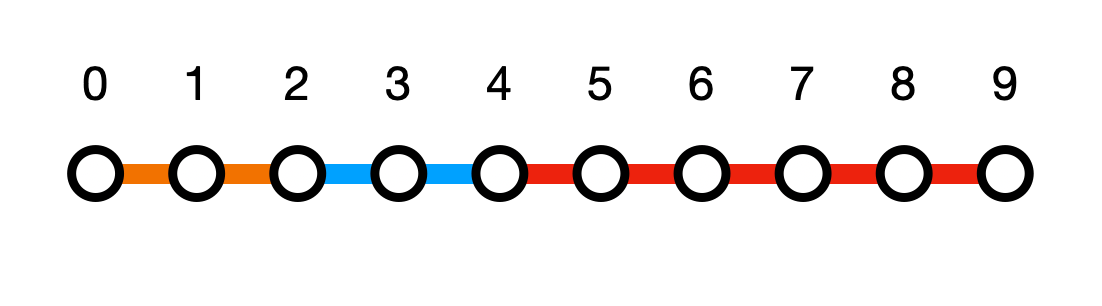
Traffic conditions are expressed in terms of speed categories ("NORMAL", "SLOW" and "TRAFFIC_JAM") applicable on a given interval of the response polyline. These intervals are defined by the indexes of their starting (inclusive) and ending (exclusive) polyline points.
Here's an example of a 10 coordinate polyline with three speedReadingIntervals:
{
    "travelAdvisory": {
        "speedReadingIntervals": [
            {
                "startPolylinePointIndex": 0,
                "endPolylinePointIndex": 2,
                "speed": "SLOW"
            },
            {
                "startPolylinePointIndex": 2,
                "endPolylinePointIndex": 4,
                "speed": "NORMAL"
            },
            {
                "startPolylinePointIndex": 4,
                "endPolylinePointIndex": 9,
                "speed": "TRAFFIC_JAM"
            }
        ]
    }
}
The JSON above indicates the following traffic conditions along the route:
- Coordinates 0 to 2 experience "SLOW" traffic (represented in orange).
- Coordinates 2 to 4 have "NORMAL" traffic (displayed in blue).
- Coordinates 4 to 9 face "TRAFFIC_JAM" conditions (marked in red).
But the encoded polyline returned by the Routes API looks something like this:
l@|@JXkA`@mB^eBJg@BU]Ic@Kc@MUGICECGAe@SWMIEe@]a@[[]OOa@c@y@}@UWq@{@s@w@]_@W[KMUUs@u@OQWWg@i@gAqAiAoAu@{@SWQUQYGIOUEKQ]Yu@{eCISQe@Sg@_@y@Yu@Kc@MUGIHow do we convert this into color coded polylines that we can display on a map? First, decode the polyline provided by the Routes API using the Google Maps Geometry Library.
/* Polyline.jsx */
const Polyline = ({ route, routeIndex, onClick }) => {
  const [polylines, setPolylines] = useState([]);
  const geometryLibrary = useMapsLibrary("geometry");

  useEffect(() => {
    if (!route?.polyline?.encodedPolyline || !geometryLibrary) return;

    const decodePath = (encodedPath) => {
      return geometryLibrary.encoding.decodePath(encodedPath).map((point) => ({
        lat: point.lat(),
        lng: point.lng(),
      }));
    };

    const polylinePoints = decodePath(route.polyline.encodedPolyline);
  });
};
This converts the polyline into an array of individual latitude and longitude coordinates (below).
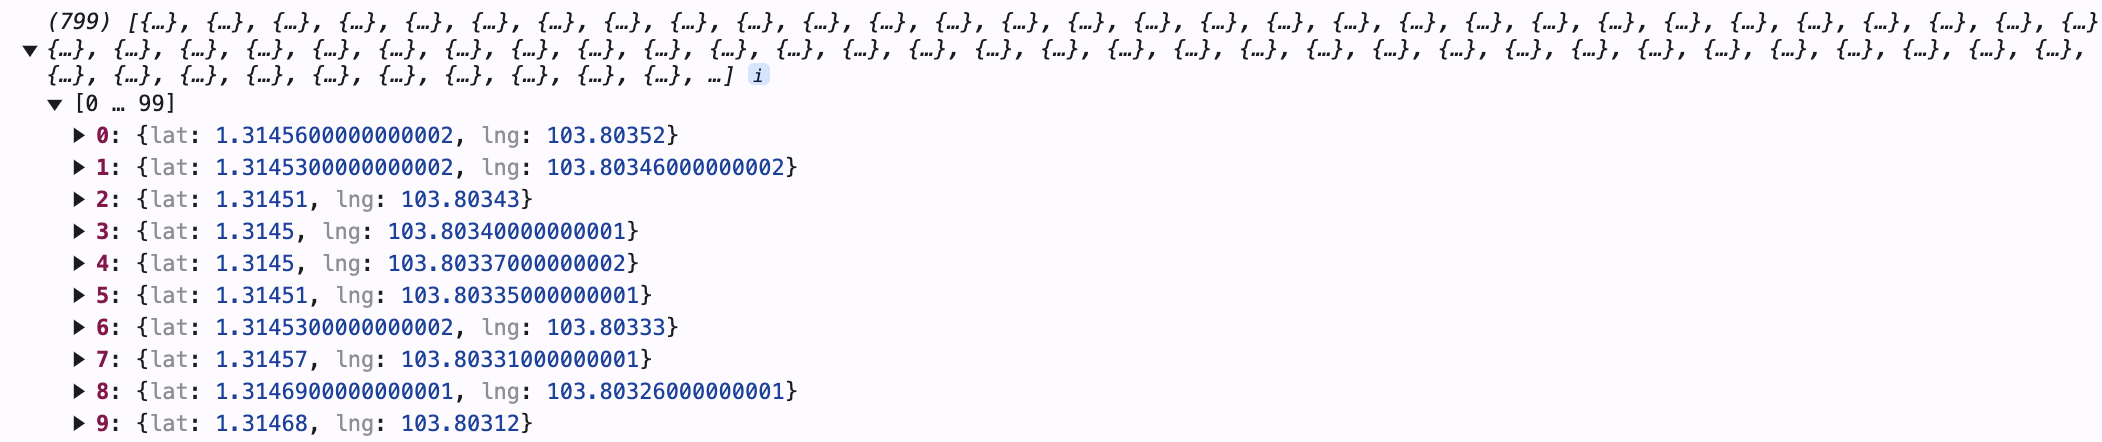
Next, use the speedReadingIntervals array to determine the startPolylinePointIndex and endPolylinePointIndex for each colored segment. Then extract the corresponding coordinates, group them into segments, and encode each segment into a shorter polyline.
/* Polyline.jsx */
let zIndex = route.travelAdvisory.speedReadingIntervals.length + 2;
const newPolylines = route.travelAdvisory.speedReadingIntervals.map(
(interval) => {
const newPoints = polylinePoints.slice(
interval.startPolylinePointIndex,
interval.endPolylinePointIndex + 1,
);
return {
path: geometryLibrary.encoding.encodePath(newPoints),
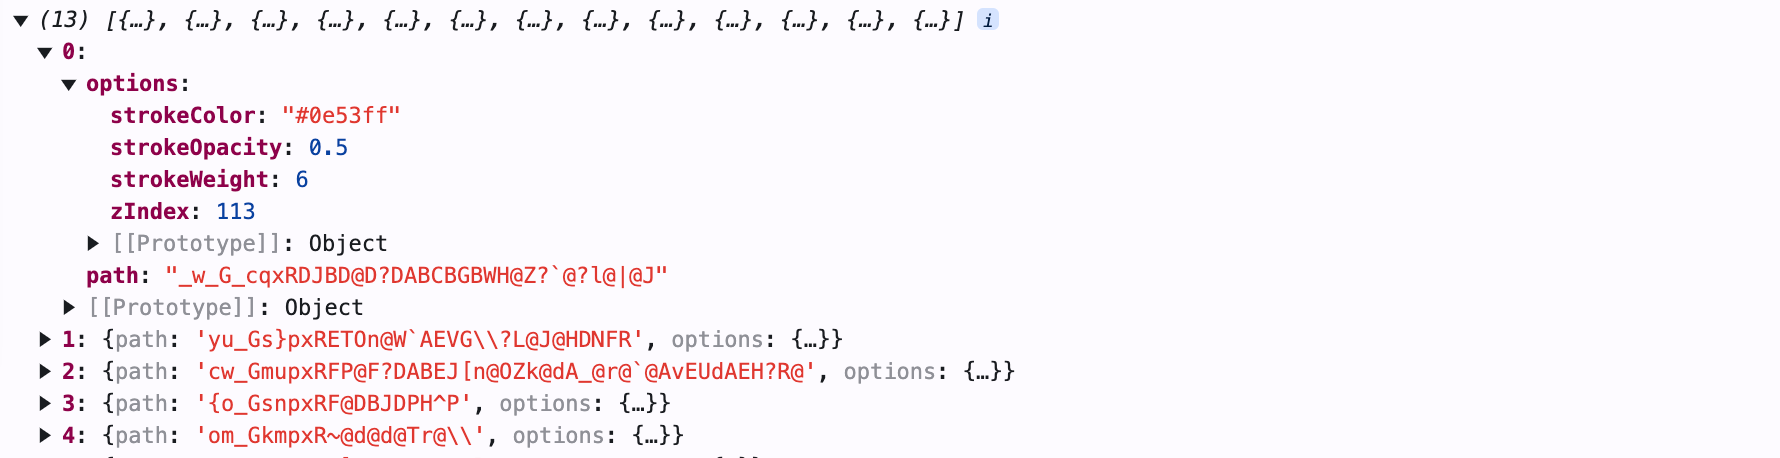
options: {
zIndex: 100 - routeIndex + zIndex--,
strokeColor: SPEED_COLORS[interval.speed] || SPEED_COLORS.NORMAL,
strokeOpacity: routeIndex === 0 ? 1.0 : 0.5,
strokeWeight: 6,
},
};
},
);
For each segment, store this polyline in a new array (let's call it polylines) and pair it with an options object that defines its color (based on speed category), opacity, and thickness.
Finally, for each polyline object in polylines, pass the polyline.path and polyline.options object as props into a react-google-maps <Polyline/> component and render it inside a <Map/> component.
/* Polyline.jsx */
import { Polyline as EPolyline } from './external/Polyline';

return (
  <>
    {polylines.map((polyline, index) => (
      <EPolyline
        key={`p-${index}`}
        onClick={(e) => onClick(e, route)}
        encodedPath={polyline.path}
        {...polyline.options}
      />
    ))}
  </>
);
The final output is a series of connected polylines displayed on a map, where each segment represents a different speedReadingInterval.
The complete source code for the code snippets above is available at the routes_api_demo GitHub repository.
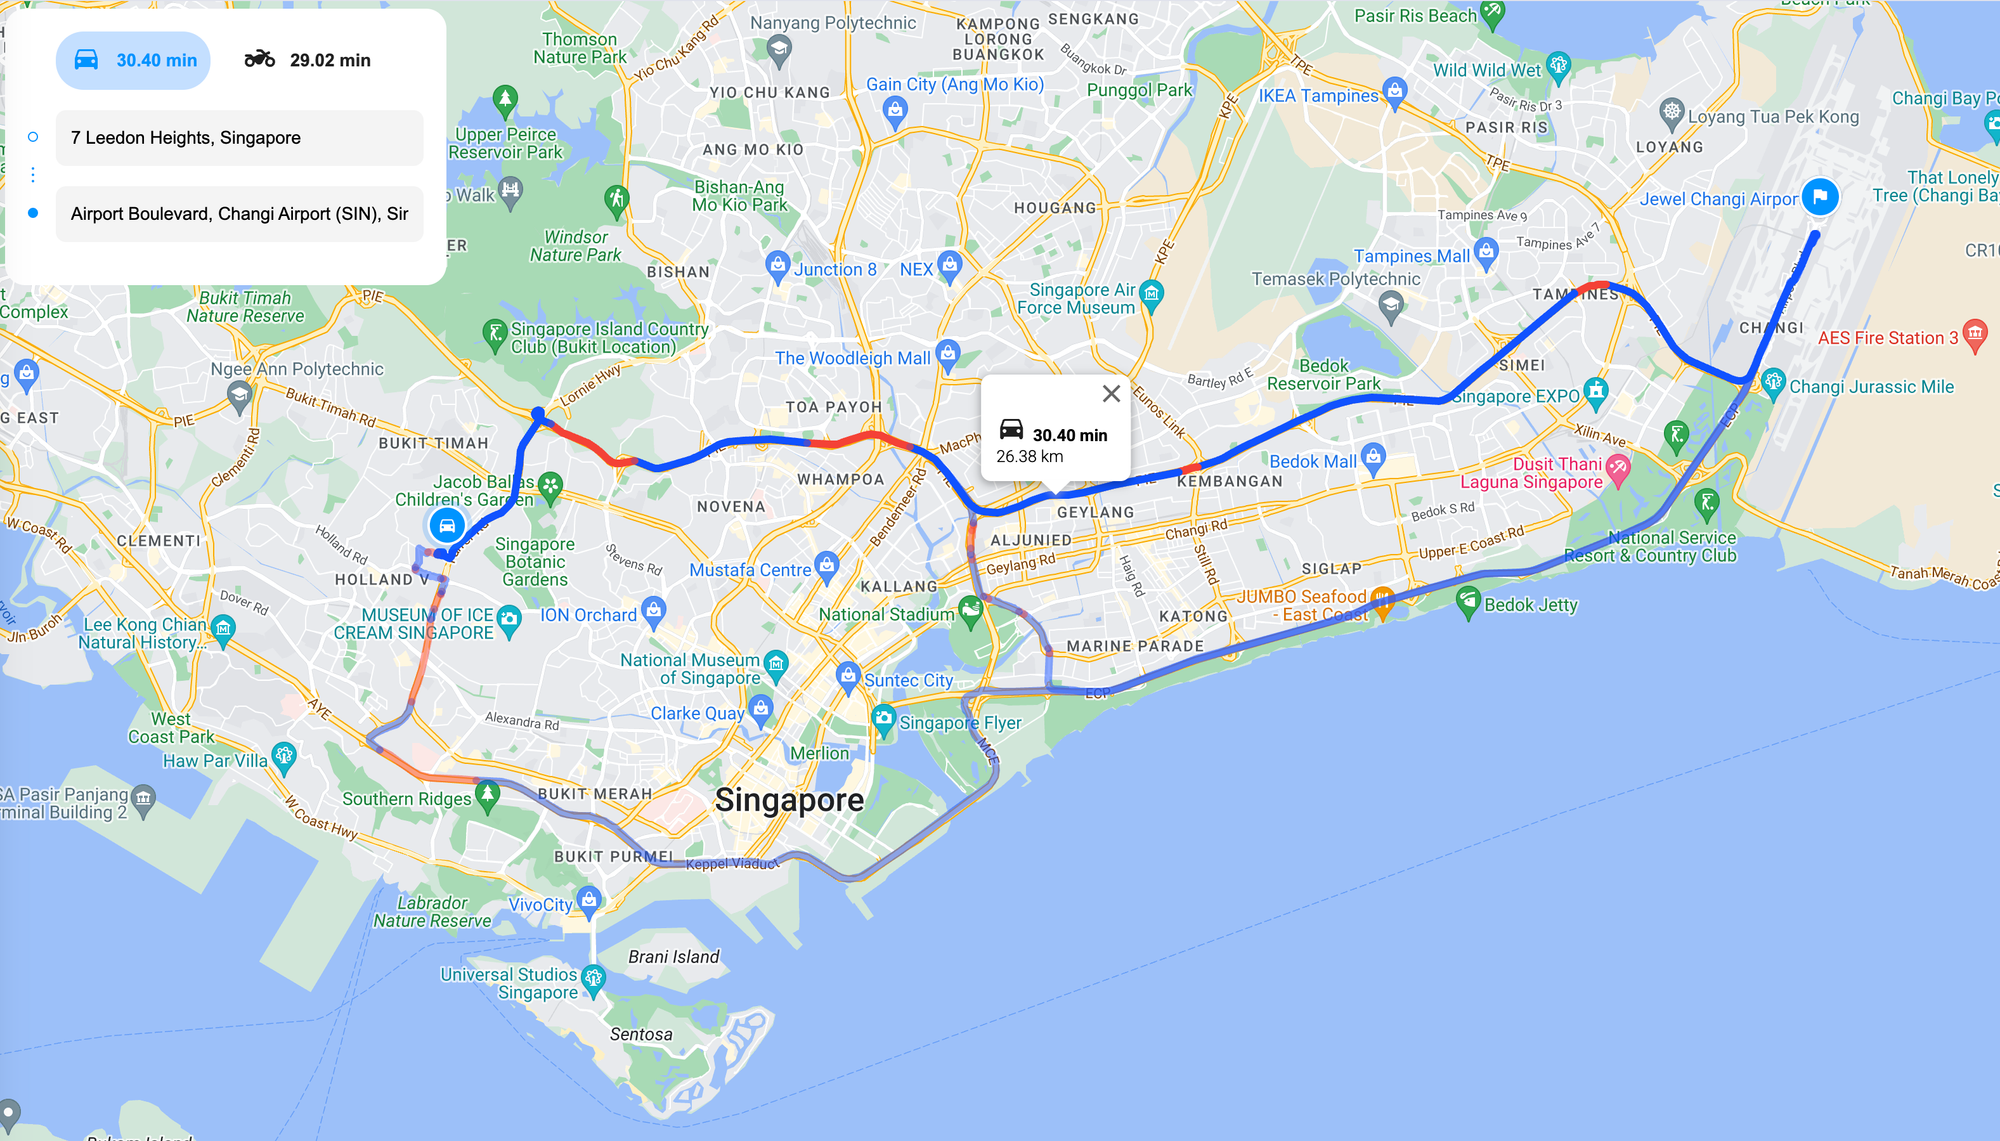
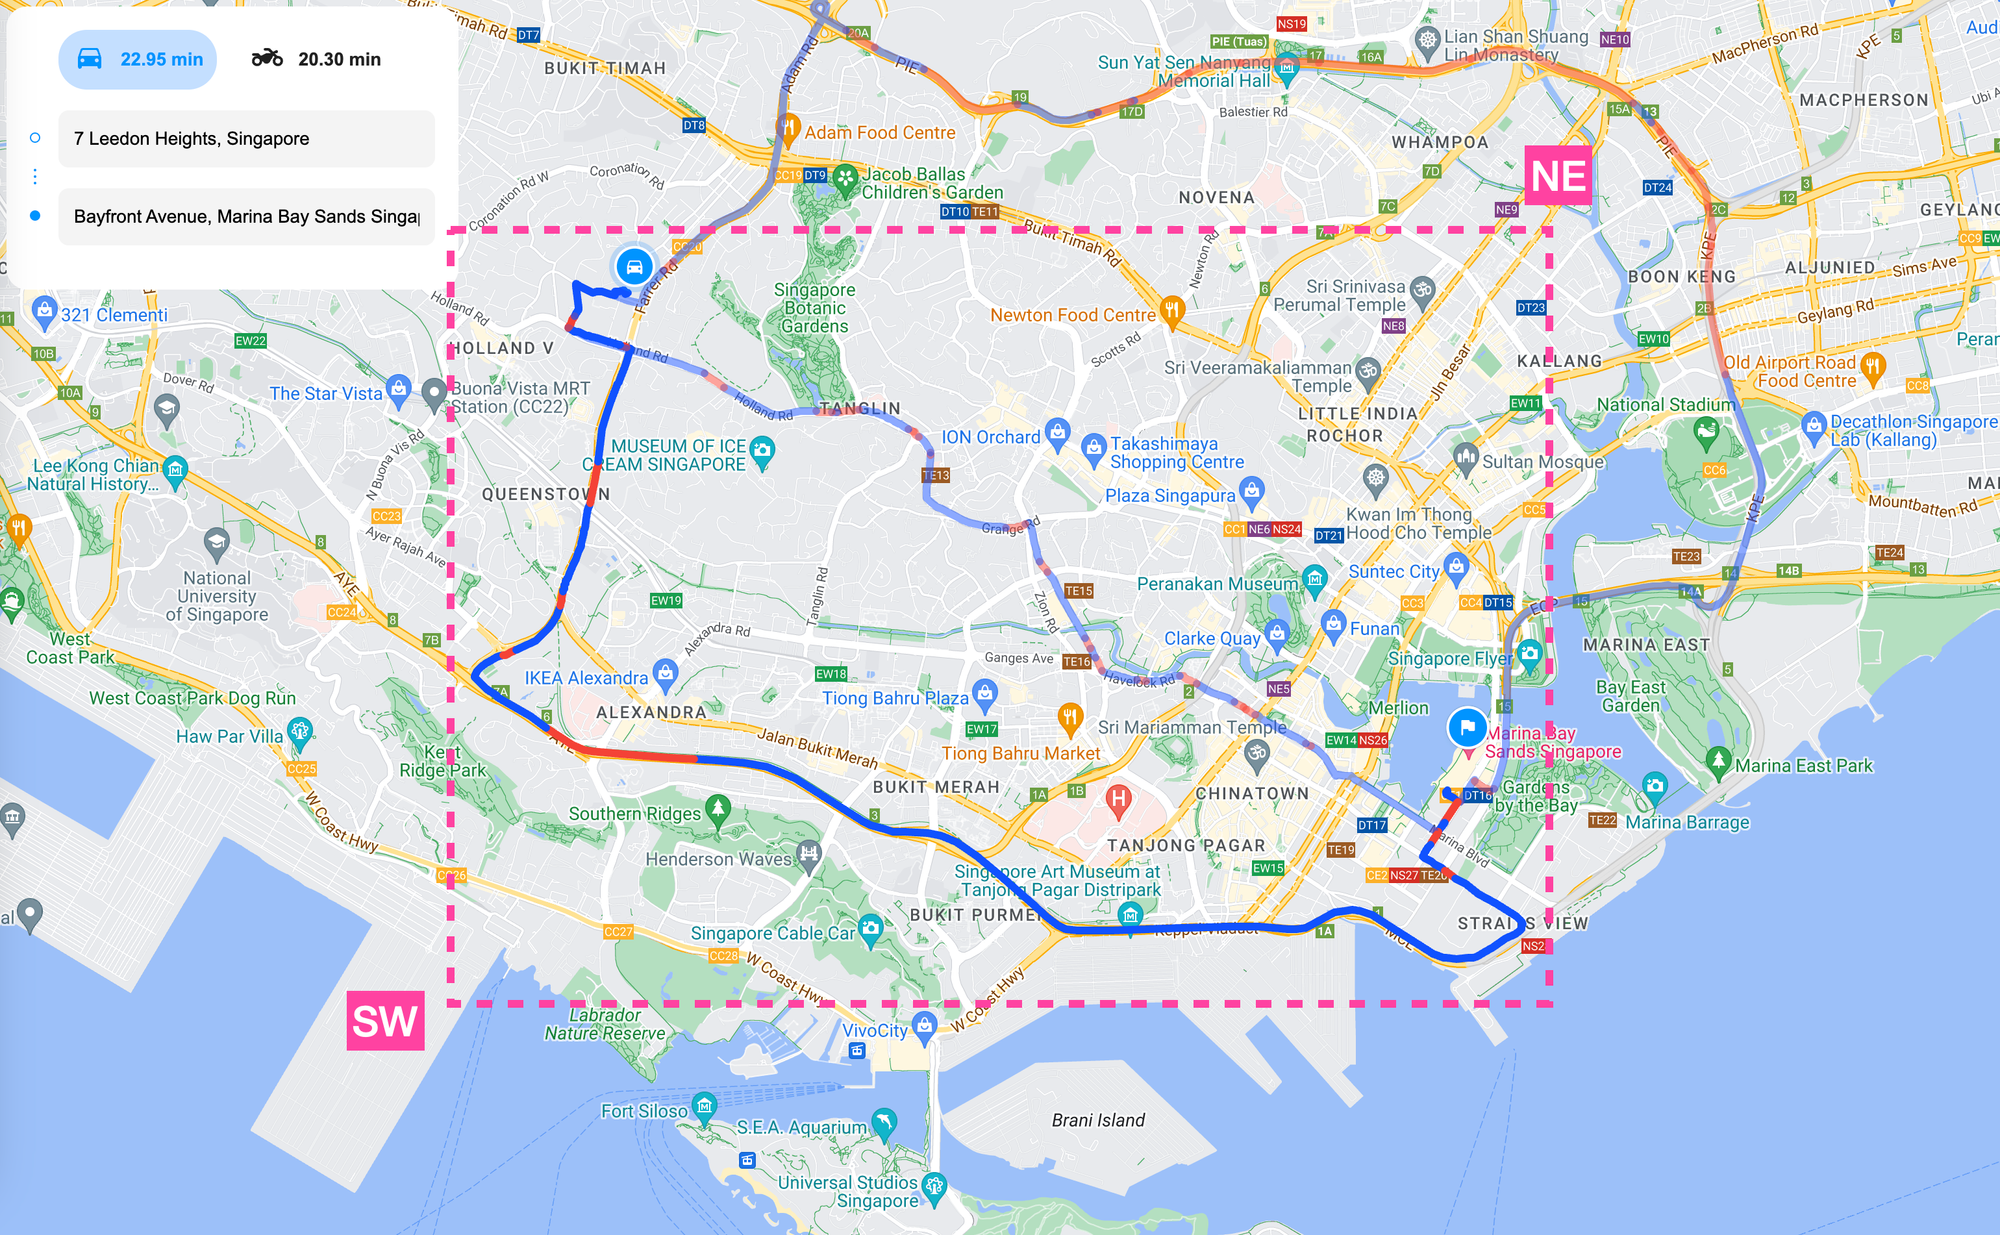
Using the Routes API to plan a route with multiple stops
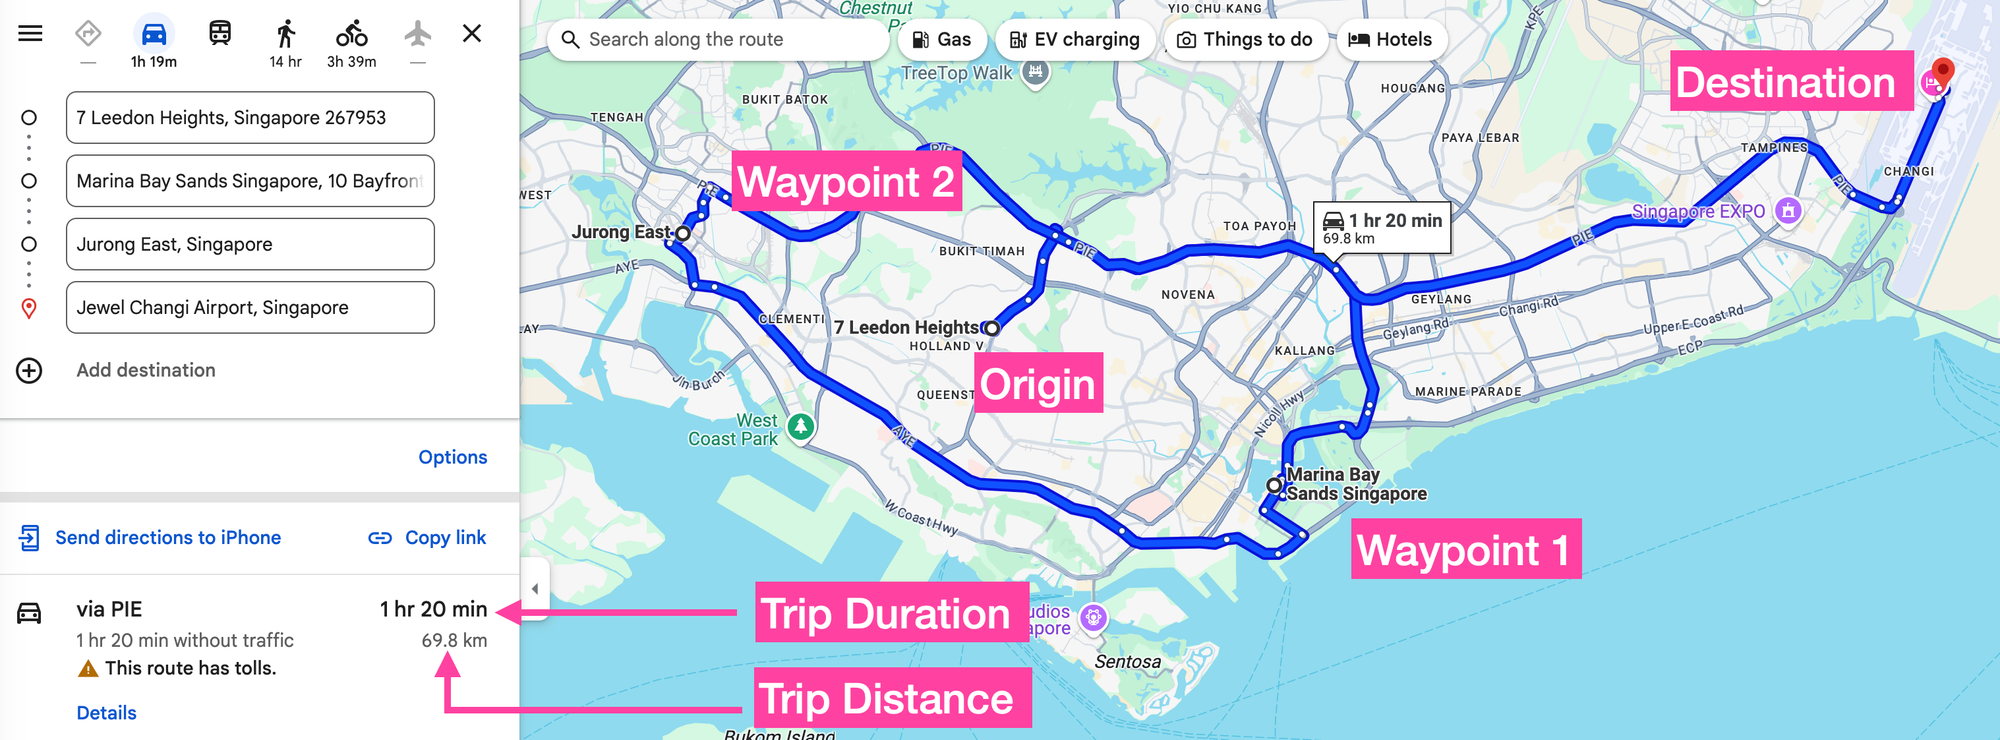
You can also use the Routes API to add multiple waypoints (intermediate stops) between the origin and the final destination. This is especially useful for planning routes that include scheduled stops, or for avoiding specific areas along the way.
{
    "intermediates": [
        {
            "address": "Marina Bay Sands Singapore, 10 Bayfront Ave, Singapore 018956"
        },
        {
            "address": "Jurong East, Singapore"
        }
    ]
}
Here's a simple example that uses the intermediates array property to add two intermediate waypoints to a Routes API request.
Endpoint POST https://routes.googleapis.com/directions/v2:computeRoutes
Headers
Content-Type: application/json
X-Goog-Api-Key: YOUR_API_KEY
X-Goog-FieldMask: routes.duration,routes.distanceMeters, routes.legs
Request
{
    "origin": {
        "address": "7 Leedon Heights, Singapore 267953"
    },
    "destination": {
        "address": "Jewel Changi Airport, Singapore"
    },
    "intermediates": [
        {
            "address": "Marina Bay Sands Singapore, 10 Bayfront Ave, Singapore 018956"
        },
        {
            "address": "Jurong East, Singapore"
        }
    ],
    "travelMode": "DRIVE",
    "polylineQuality": "HIGH_QUALITY",
    "extraComputations": "TRAFFIC_ON_POLYLINE",
    "routingPreference": "TRAFFIC_AWARE",
    "departureTime": "2025-02-24T01:00:00Z"
}
Response
{
    "routes": [
        {
            "legs": [
                {
                    // Origin to waypoint 1

                    "distanceMeters": 16972,
                    "duration": "1449s",
                    "staticDuration": "1371s",
                    "polyline": {
                        // ... polyline string
                    },
                    "startLocation": {
                        "latLng": {
                            "latitude": 1.3145563999999998,
                            "longitude": 103.8035189
                        }
                    },
                    "endLocation": {
                        "latLng": {
                            "latitude": 1.2842133,
                            "longitude": 103.8604276
                        }
                    },
                    "steps": [
                        // ... steps array
                    ]
                },
                {
                    // Waypoint 1 to waypoint 2

                    "distanceMeters": 18908,
                    "duration": "1608s",
                    "staticDuration": "1470s",
                    "polyline": {
                        // ... polyline string
                    },
                    "startLocation": {
                        "latLng": {
                            "latitude": 1.2842133,
                            "longitude": 103.8604276
                        }
                    },
                    "endLocation": {
                        "latLng": {
                            "latitude": 1.3327898999999999,
                            "longitude": 103.7437308
                        }
                    },
                    "steps": [
                        // ... steps array
                    ]
                },
                {
                    // Waypoint 2 to destination

                    "distanceMeters": 33931,
                    "duration": "2317s",
                    "staticDuration": "1947s",
                    "polyline": {
                        // ... polyline string
                    },
                    "startLocation": {
                        "latLng": {
                            "latitude": 1.3327898999999999,
                            "longitude": 103.7437308
                        }
                    },
                    "endLocation": {
                        "latLng": {
                            "latitude": 1.3609805,
                            "longitude": 103.99002589999999
                        }
                    },
                    "steps": [
                        // ... steps array
                    ]
                }
            ],
            "distanceMeters": 69811,
            "duration": "4787s"
        }
    ]
}
Each route contains a separate leg for the path from each waypoint to the next. For each additional waypoint added to the route after the origin and destination, the Routes API adds a separate leg.
Metrics for the route as a whole can be found at the end of the response body. In the example above, the total driving distance, distanceMeters, is 69811 m (69.8 km) and the total trip duration, or drive time, is 4787 sec (79 min 47 sec). These values closely match the numbers returned by the Google Maps app.
Optimize waypoints with the Routes API
In the example above, the route sent the driver in a loop around Singapore. By default, the Compute Routes endpoint of the Routes API follows the exact order of the waypoints provided. To optimize the route and arrange stops in the most efficient order, you can include "optimizeWaypointOrder": "true" in the request body.
Endpoint POST https://routes.googleapis.com/directions/v2:computeRoutes
Headers
Content-Type: application/json
X-Goog-Api-Key: YOUR_API_KEY
X-Goog-FieldMask: routes.duration,routes.distanceMeters, routes
Request
{
    "origin": {
        "address": "7 Leedon Heights, Singapore 267953"
    },
    "destination": {
        "address": "Jewel Changi Airport, Singapore"
    },
    "intermediates": [
        {
            "address": "Marina Bay Sands Singapore, 10 Bayfront Ave, Singapore 018956"
        },
        {
            "address": "Jurong East, Singapore"
        }
    ],
    "travelMode": "DRIVE",
    "polylineQuality": "HIGH_QUALITY",
    "extraComputations": "TRAFFIC_ON_POLYLINE",
    "routingPreference": "TRAFFIC_AWARE",
    "departureTime": "2025-02-24T01:00:00Z",
    "optimizeWaypointOrder": "true"
}
Response
{
    "routes": [
        {
            "legs": [
                {
                    "distanceMeters": 13710,
                    "duration": "1322s",
                    "staticDuration": "1247s",
                    "polyline": {
                        "encodedPolyline": "some_polyline"
                    },
                    "startLocation": {
                        "latLng": {
                            "latitude": 1.3145563999999998,
                            "longitude": 103.8035189
                        }
                    },
                    "endLocation": {
                        "latLng": {
                            "latitude": 1.3327525,
                            "longitude": 103.7437052
                        }
                    },
                    "steps": [
                        // ... steps array
                    ],
                    "travelAdvisory": {
                        "speedReadingIntervals": [
                            // ... speedReadingIntervals array
                        ]
                    },
                },
                {
                    "distanceMeters": 18358,
                    "duration": "1700s",
                    "staticDuration": "1331s",
                    "polyline": {
                        some_polylines"
                    },
                    "startLocation": {
                        "latLng": {
                            "latitude": 1.3327525,
                            "longitude": 103.7437052
                        }
                    },
                    "endLocation": {
                        "latLng": {
                            "latitude": 1.2842133,
                            "longitude": 103.8604276
                        }
                    },
                    "steps": [
                        // ... steps array
                    ],
                    "travelAdvisory": {
                        "speedReadingIntervals": [
                            // ... speedReadingIntervals aray
                        ]
                    }
                },
                {
                    "distanceMeters": 19497,
                    "duration": "1204s",
                    "staticDuration": "1125s",
                    "polyline": {
                        "another polyline"
                    },
                    "startLocation": {
                        "latLng": {
                            "latitude": 1.2842133,
                            "longitude": 103.8604276
                        }
                    },
                    "endLocation": {
                        "latLng": {
                            "latitude": 1.3609805,
                            "longitude": 103.99002589999999
                        }
                    },
                    "steps": [
                        // ... steps array
                    ],
                    "travelAdvisory": {
                        "speedReadingIntervals": [
                            // ... speedReadingIntervals array
                        ]
                    },
                }
            ],
            "distanceMeters": 51565,
            "duration": "4227s",
            "staticDuration": "3705s",
            "polyline": {
                "encodedPolyline": "yet_another polyline"
            },
            "description": "PIE",
            "warnings": [
                "This route includes a highway.",
                "This route has tolls."
            ],
            "viewport": {
                "low": {
                    "latitude": 1.2705161999999999,
                    "longitude": 103.7423905
                },
                "high": {
                    "latitude": 1.3613139,
                    "longitude": 103.99001758752786
                }
            },
            "travelAdvisory": {
                "speedReadingIntervals": [
                    ... // speedReadingIntervals array
                ]
            },
            "optimizedIntermediateWaypointIndex": [
                1,
                0
            ],
            "routeToken": "a_route_token",
            "routeLabels": [
                "DEFAULT_ROUTE"
            ],
            "polylineDetails": {}
        }
    ]
}
Using the index numbers for the two waypoints provided in the request, the service then returns the optimized order:
{
    "optimizedIntermediateWaypointIndex": [
        1,
        0
    ]
}
With the waypoint order optimized, the new route now takes 4227 sec (down from 4787 sec) and 51565 m (down from 69811 m).

Google Maps two wheeler routes
The default travel mode in the Routes API is set to "DRIVE", which optimizes routes for passenger cars. However, if you operate a quick commerce business like Swiggy or Getir, where deliveries are made using scooters and motorbikes, you should use the "TWO_WHEELER" option. This ensures that your routes and estimated arrival times (ETAs) are tailored specifically for two wheeled vehicles.
This is especially important if you operate in cities such as Bangkok, Kuala Lumpur or Jakarta, where motor cycles and scooters can weave through traffic and take shortcuts and roads specific to two wheelers.
To enable two wheeler mode, add "travelMode" : "TWO_WHEELER" to the request body:
Endpoint POST https://routes.googleapis.com/directions/v2:computeRoutes
Headers
Content-Type: application/json
X-Goog-Api-Key: YOUR_API_KEY
X-Goog-FieldMask: routes.duration,routes.distanceMeters
Request
{
    "origin": {
        "address": "Petronas Twin Towers, Kuala Lumpur, Malaysia"
    },
    "destination": {
        "address": "KL Sentral, Kuala Lumpur, Malaysia"
    },
    "travelMode": "TWO_WHEELER",
    "routingPreference": "TRAFFIC_AWARE",
    "departureTime": "2025-02-24T01:00:00Z"
}
Response
{
    "routes": [
        {
            "distanceMeters": 7098,
            "duration": "924s"
        }
    ]
}
Using "TWO WHEELER" mode, a trip from Petronas Twin Towers to KL Sentral in Kuala Lumpur takes 924 sec (15m 24s). The same trip on "DRIVE" mode take 1070 sec (17m 50).
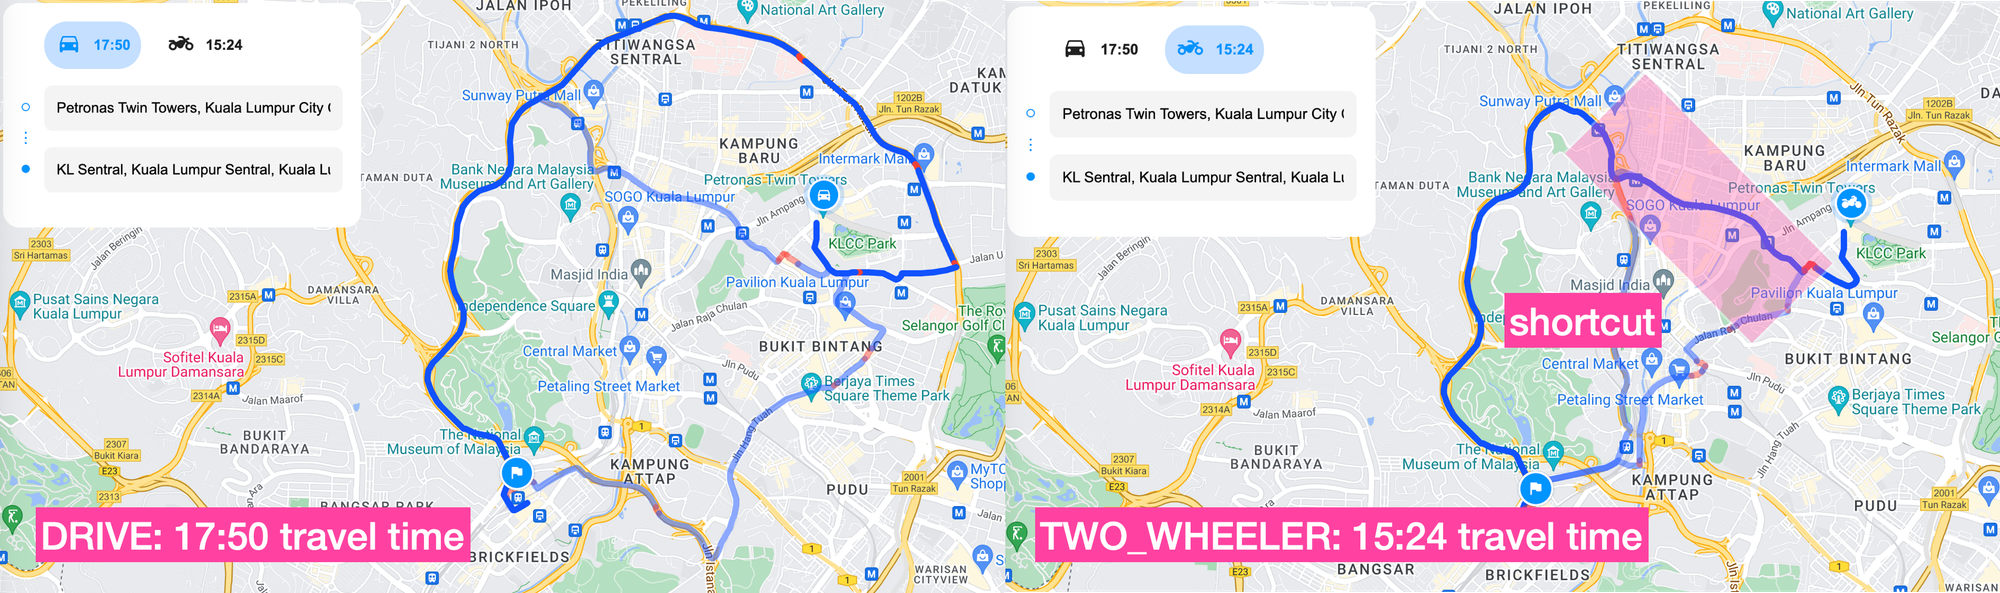
When comparing both routes, you'll notice that the "TWO_WHEELER" mode provides a significantly faster travel time. This is not only due to the higher average speeds of two-wheelers but also because, in this specific case, the Routes API prioritizes surface streets. By doing so, it avoids the long detour needed to reach the nearest highway, resulting in a more efficient route.
How to avoid tolls on Google Maps
In last-mile delivery, every cent counts. With tight or nonexistent profit margins, minimizing the cost per delivery is crucial. If you want your drivers to take the most direct route but avoid tolls, you can use the avoidTolls parameter within the routeModifiers object in your request body, like this:
{
    "routeModifiers": {
        "avoidTolls": true
    }
}
Endpoint POST https://routes.googleapis.com/directions/v2:computeRoutes
Headers
Content-Type: application/json
X-Goog-Api-Key: YOUR_API_KEY
X-Goog-FieldMask: routes.duration,routes.distanceMeters
Request
{
    "origin": {
        "address": "7 Leedon Heights, Singapore 267953"
    },
    "destination": {
        "address": "Marina Bay Sands Singapore, 10 Bayfront Ave, Singapore 018956"
    },
    "travelMode": "DRIVE",
    "routingPreference": "TRAFFIC_AWARE",
    "departureTime": "2025-02-24T00:00:00Z",
    "routeModifiers": {
        "avoidTolls": true
    }
}
Response
{
    "routes": [
        {
            "distanceMeters": 10439,
            "duration": "1683s"
        }
    ]
}
With avoidTolls enabled, the Routes API returns a route that is longer and encounters heavy traffic (28m 3s) compared to one that uses an expressway (23m 5s).
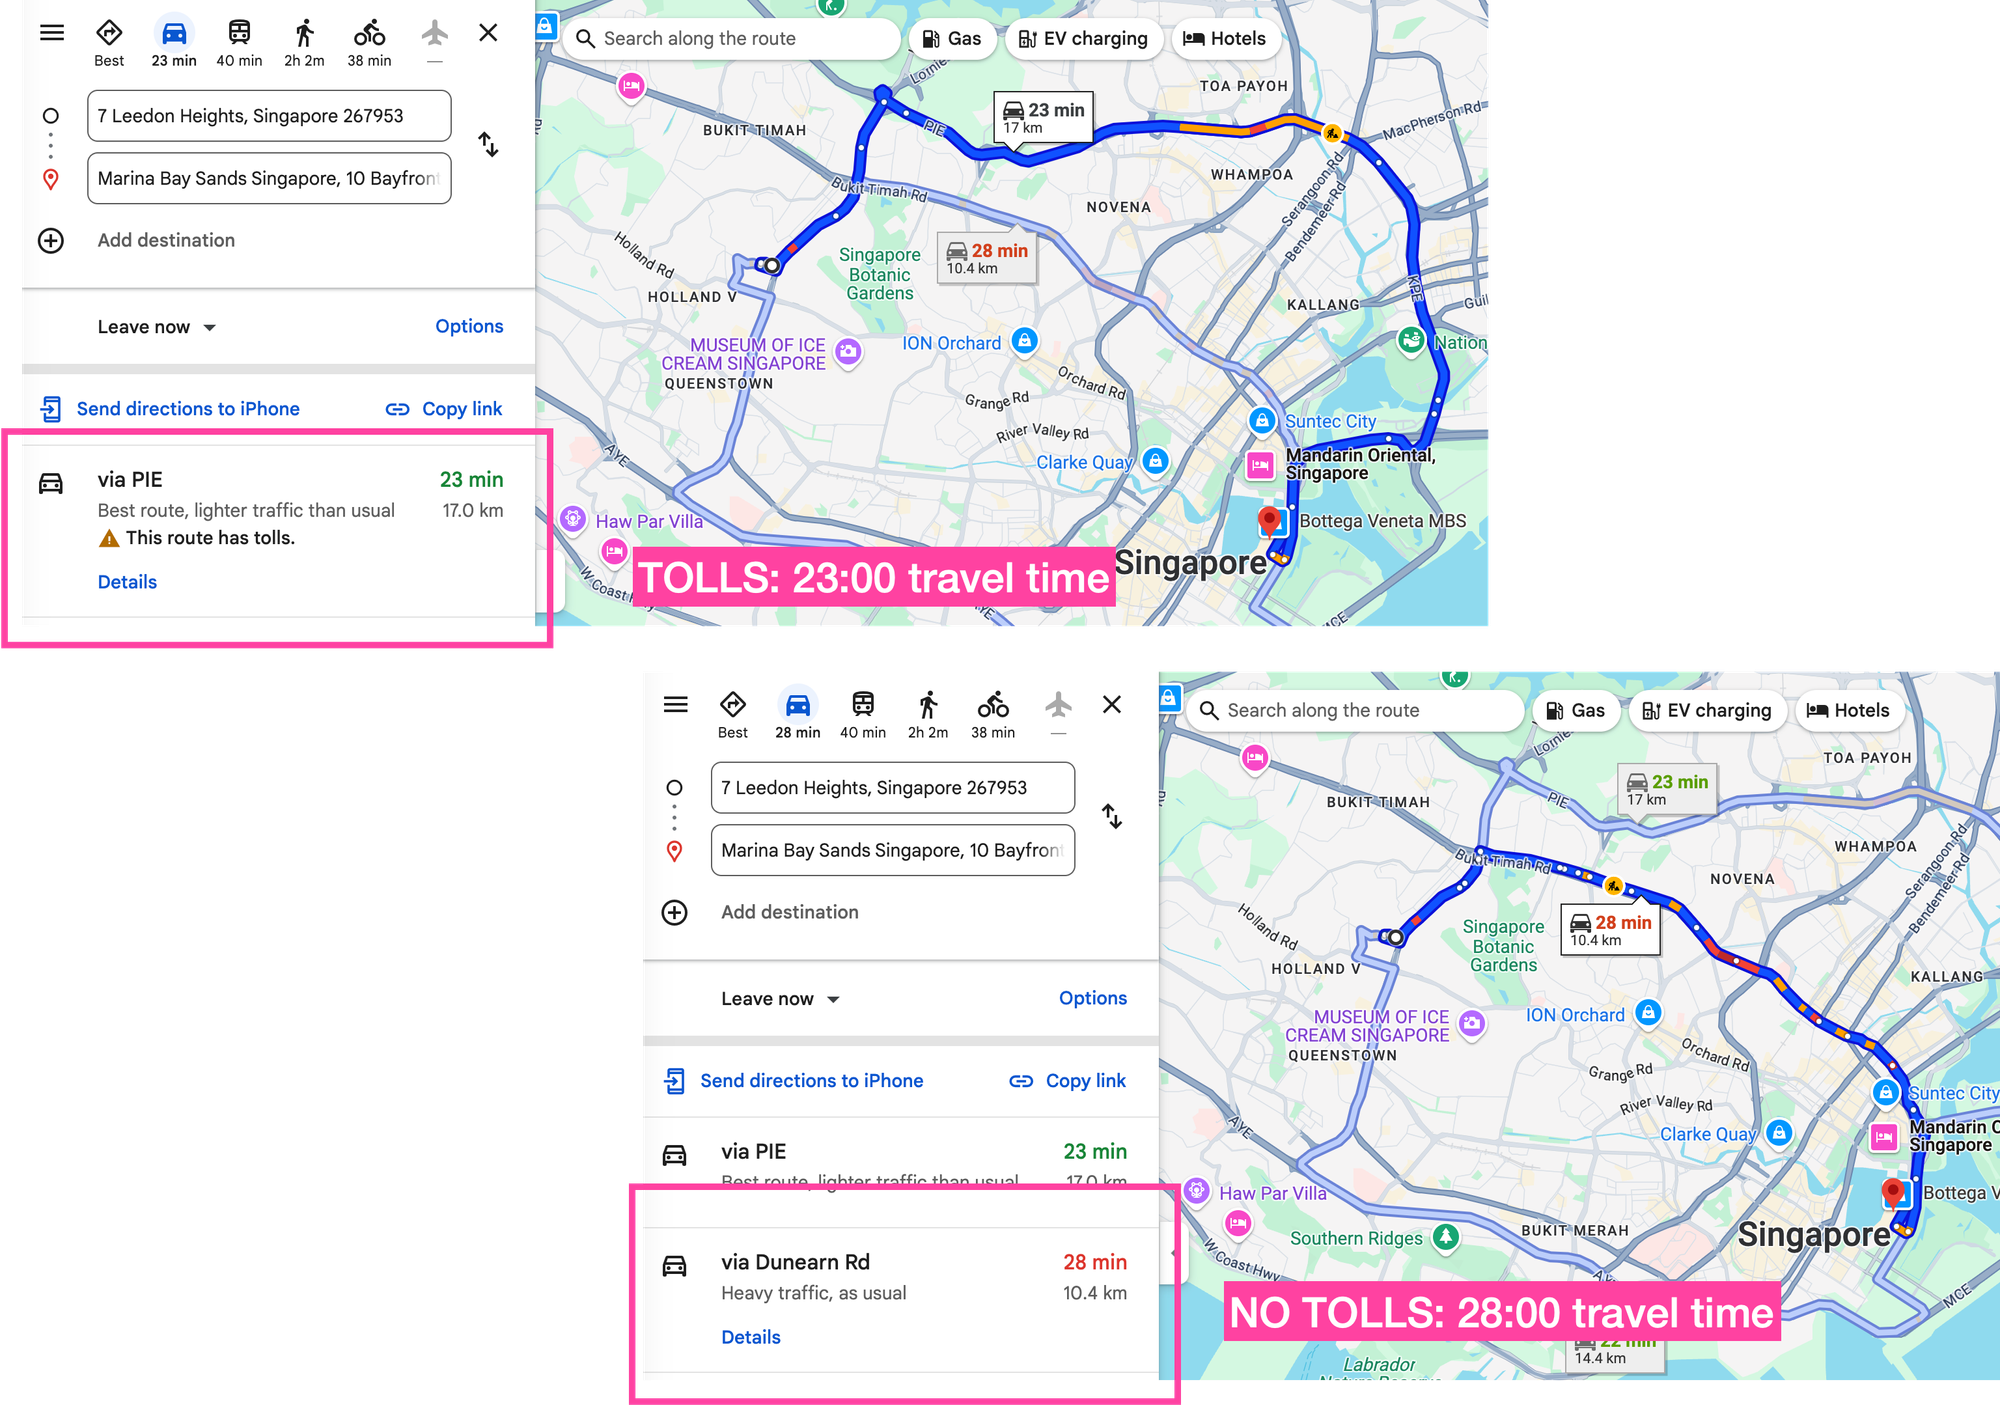
To check the estimated toll cost, add routes.travelAdvisory.tollInfo to the request field mask together with the following extraComputations and routeModifiers (this feature is only available in select cities, check coverage for TollPass).
{
    "extraComputations": [
        "TOLLS"
    ],
    "routeModifiers": {
        "tollPasses": [
            "US_MA_EZPASSMA",
            "US_WA_GOOD_TO_GO"
        ]
    }
}
Show multiple routes / alternative routes in Google Maps
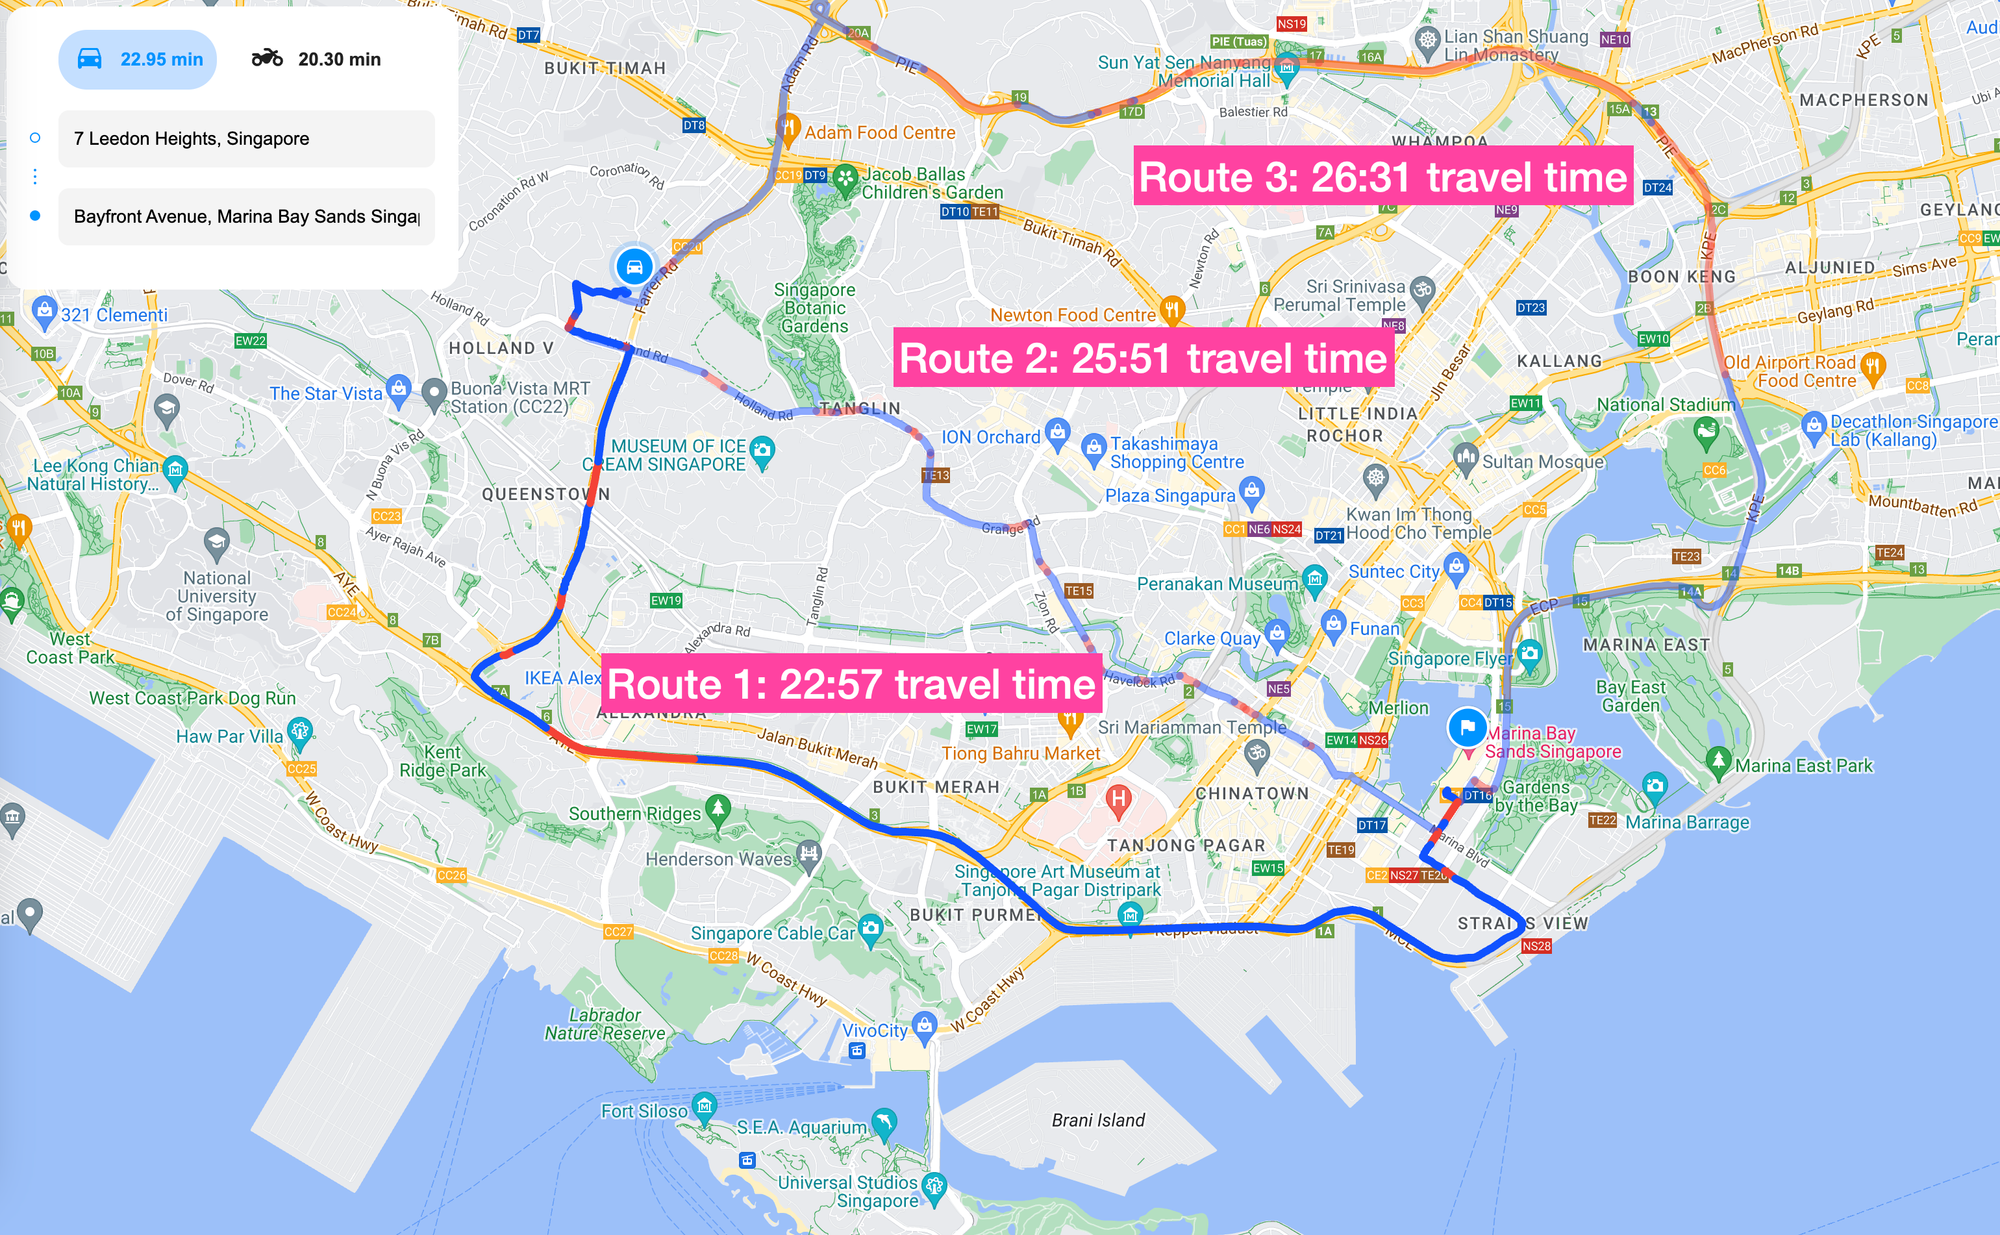
By default, the Routes API returns a single route, which is typically the fastest route from the origin to the destination. But just like in the Google Maps app, the Routes API can also return alternative routes so that your users can choose one that best fits their requirements. All you need to do is add "computeAlternativeRoutes": true to the request body:
Endpoint POST https://routes.googleapis.com/directions/v2:computeRoutes
Headers
Content-Type: application/json
X-Goog-Api-Key: YOUR_API_KEY
X-Goog-FieldMask: routes.duration,routes.distanceMeters,routes.warnings
Request
{
    "origin": {
        "address": "7 Leedon Heights, Singapore 267953"
    },
    "destination": {
        "address": "Marina Bay Sands Singapore, 10 Bayfront Ave, Singapore 018956"
    },
    "computeAlternativeRoutes": true,
    "travelMode": "DRIVE",
    "routingPreference": "TRAFFIC_AWARE",
    "departureTime": "2025-02-24T00:00:00Z"
}
Response
{
    "routes": [
        {
            "distanceMeters": 16972,
            "duration": "1377s",
            "warnings": [
                "This route has tolls.",
                "This route includes a highway."
            ]
        },
        {
            "distanceMeters": 10436,
            "duration": "1551s",
            "warnings": [
                "This route has tolls."
            ]
        },
        {
            "distanceMeters": 14351,
            "duration": "1591s",
            "warnings": [
                "This route has tolls.",
                "This route includes a highway."
            ]
        }
    ]
}
In the response, the routes array will include up to three alternative routes, along with polylines, travel distance, trip duration, and any toll or highway usage information.
Vehicle heading and side of road preference
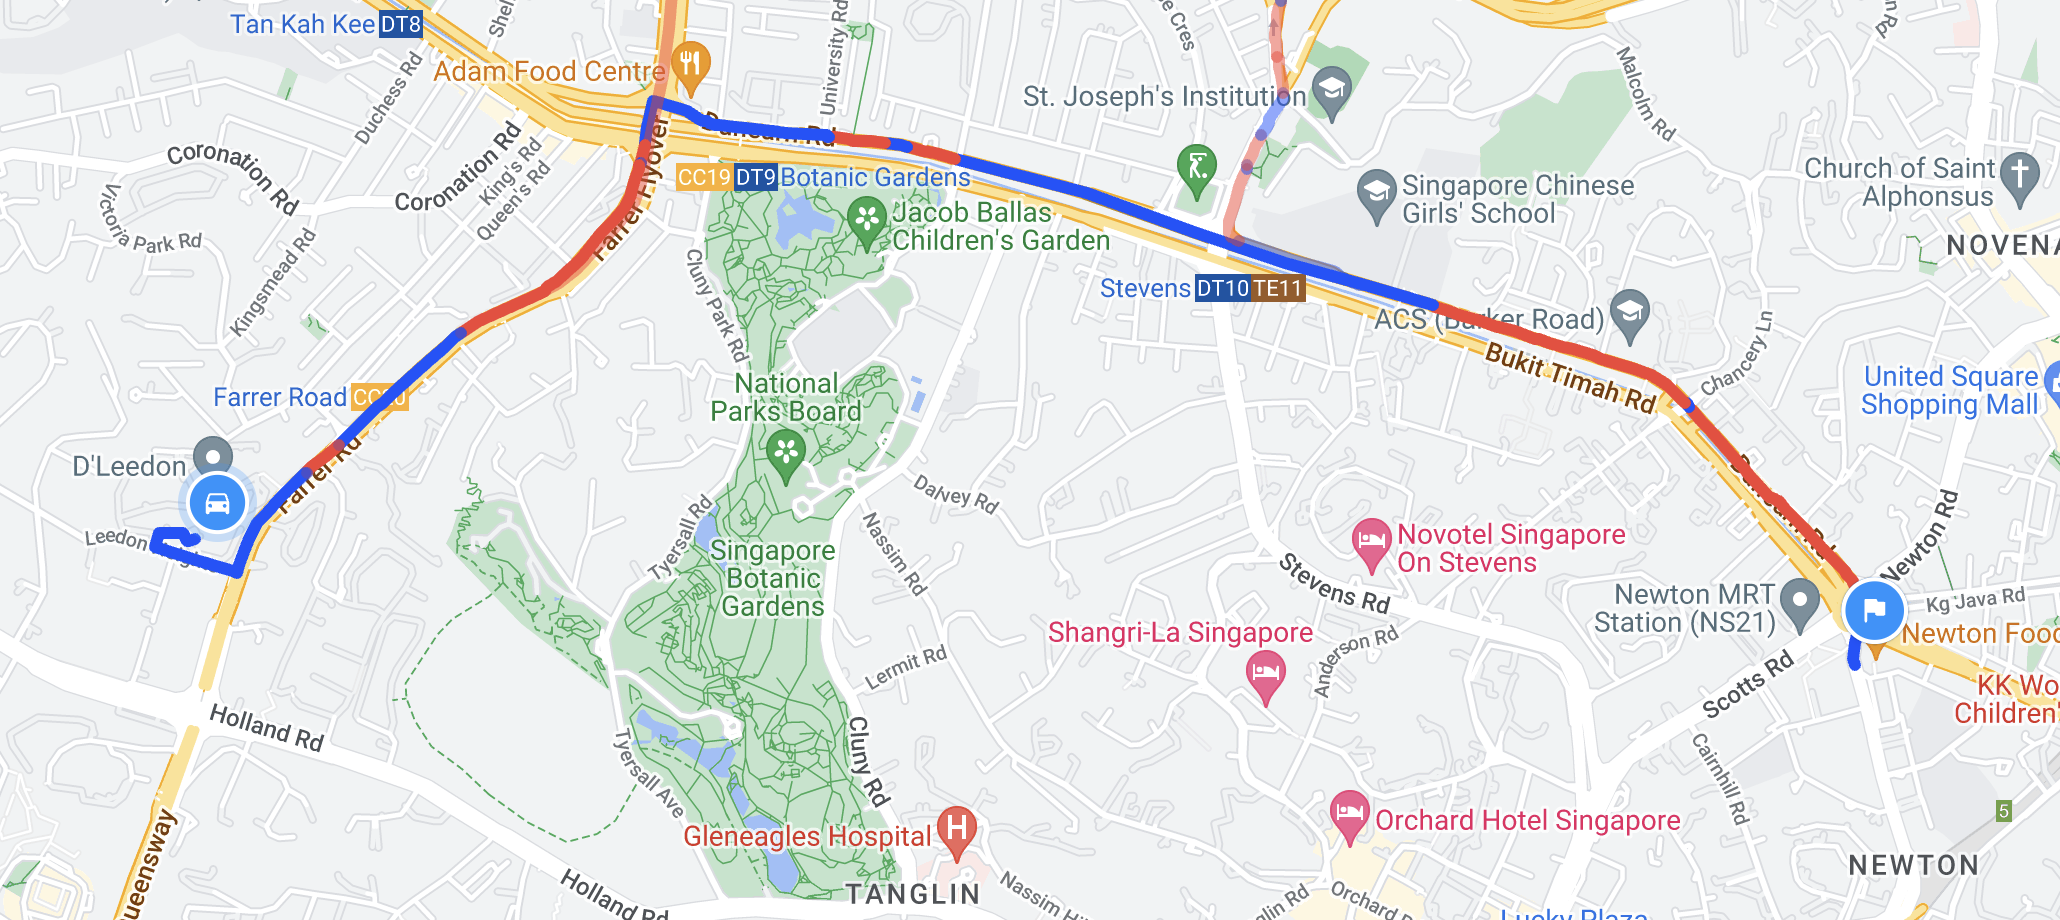
If your chosen origin is next to a two way road, the Routes API will select the fastest route to the destination. This may involve making a right or left turn across the road to optimize travel time.

In certain situations, such as when a taxi driver receives a pickup notification, making a turn across the road may be risky and unsafe, so it's best to avoid it. If you call the Routes API directly, it will return a travel time that is unrealistic because it doesn't take into account the U-turns and additional maneuvers needed to safely get to the other side of the road.
Side of road
To resolve this, add "sideOfRoad": true to the origin object in your Routes API request. This will prompt the routing engine to assume the driver will continue driving until he can safely make a U-turn or take an alternative route to reach their destination. Here's a concrete example of how vehicle headings and side of road preferences work.
Consider the route starting from Hua Yu Wee Seafood Restaurant, 462 Upper E Coast Rd, Singapore 466508 to Villa Haji Kahar, 3 Bedok Ave, Singapore 469898.
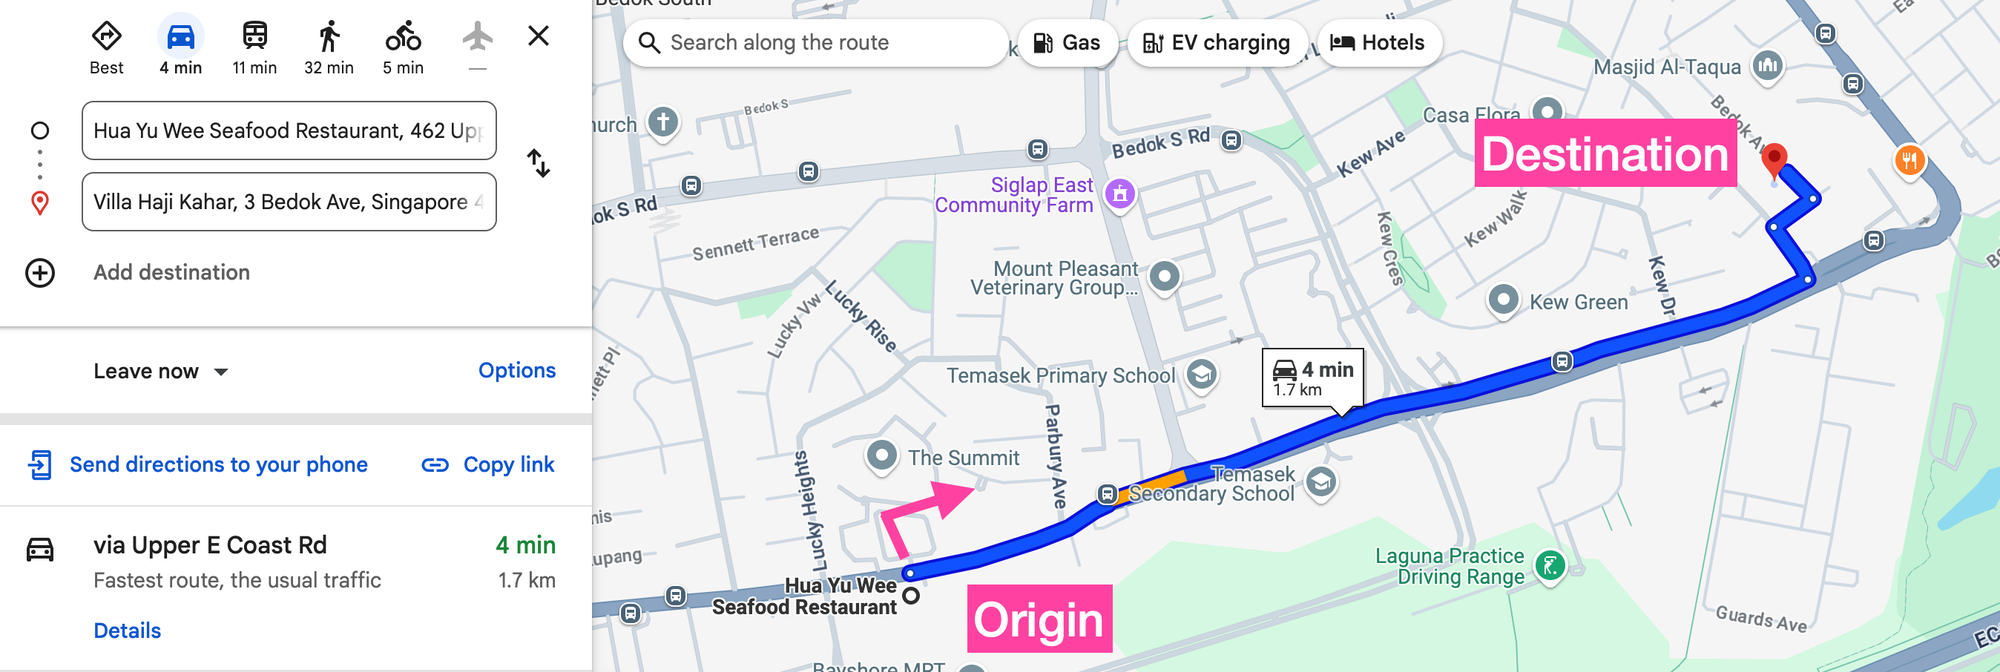
In Singapore, cars drive on the left side of the road. If you start from Hua Yu Wee, the default route from the Routes API requires a risky right turn into traffic. To get a safer and more realistic route, specify that the driver should continue on the same side of the road he is already on.
Endpoint POST https://routes.googleapis.com/directions/v2:computeRoutes
Headers
Content-Type: application/json
X-Goog-Api-Key: YOUR_API_KEY
X-Goog-FieldMask: routes.duration,routes.distanceMeters,routes.polyline
Request
{
    "origin": {
        "address": "Hua Yu Wee Seafood Restaurant, 462 Upper E Coast Rd, Singapore 466508",
        "sideOfRoad": true

    },
    "destination": {
        "address": "Villa Haji Kahar, 3 Bedok Ave, Singapore 469898"
    },
    "computeAlternativeRoutes": true,
    "travelMode": "DRIVE",
    "routingPreference": "TRAFFIC_AWARE",
    "departureTime": "2025-02-24T00:00:00Z"
}
Response
{
"routes": [
{
"distanceMeters": 2506,
"duration": "494s",
"polyline": {
"encodedPolyline": "az_GcalyRb@lFoKfA[ASO}@}B]eAa@m@{@cACK?wEj@CNGVs@LiAPIjAG~FQ`@EESy@wAGSIIa@wAg@aCYiBoBeHq@mCk@_FaBiIWcAu@gEKm@]mBUw@iA}Cg@NkBlAoAkBiAfA"
}
}
]
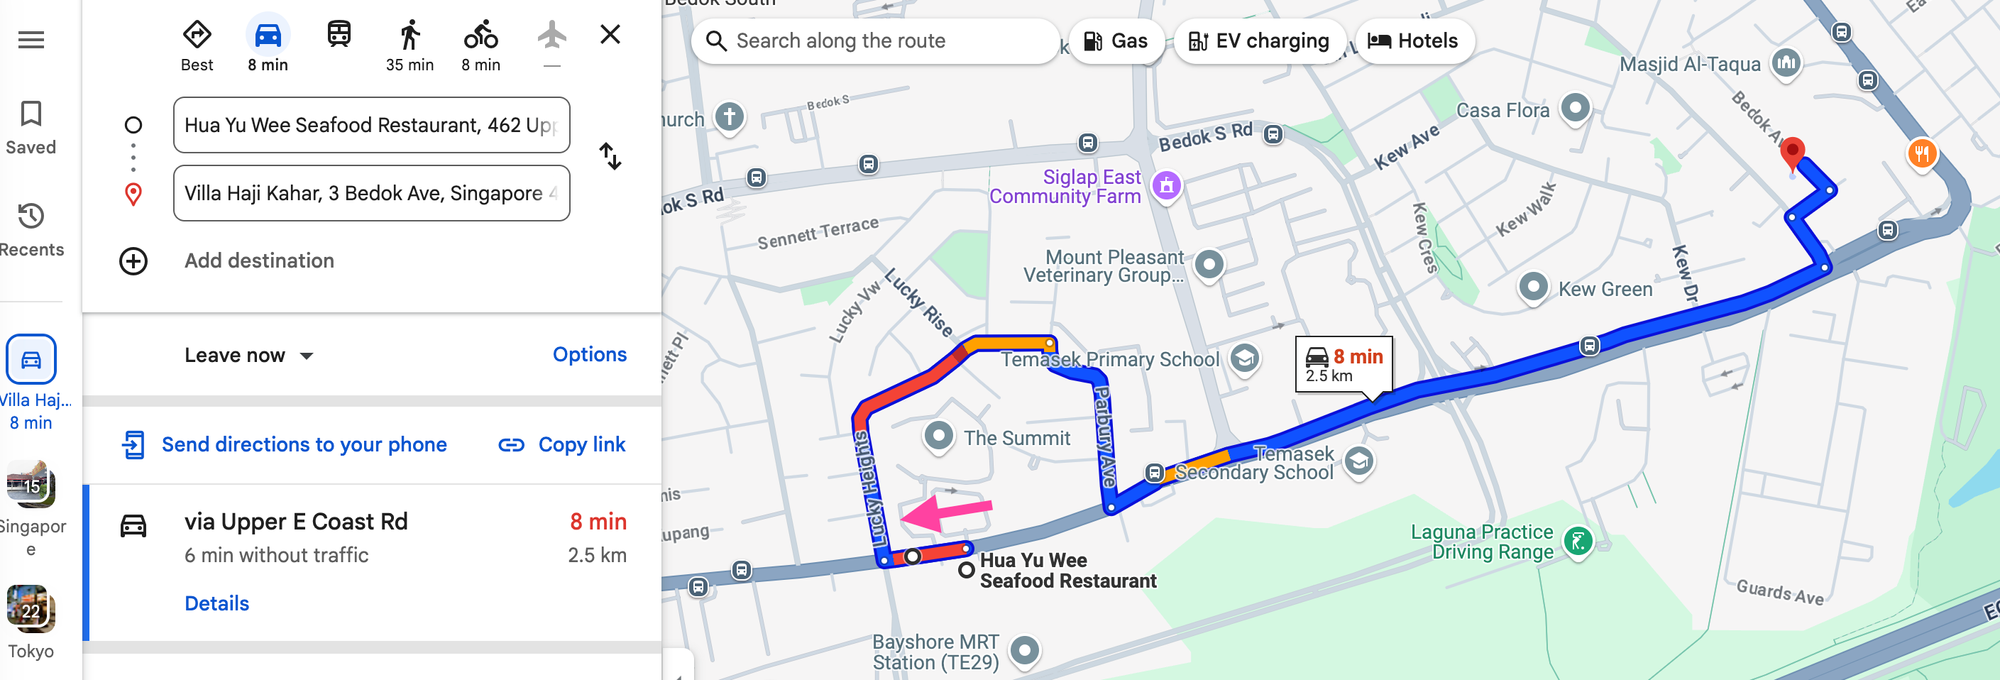
}With sideOfRoad set to true, the new route (which involves a small detour) takes 8m 14s compared to the 4m 27s for the default route provided by the Routes API.
Vehicle heading
Alternatively, if you know the driver’s heading, for example, by retrieving it from the location listener in the Google Navigation SDK or by calculating it from stored GPS traces using the Compute Heading method in the Google Geometry library - you can include the heading field in the origin object to achieve a similar result.
This is especially useful when using the driver's real-time GPS location as the origin, as it may not always align with the correct side of the road they are driving on.
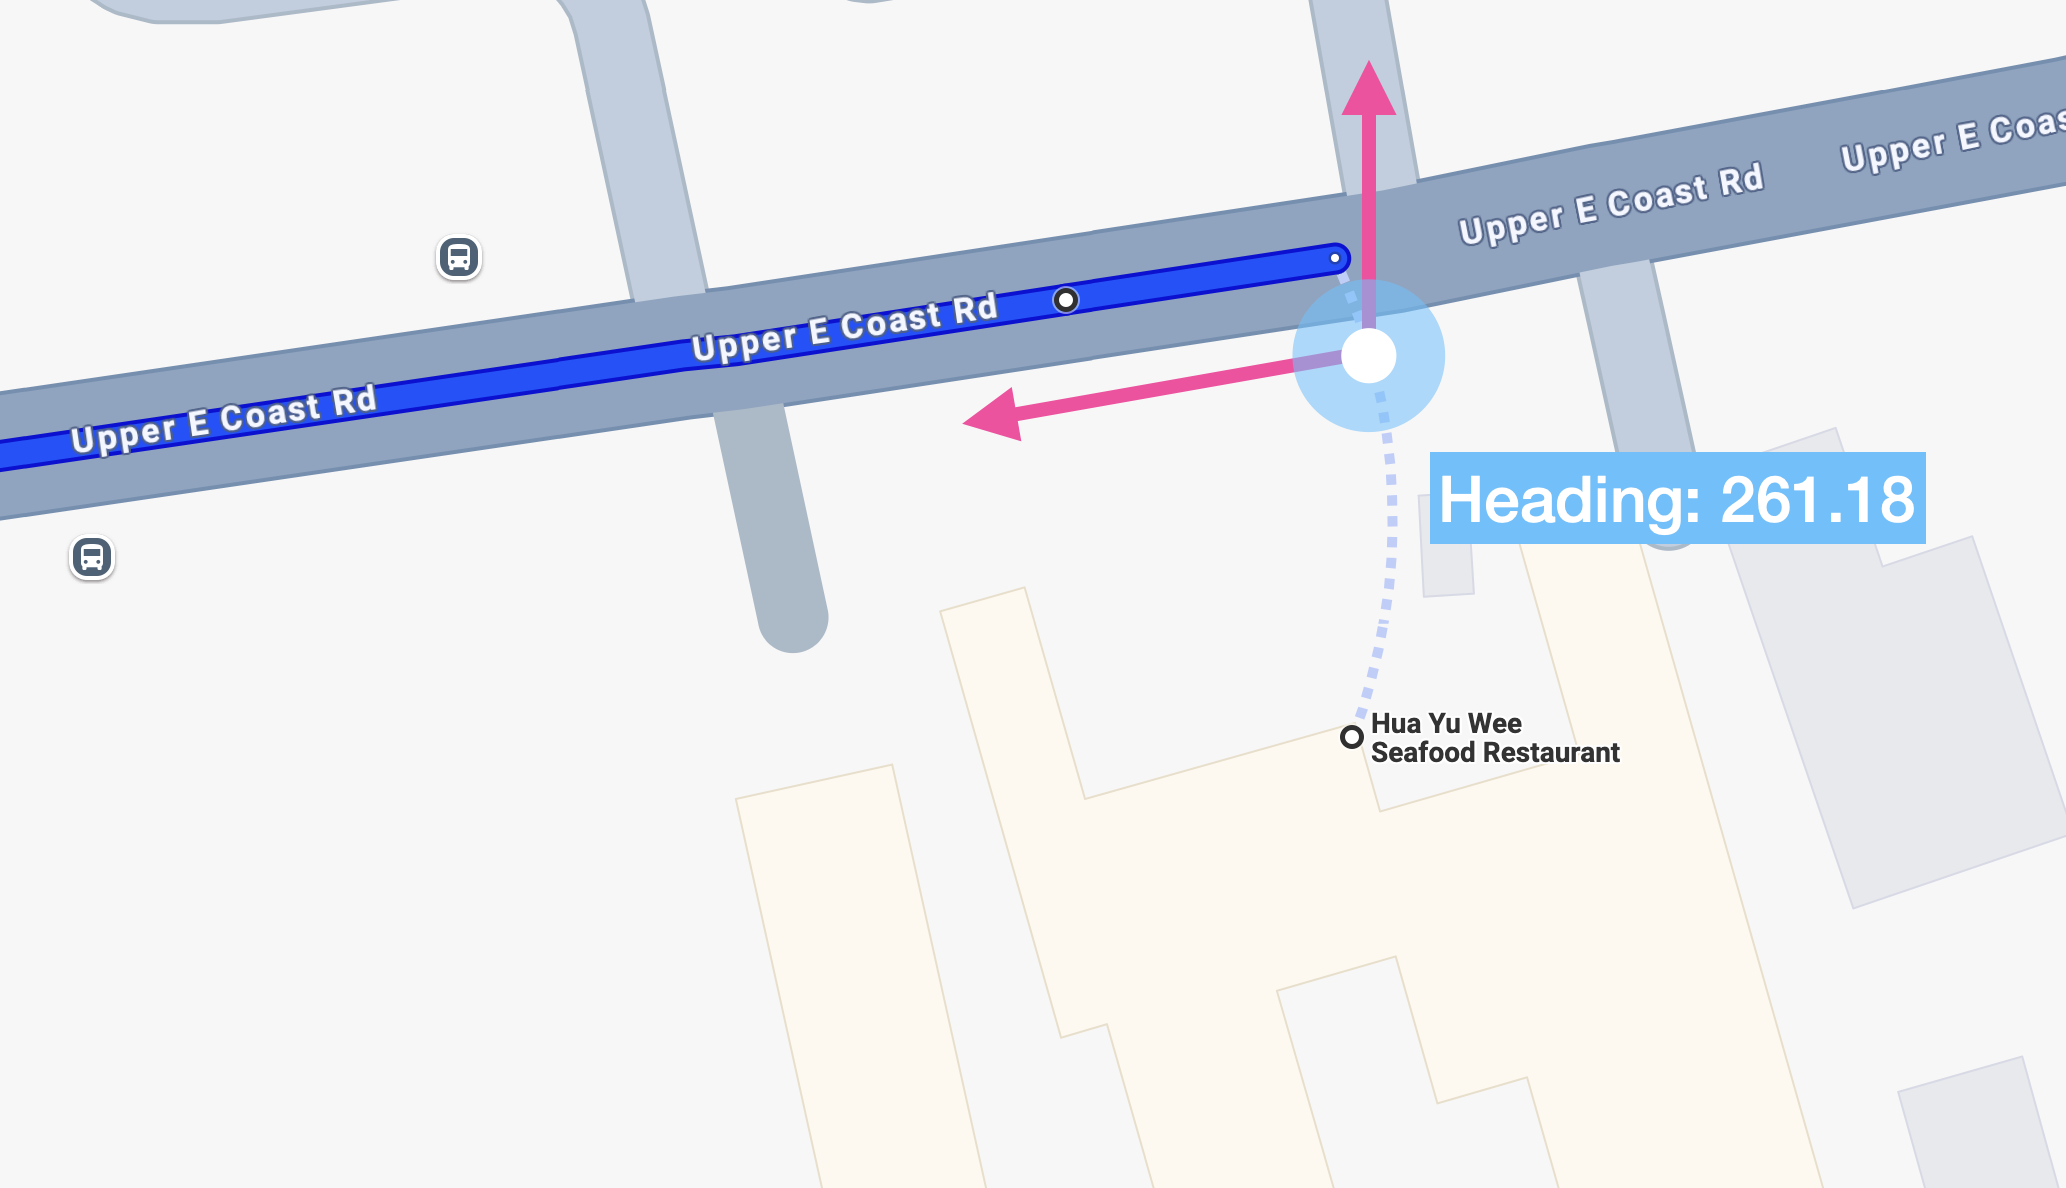
Heading values are whole numbers that align with the compass directions, and therefore range from zero to 359. For example, a value of 0 indicates a heading direction of due North. In the example above, the heading of a vehicle driving on the left side of the road and picking someone ip from Hua Yu Wee restaurant is approximately 261.18.
{
    "origin": {
        "location": {
            "latLng": {
                "latitude": 1.315003,
                "longitude": 103.941463
            },
            "heading": 261
        }
    },
    ...
}
Get a route token
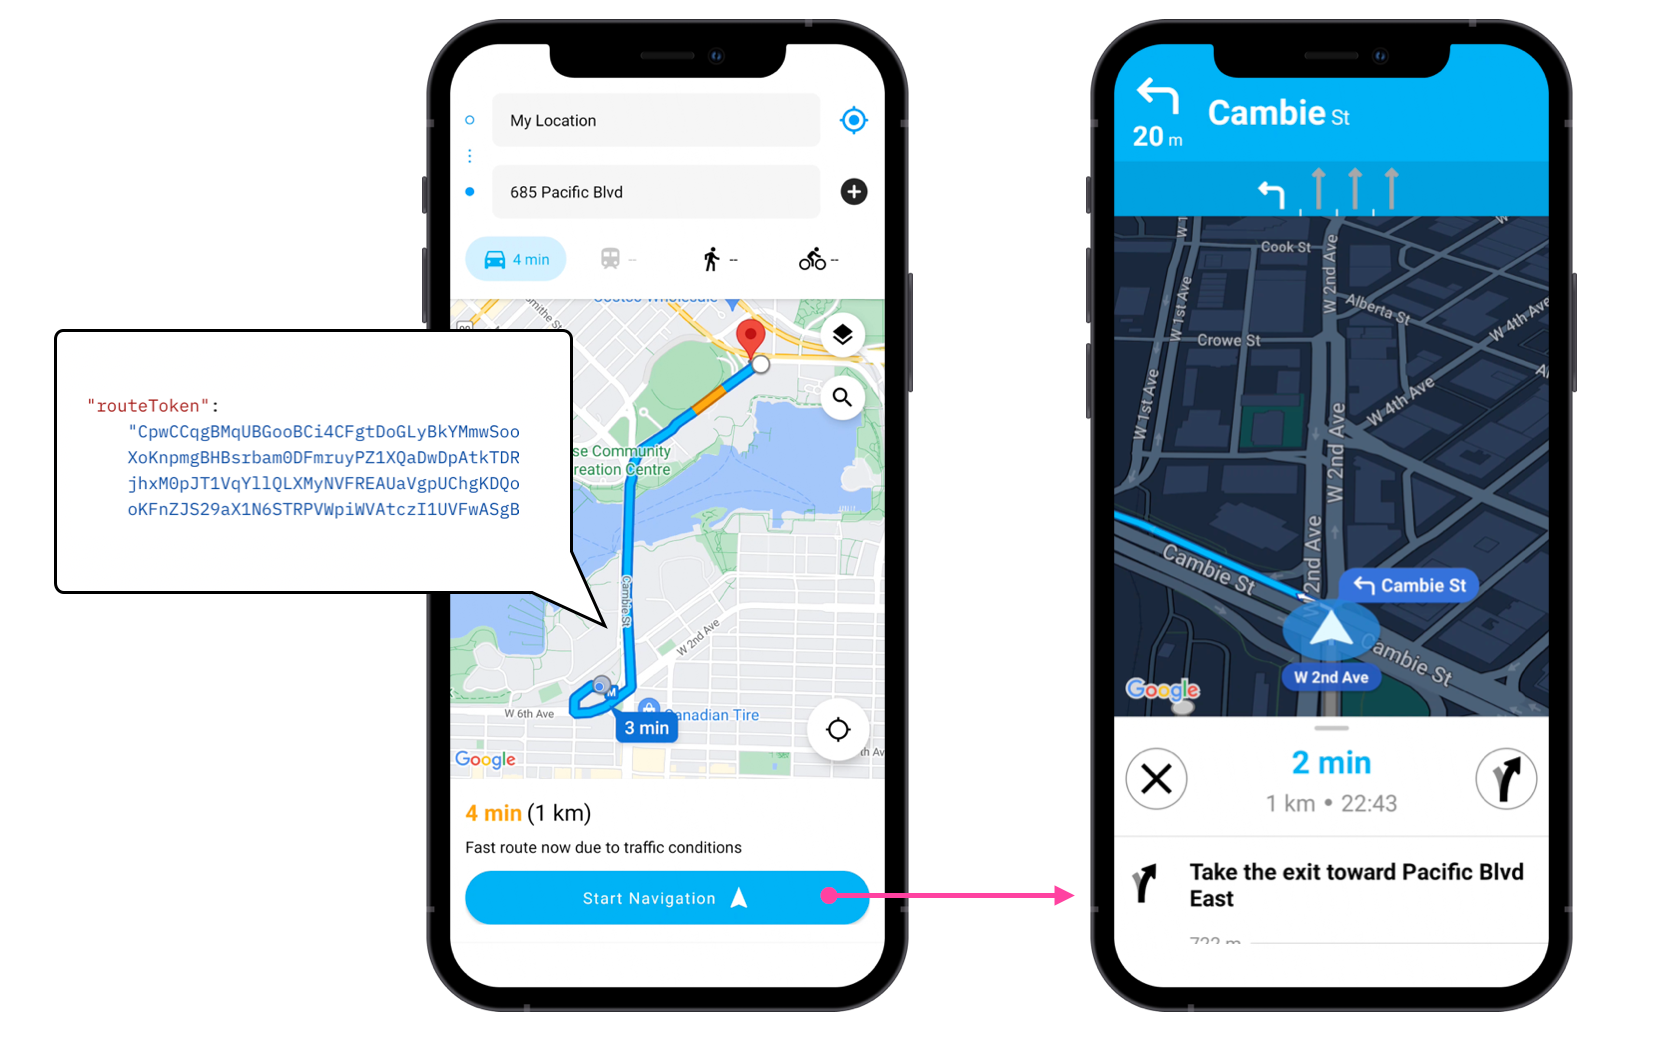
The Routes API plays well with other Google Maps APIs. For example, you can use it to generate a route token that can be passed on to the Google Navigation SDK for in-app turn by turn navigation. This encrypted route token includes both the route polyline and objectives.
To get the Routes API to return a route token:
- Set
travelModeto "DRIVE", - Set
routingPreferenceto "TRAFFIC_AWARE" , - Specify the
routes.routeTokenfield mask
Endpoint POST https://routes.googleapis.com/directions/v2:computeRoutes
Headers
Content-Type: application/json
X-Goog-Api-Key: YOUR_API_KEY
X-Goog-FieldMask: routes.routeToken
Request
{
    "origin": {
        "address": "7 Leedon Heights, Singapore 267953"
    },
    "destination": {
        "address": "Marina Bay Sands Singapore, 10 Bayfront Ave, Singapore 018956"
    },
    "computeAlternativeRoutes": true,
    "travelMode": "DRIVE",
    "routingPreference": "TRAFFIC_AWARE",
    "departureTime": "2025-02-24T00:00:00Z"
}
Response
{
    "routes": [
        {
            "routeToken": "CrsCCsYBMsMBGqgBCjMCFg5VIHzyBkYMyyDoxO4BupvyBrmKswimAaqCI9HwI8awgQTJwFns2ecBjWGWYoy9AgASNLxgT3G8NgpsHPKF6m0sNRfhAk6wZGpTqZ68pfO2ElrN05jTYWHVqTAgFb69oOxpRefYWrAaFAAbtAKABgACJUGGBgIBA_____8PKg1SX3cOAAAICgYKABV3MgEGPaaqBz9FUIKYPUiekcyEo5TgodkBIhZxeGlzWl9GTDFyM0wxZ19hazgtaEN3EAUaVwpVChgKDQoCCAERAAAAAACAZkARppvEIBCEt0ASGggAEAMQBhATEBIYAkIMCgYQgO3uvQYaAggFIhsKF3FoaXNaN3pMUE5hOXk5WVAycFBQb1FzcAEoASIVANIYyLeEYHP-97XdsVZCQt-xVdHt"
        }
    ]
}
You can then pass the route token to the Navigation SDK using the Navigator.setDestinations() method like so:
/*** MainActivity.kt ***/
CustomRoutesOptions customRoutesOptions =
      CustomRoutesOptions.builder()
      .setRouteToken(routeToken)
      .setTravelMode(TravelMode.DRIVING)
      .build();

ListenableResultFuture<RouteStatus> routeStatusFuture =
        navigator.setDestinations(destinations, customRoutesOptions, displayOptions);
Routes API alternatives
There are three main alternatives to the Routes API. The Google Directions API, the OSRM Route API, and competing navigation and location based services such as MapBox, HERE Maps and TomTom.
Google Directions API The Google Directions API is the OG point to point routing API. It's less expensive (pricing starts at $5 CPM) but does not include traffic on polylines, toll information or two wheeler routes. It's also going to be discontinued in Q2 2025, and will not be eligible for volume discounts and bulk pricing.
OSRM Route API The Open Source Routing Machine (OSRM) Route API uses user contributed OpenStreetMap data to offer a free alternative to the Google Maps Routes API. Its main drawback is that it does not account for real time traffic, which can lead to inaccurate ETAs and travel times. It also requires some engineering expertise to install and set up correctly.
MapBox, HERE Maps and TomTom MapBox, HERE Maps and TomTom are geospatial technology and mapping companies that primarily serve governments, auto manufacturers, and large enterprises. Their APIs are generally more affordable than Google Maps but can be more complex to use. HERE Maps and TomTom stand out for their built in truck routing features, making them a strong choice for companies operating large delivery trucks or heavy vehicles.
Using the Routes API to build a traffic aware navigation app
In this final section, we'll create a traffic aware navigation app. The app will allow users to select a start and end location and will retrieve one or more routes for both cars and two wheelers using the Routes API. The app will also show real time traffic conditions using color coded polylines, making it easy to see traffic conditions along the route.
How our code is structured
routes_api_demo is a single page react app built on three main components:
<SearchBox/>, a container for the<PlaceAutocompleteInput/>input fields where we'll enter the origin and destination for our route,<Map/>, which renders and manages a Google Map instance for us to draw traffic aware route polylines on.- The Redux state management library.
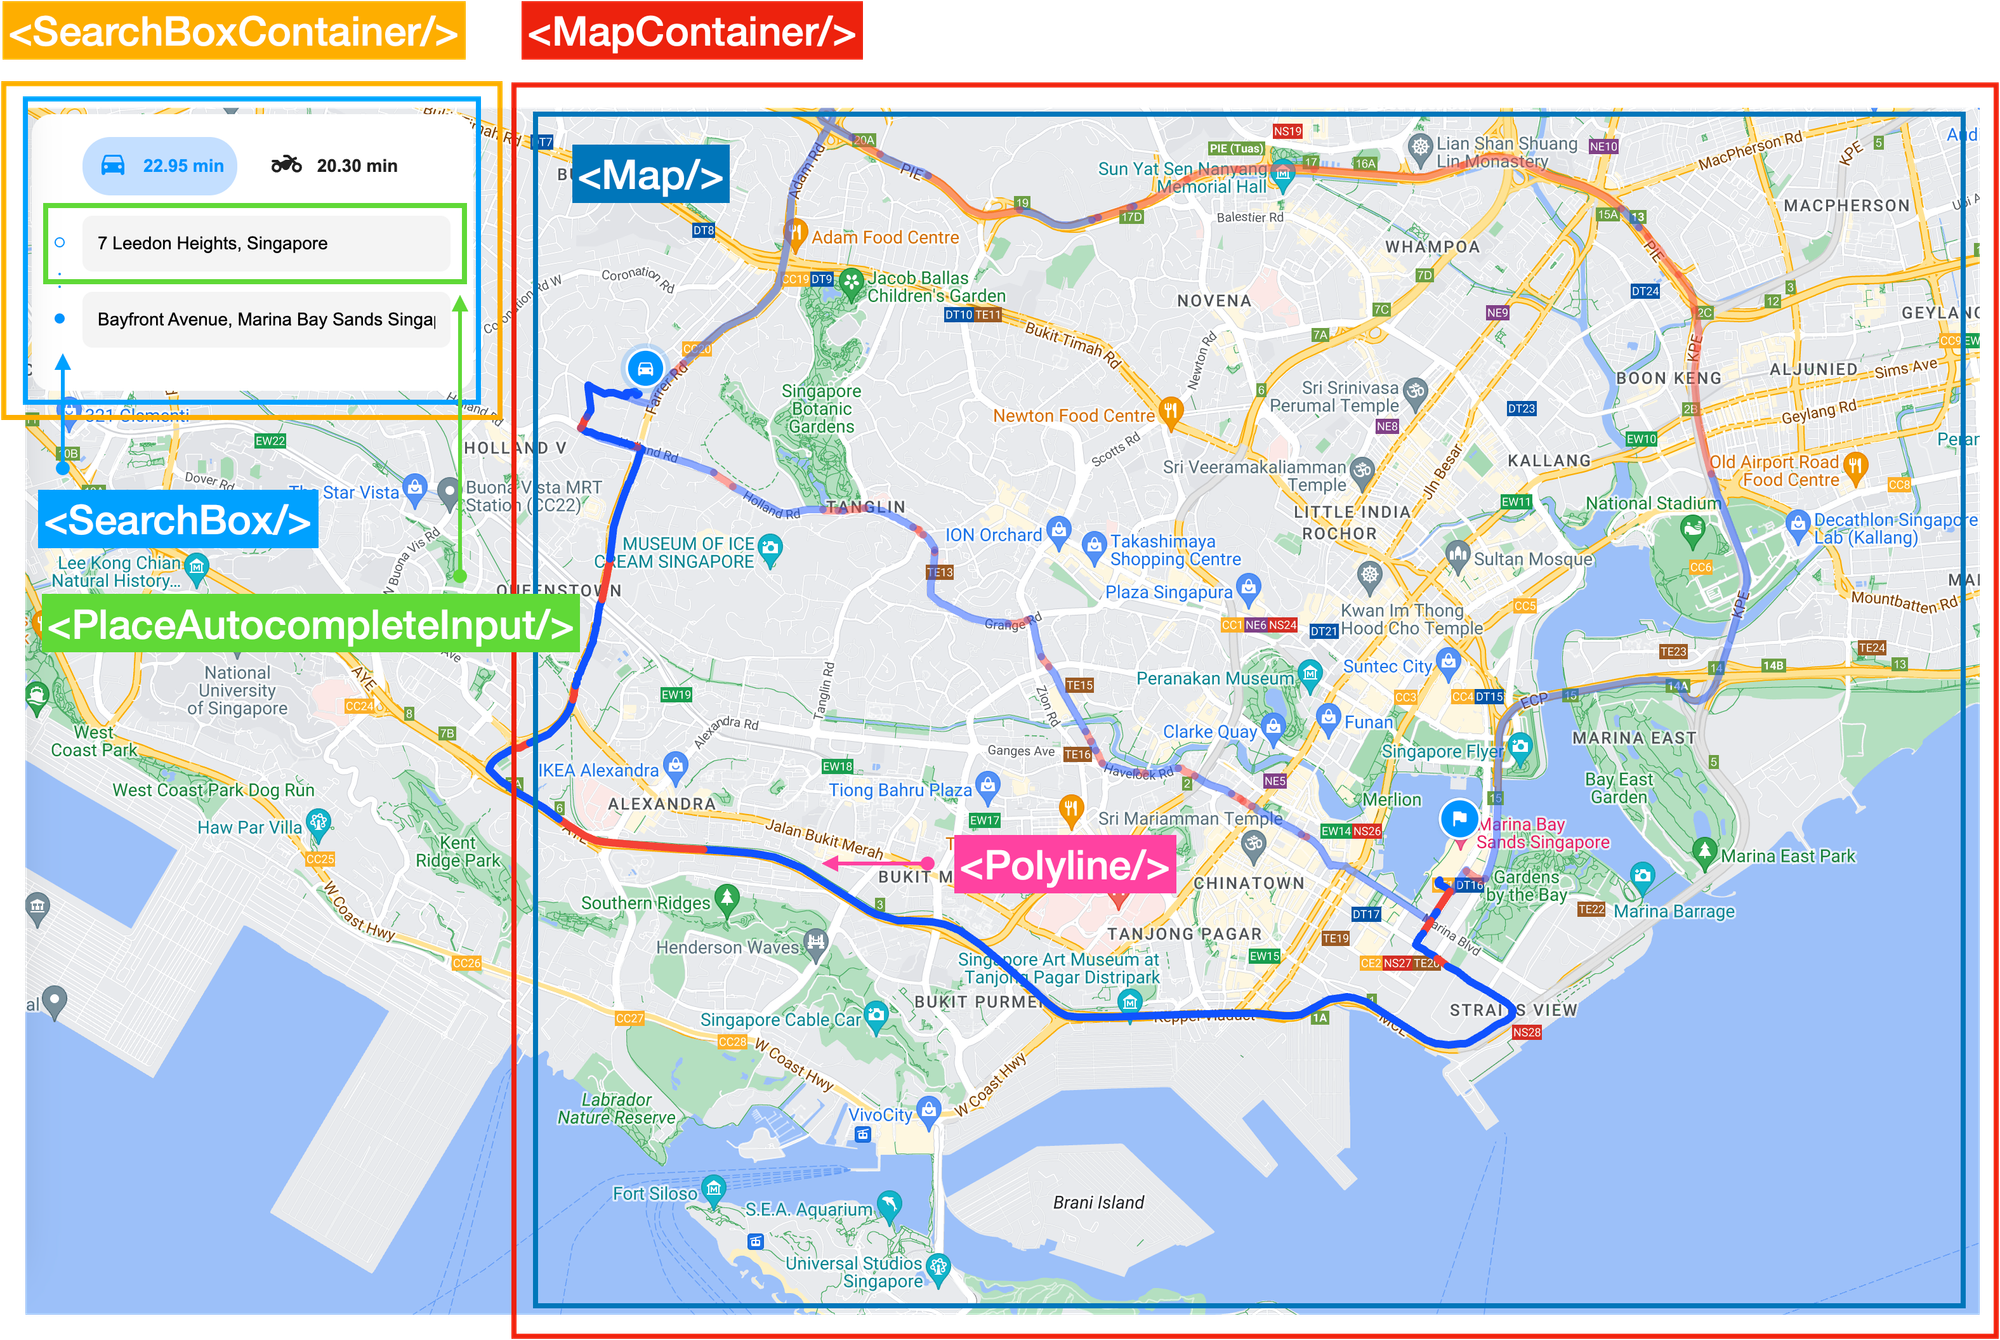
Like our other tutorials, we'll be using @vis.gl/react-google-maps to quickly set up our app. This library simplifies integrating Google Maps into a React app by offering prebuilt components that make it easy to handle map interactions and UI in a React-friendly way. The <Map/>, <AdvancedMarker/>, <Polyline/> and <InfoWindow/> components are all examples of this. You can find the complete source code and installation instructions for running the app locally in our GitHub repository.
App.jsx
App.jsx functions as the primary entry point to our app. It features a streamlined, map-focused interface with a search box (<SearchBoxContainer/>) on the left, where users can enter their origin and destination to plan a route. The Google Maps base map (<MapContainer/>) serves as the background on which the route polyline is displayed.
/*** App.jsx ***/
import React from 'react';
import { APIProvider } from '@vis.gl/react-google-maps';
import MapContainer from './containers/MapContainer';
import SearchBoxContainer from './containers/SearchBoxContainer';

import './App.scss';

const App = () => {
  return (
    <div className="App">
      <APIProvider apiKey={process.env.REACT_APP_GOOGLE_API_KEY}>
        <div className="control-pannel">
          <SearchBoxContainer />
        </div>
        <MapContainer />
      </APIProvider>
    </div>
  );
};

export default App;
The <APIProvider/> wrapper component supplies the Google Maps API context to it's <MapContainer/> child component. This setup allows <MapContainer/> to access the Google Maps API using the REACT_APP_GOOGLE_API_KEY.
SearchBoxContainer.jsx
SearchBoxContainer.jsx is a container component that takes care of state management for its child, <SearchBox/>. It also handles API calls to the Google Routes API, fetching route data when a valid origin and destination are provided.
When the user selects a new origin or destination in the address autocomplete search box (or chooses a different travel mode), the useEffect hook is triggered. This hook then calls the getDirections() method from /services/google.js, which subsequently makes an API request to the Routes API to get the best route.
/*** SearchBoxContainer.jsx ***/
import { getDirections } from '../services/google';

useEffect(() => {
    const fetchDirections = async () => {
      if (origin && destination && Object.keys(origin).length && Object.keys(destination).length) {
        try {
          console.log('Fetching directions:', { origin, destination });
          const newRoutes = {};
          for (const mode of TRAVEL_MODES) {
            const res = await getDirections({
              origin: { address: origin.formattedAddress },
              destination: { address: destination.formattedAddress },
              travelMode: mode,
              routingPreference: 'traffic_aware',
              extraComputations: ['TRAFFIC_ON_POLYLINE'],
            });
            newRoutes[mode] = res?.routes || [];
          }
          dispatch(setData({ routes: newRoutes }));
        } catch (error) {
          console.error('Failed to fetch directions:', error);
          dispatch(setData({ routes: [], error: 'Failed to fetch directions' }));
        }
      }
    };
Google.js
services/google.js fetches data from the Routes API. When the getDirections() method is called, we use the axios.post() method to make an HTTP POST request to the Compute Routes endpoint of the Google Routes API: https://routes.googleapis.com/directions/v2:computeRoutes. The request is built incrementally.
First the headers (x-goog-api-key, x-goog-fieldmask) followed by the body ( {origin, destination, travelMode, routingPreference, extracomputations, polylineQuality, computeAlternativeRoutes}), wrapped in a axios.post() call.
/*** google.js ***/
import axios from 'axios';

const DIRECTION_API_URL = 'https://routes.googleapis.com/directions/v2:computeRoutes';
const API_KEY = process.env.REACT_APP_GOOGLE_API_KEY;

const getHeaders = () => ({
  'x-goog-api-key': API_KEY,
  'x-goog-fieldmask': '*',
});

const buildRequestBody = (body) => ({
  ...body,
  polylineQuality: 'high_quality',
  computeAlternativeRoutes: true,
});

const getDirections = async (body) => {
  try {
    const response = await axios.post(DIRECTION_API_URL, buildRequestBody(body), {
      headers: getHeaders(),
    });
    return response.data;
  } catch (error) {
    console.error('Error fetching directions:', error);
    throw error;
  }
};

export { getDirections };
The response payload is dispatched to Redux and used to update the global state in SearchBoxContainer.jsx.
SearchBox.jsx
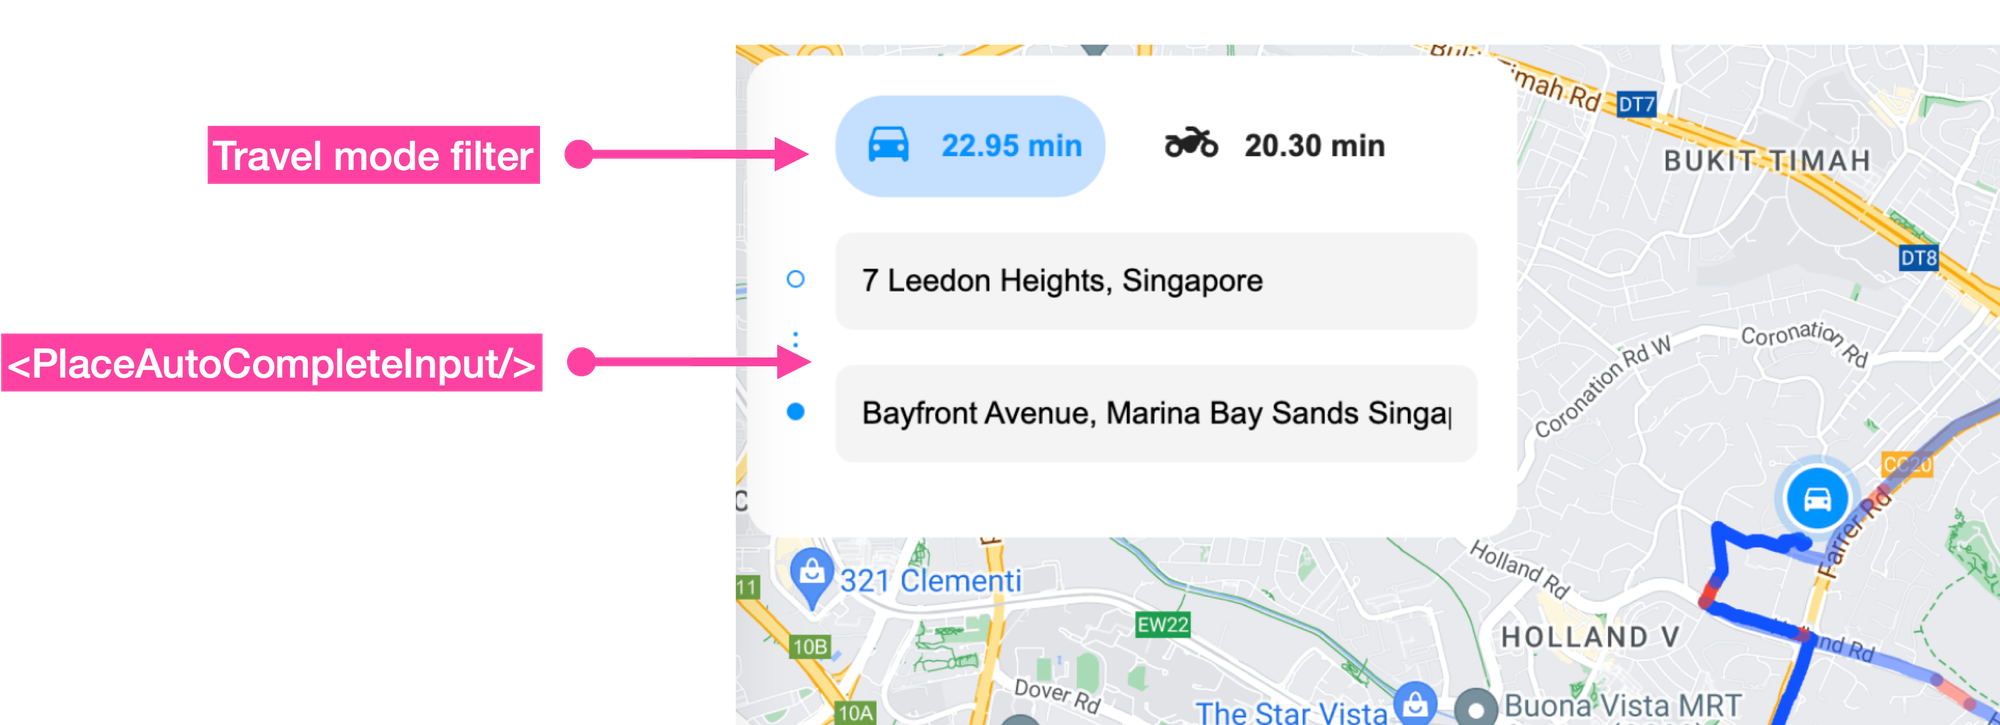
SearchBox.jsx is a presentational component that wraps both <PlaceAutocompleteInput/> and the travel mode selections buttons. When a user selects a new address or switches travel mode, this information is passed to the parent <SearchBoxContainer/> via the onOriginAddressChange, onDestinationAddressChange and onTravelModeChange props.
/*** SearchBox.jsx ***/
import React from 'react';
import PlaceAutocompleteInput from './PlaceAutocompleteInput';
import { TRAVEL_MODES } from '../constants';
import { formatDuration } from '../services/time';
import Image from '../images';

import './SearchBox.scss';

const SearchBox = ({ routes, travelMode, onTravelModeChange, onOriginAddressChange, onDestinationAddressChange }) => {
  return (
    <div className="search-box">
      <div className="travel-mode-filter-btns">
        {TRAVEL_MODES.map((mode) => {
          const duration = formatDuration(routes[mode]?.[0]?.duration);
          return (
            <button key={mode} className={travelMode === mode ? 'active' : ''} onClick={() => onTravelModeChange(mode)}>
              <Image type={mode} />
              {duration && <span>{duration}</span>}
            </button>
          );
        })}
      </div>
      <div className="input-address-group">
        <Image type="ThreeDot" />
        <PlaceAutocompleteInput onPlaceSelect={onOriginAddressChange} />
        <PlaceAutocompleteInput onPlaceSelect={onDestinationAddressChange} />
      </div>
    </div>
  );
};

export default SearchBox;
PlaceAutocompleteInput.jsx
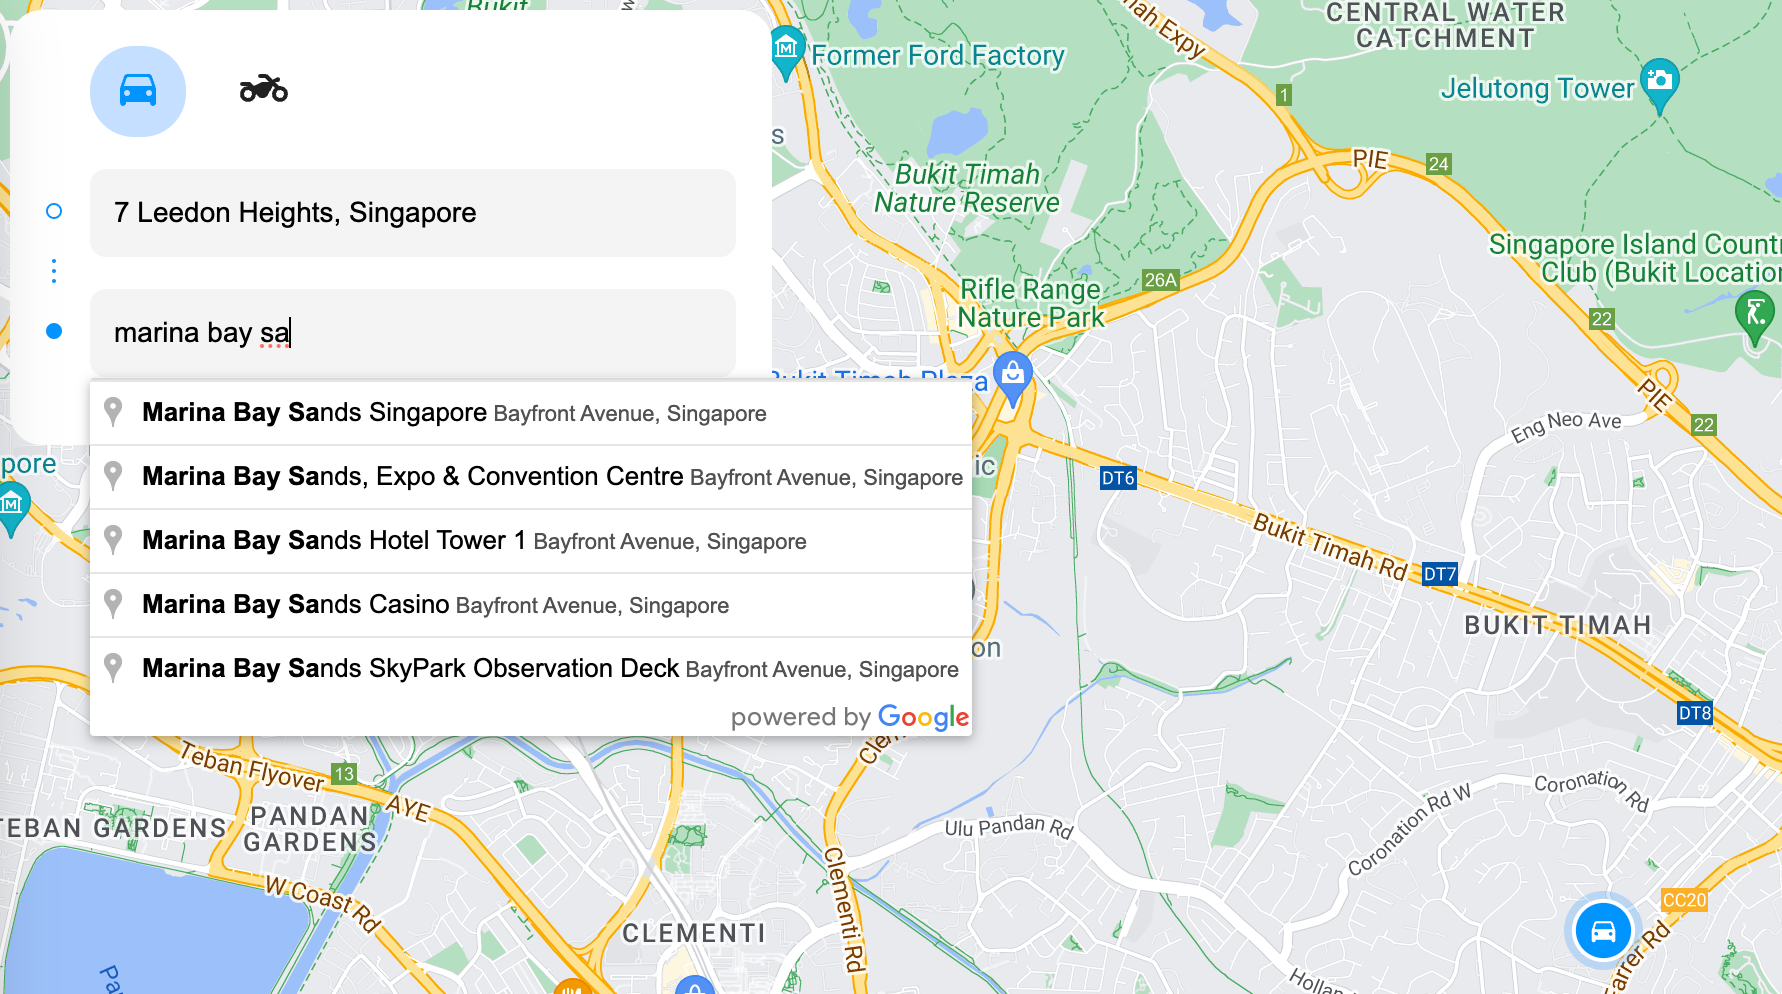
The <PlaceAutocompleteInput/> component, as the name suggests, contains a text input field that uses Google Places Autocomplete to suggest places dynamically as the user types.
To do this, we first add a text input field in the return statement of PlaceAutocompleteInput.jsx and give it the ref="inputRef".
Second, in a useEffect hook, we create a new Google Places Autocomplete instance with the line: new places.Autocomplete(inputRef.current, options) and bind it to the text input field.
Third, we set up an event listener on the placeAutocomplete object which listens for the "place_changed" event that is triggered whenever the user selects a place from the list of autocomplete suggestions. The result is passed to the onPlaceSelect prop, which eventually bubbles up to SearchBoxContainer.jsx.
/*** PlaceAutocompleteInput.jsx ***/
import React, { useRef, useEffect, useState } from 'react';
import { useMapsLibrary } from '@vis.gl/react-google-maps';
import './PlaceAutocompleteInput.scss';

const PlaceAutocompleteInput = ({ onPlaceSelect }) => {
  const [placeAutocomplete, setPlaceAutocomplete] = useState(null);
  const inputRef = useRef(null);
  const places = useMapsLibrary('places');

  useEffect(() => {
    if (!places || !inputRef.current) return;

    const options = {
      fields: ['place_id', 'geometry', 'name', 'formatted_address'],
    };

    setPlaceAutocomplete(new places.Autocomplete(inputRef.current, options));
  }, [places]);

  useEffect(() => {
    if (!placeAutocomplete) return;

    placeAutocomplete.addListener('place_changed', () => {
      onPlaceSelect(placeAutocomplete.getPlace());
    });
  }, [onPlaceSelect, placeAutocomplete]);

  return (
    <div className="autocomplete-container">
      <input ref={inputRef} />
    </div>
  );
};

export default PlaceAutocompleteInput;
The placeAutocomplete.getPlace() object returned by Google Places Autocomplete and passed up to SearchBoxContainer.jsx, has the following structure:
{
    "formatted_address": "11 Leedon Heights, D'Leedon, Singapore 267955",
    "geometry": {
        "location": {
            "lat": 1.3162837,
            "lng": 103.8045578
        },
        "viewport": {
            "south": 1.315023719708498,
            "west": 103.8031722197085,
            "north": 1.317721680291502,
            "east": 103.8058701802915
        }
    },
    "name": "D'Leedon",
    "place_id": "ChIJk2oGxxMa2jERBMEx943Jyyo",
    "html_attributions": []
}
In SearchBoxContainer.jsx, this address data is sent to the handleAddressChange() method where it is used to update the application's state using a Redux action (setData).
/*** SearchBoxContainer.jsx ***/
dispatch(
  setData({
    [type]: {
      name: address.name,
      formattedAddress: address.formatted_address,
      position: {
        lat: address.geometry.location.lat(),
        lng: address.geometry.location.lng(),
      },
      place_id: address.place_id,
    },
  }),
);
If type was "origin", then the JSON blob saved to redux would look like this:
{
  "origin": {
    "name": "D'Leedon",
    "formattedAddress": "11 Leedon Heights, D'Leedon, Singapore 267955",
    "position": {
      "lat": 1.3162837,
      "lng": 103.8045578
    },
    "place_id": "ChIJk2oGxxMa2jERBMEx943Jyyo"
  }
}
MapContainer.jsx
MapContainer.jsx is a container component for <Map/>. Whenever state.map.data in the Redux store changes i.e. whenever the origin, destination, or route is updated, const { origin, destination, routes, travelMode } = useSelector((state) => state.map.data); is run and the new values for travelMode, routes, origin and destination are passed as props to <Map/>.
/*** containers/MapContainer.jsx ***/
import React from 'react';
import { useSelector } from 'react-redux';

import Map from '../components/Map';

const MapContainer = () => {
  const { origin, destination, routes, travelMode } = useSelector((state) => state.map.data);

  return <Map origin={origin} destination={destination} travelMode={travelMode} routes={routes[travelMode] || []} />;
};

export default MapContainer;
Map.jsx
Map.jsx (/Map/index.jsx) initializes a <Map/> component centered on Vancouver, BC. When a user enters an origin and destination to retrieve a route, the map automatically recenters on that route, which is displayed using a <Polyline/>.
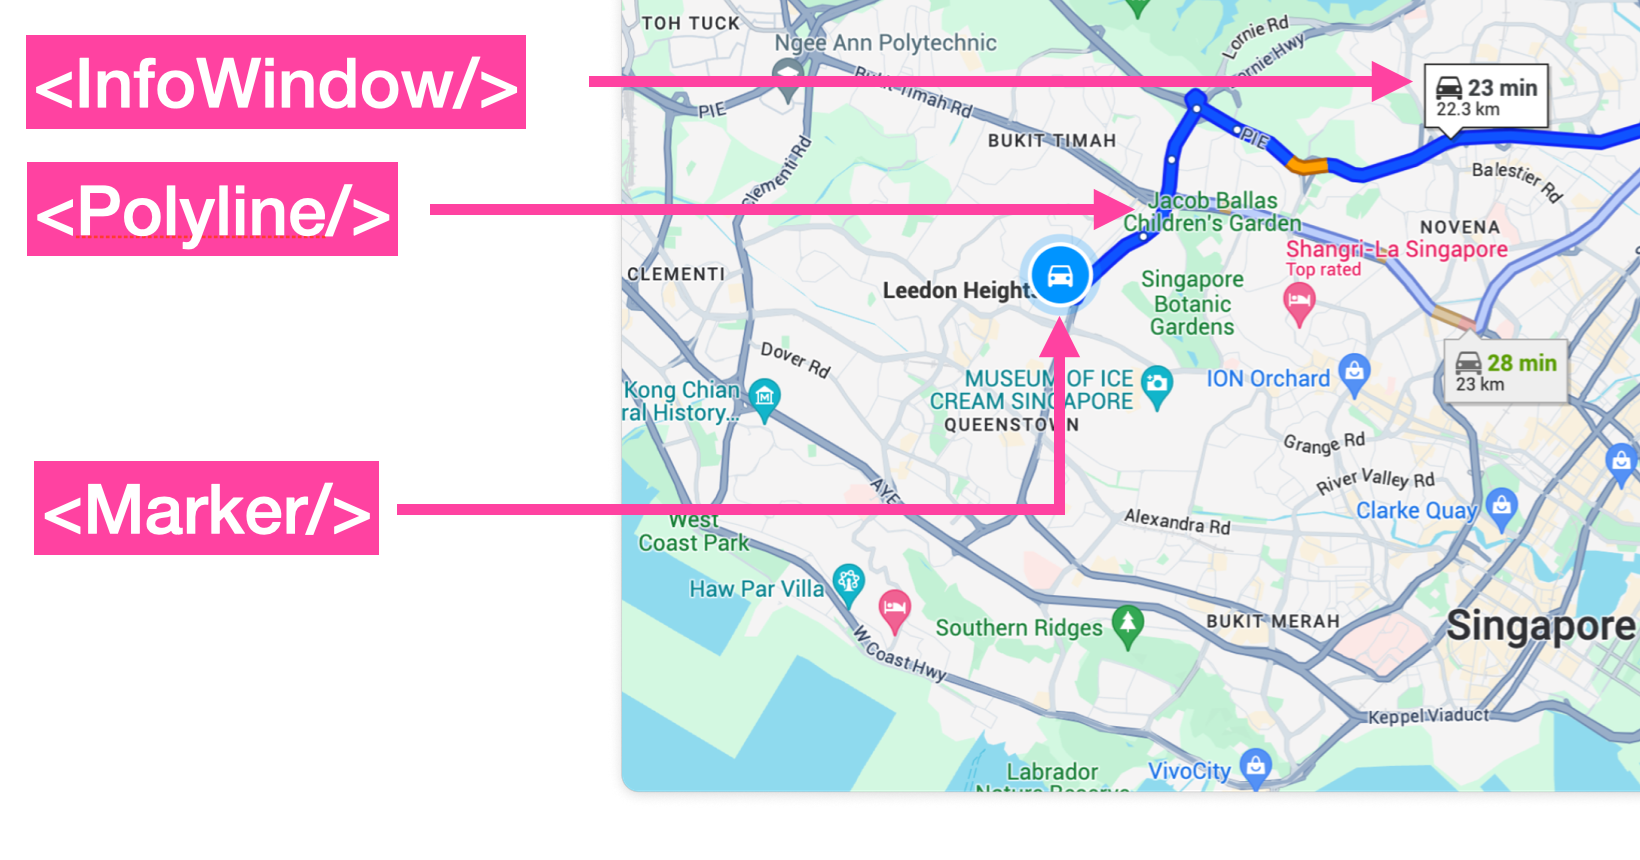
In addition to <Polyline/>, the <Map/> component includes three key child components:
<MapHandler/>: Adjusts the map's viewport as needed.<Marker/>: Adds icons to indicate the starting and ending points of the route.<InfoWindow/>: Popup window that displays the travel mode, trip distance and duration when you click on a route polyline.
/*** components/Map/index.jsx ***/
import React, { useMemo, useState } from 'react';
import { useMap, Map as Gmap, InfoWindow } from '@vis.gl/react-google-maps';
import { DEFAULT_MAP_CENTER, DEFAULT_MAP_ZOOM } from '../../constants';
import Marker from './Marker';
import Polyline, { InfoWindow as PolylineInfoWindow } from './Polyline';
import MapHandler from './MapHandler';

const Map = ({ origin, destination, travelMode, routes }) => {
  const map = useMap();
  const [infoWindow, setInfoWindow] = useState(null);
  const [activeRoute, setActiveRoute] = useState(0);

  const stops = useMemo(() => {
    const stopsArray = [];
    if (origin?.position) stopsArray.push(origin);
    if (destination?.position) stopsArray.push(destination);
    return stopsArray;
  }, [origin, destination]);

  const handlePolylineClick = (event, route, routeIndex) => {
    const position = {
      lat: event.latLng.lat(),
      lng: event.latLng.lng(),
    };
    setActiveRoute(routeIndex);
    setInfoWindow({
      position,
      content: <PolylineInfoWindow route={route} travelMode={travelMode} />,
    });
  };

  return (
    <Gmap
      mapId={process.env.REACT_APP_GOOGLE_MAP_ID}
      defaultZoom={DEFAULT_MAP_ZOOM}
      defaultCenter={DEFAULT_MAP_CENTER}
      gestureHandling="greedy"
      disableDefaultUI={true}
    >
      <MapHandler map={map} stops={stops} />
      {origin && <Marker type="OriginMarker" position={origin.position} />}
      {destination && <Marker type="DestinationMarker" position={destination.position} />}
      {routes.map((route, routeIndex) => (
        <Polyline
          key={`polyline-${routeIndex}`}
          route={route}
          activeRoute={activeRoute}
          routeIndex={routeIndex}
          onClick={handlePolylineClick}
        />
      ))}
      {infoWindow && (
        <InfoWindow
          key={infoWindow.position.lat + ',' + infoWindow.position.lng}
          position={infoWindow.position}
          onCloseClick={() => setInfoWindow(null)}
        >
          {infoWindow.content}
        </InfoWindow>
      )}
    </Gmap>
  );
};

export default React.memo(Map);
MapHandler.jsx
MapHandler.jsx is responsible for centering <Map/> squarely on the route polyline. It does this in a two step process:
- Iterating over the
stopsarray (the start and end location of each route) and use theLatLngBounds.extend()method determine the "corner" southwest and northeast bounds (aLatLngBoundsobject in Google Maps represents a rectangular geographic area defined by its northeast and southwest corners). - Calling the
Maps.fitBounds()method to contain the viewport within the given bounds.
/*** components/Map/MapHandler.jsx ***/
import React, { useEffect } from 'react';

const MapHandler = ({ map, stops }) => {
  useEffect(() => {
    if (!map) return;

    if (stops.length > 0) {
      const bounds = new window.google.maps.LatLngBounds();
      stops.forEach((stop) => {
        bounds.extend(new window.google.maps.LatLng(stop.position.lat, stop.position.lng));
      });
      map.fitBounds(bounds);
    }

    if (stops.length === 1) {
      map.setZoom(14);
    }
  }, [map, stops]);

  return null;
};

export default React.memo(MapHandler);
The final result is a <Map/> that is properly centered on the route's polyline.
Marker.jsx
<Marker/> is a React wrapper for Google's AdvancedMarkerElement, enabling the creation of customizable, interactive markers on Google Maps using SVG files. In our application, we use these markers to indicate the origin and destination of the route, which are selected through the Places Autocomplete text field.
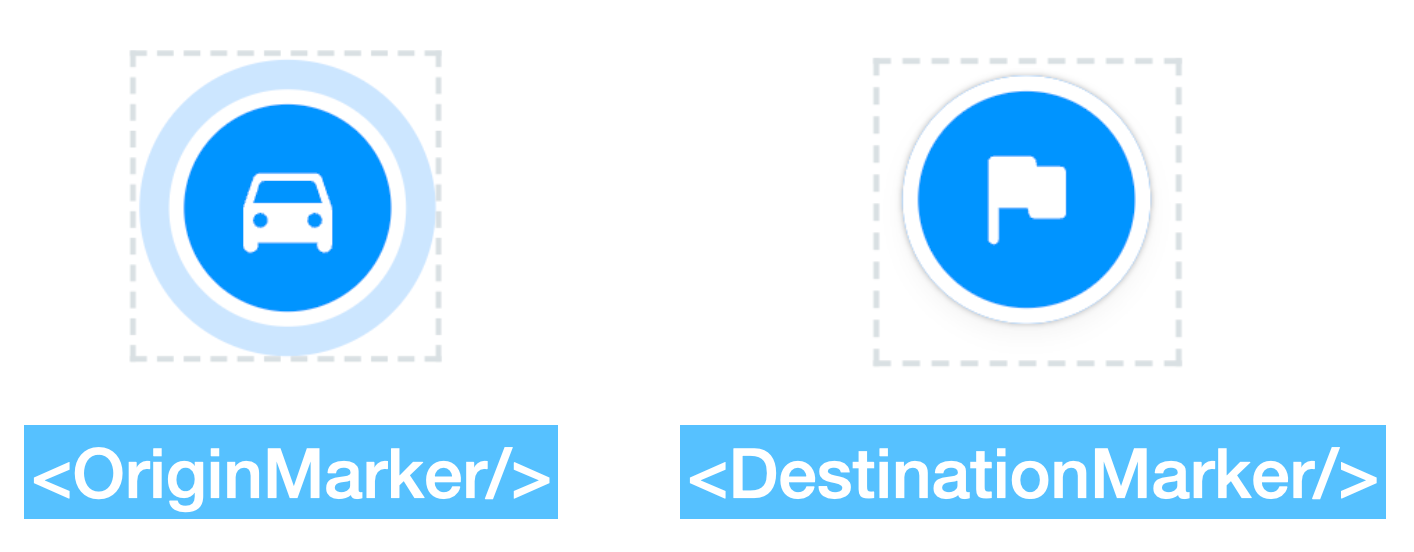
Using the origin marker as an example, here's how <Image/> in Marker.jsx is used to replace the default red marker with an SVG file:
/*** components/Map/Marker.jsx ***/
import React from 'react';
import { AdvancedMarker } from '@vis.gl/react-google-maps';
import Image from '../../images';
import './Marker.scss';

const Marker = ({ style, position, active, onToggle, type }) => {
  return (
    <AdvancedMarker
      position={position}
      className={`marker ${active ? 'active' : ''}`}
      zIndex={active ? 2 : 1}
      onClick={onToggle}
    >
      <Image type={type} style={style} />
    </AdvancedMarker>
  );
};

export default Marker;- In
<Map/>, the origin marker is added with the line:<Marker type="OriginMarker" position={origin.position}/>. - In
Marker.jsx, we next importimages/index.jsxwith the lineimport Image from '../../images'. This gives us access to the<Image/>component, which we include as a child component of<AdvancedMarker/>. - In
images/index.jsx, the code below assignsOriginMarkerto theSVGComponentvariable. In the return statement,{SVG}, now becomes<OriginMarker/>.
/*** images/index.jsx ***/
import { ReactComponent as ThreeDot } from './three-dot.svg';
import { ReactComponent as DRIVE } from './drive.svg';
import { ReactComponent as TWO_WHEELER } from './two-wheeler.svg';
import { ReactComponent as OriginMarker } from './origin-marker.svg';
import { ReactComponent as DestinationMarker } from './destination-marker.svg';

const images = {
  ThreeDot,
  DRIVE,
  TWO_WHEELER,
  OriginMarker,
  DestinationMarker,
};

const SVGComponent = images[type];
return SVGComponent ? (
  <SVGComponent
    style={{ fill: color || undefined, stroke: strokeColor || undefined }}
  />
) : null;- Because we already imported
origin-marker.svgas a React component and linked it to<OriginMarker/>, the SVG file is rendered as an inline SVG and can be used like any other JSX element.
Polyline.jsx
Each route returned by the Routes API is rendered as a <Polyline/> component on <Map/>. <Polyline/> (/Map/polyline.jsx) is actually a thin wrapper that allows us to combine multiple polylines together into a single color coded polyline. The actual rendering and event handling code can be found in a separate file, /Map/external/polyline.jsx, which was taken from the Geometry Example of the react-google-maps library. <Polyline/> accepts the following props:
key: a unique identifier for the polyline (not important)route: route data that includes polyline.encodedPolyline activeRoute: the index of the selected route (highlighted)routeIndex: the index of the route in the order it was returned by the Routes APIonClick: an event handle for the <InfoWindow/> component
/*** components/Map/index.jsx ***/
{
  routes.map((route, routeIndex) => (
    <Polyline
      key={`polyline-${routeIndex}`}
      route={route}
      activeRoute={activeRoute}
      routeIndex={routeIndex}
      onClick={handlePolylineClick}
    />
  ));
}
When route is passed as a prop into <Polyline/>, it is decoded into an array of coordinate pairs, segmented by traffic speed, and redrawn as a color coded traffic-aware polyline. This process is described near the start of this blog post in the section on drawing a route with real time traffic.
Alternative routes (if any) are given a strokeOpacity of 0.5. When a certain route is clicked on, its routeIndex is designated as the activeRoute and its polyline is given a strokeOpacity of 1.0 (a solid line).
/*** components/Map/polyline.jsx ***/
return {
  path: geometryLibrary.encoding.encodePath(newPoints),
  options: {
    zIndex: 100 - routeIndex + zIndex--,
    strokeColor: SPEED_COLORS[interval.speed] || SPEED_COLORS.NORMAL,
    strokeOpacity: routeIndex === activeRoute ? 1.0 : 0.5,
    strokeWeight: 6,
  },
};
InfoWindow.jsx
The final component we'll cover is <InfoWindow/>, which displays the trip's distance, duration, and travel mode in a temporary popup when you click on the route polyline.
When <Polyline/> is clicked, the handlePolylineClick() method in Map.jsx gets called. The info window is positioned at the click location and the route information (which includes distance and duration), together with the travelMode is passed in to <PolylineInfoWindow/>.
/*** components/Map/index.jsx ***/
const handlePolylineClick = (event, route, routeIndex) => {
  const position = {
    lat: event.latLng.lat(),
    lng: event.latLng.lng(),
  };
  setActiveRoute(routeIndex);
  setInfoWindow({
    position,
    content: <PolylineInfoWindow route={route} travelMode={travelMode} />,
  });
};
<PolylineInfoWindow/> is a named export React functional component of Polyline.jsx. It receives a route (containing distanceMeters and duration) and travelMode as props and displays them in a nicely formatted way.
/*** components/Map/Polyline.jsx ***/
export const InfoWindow = ({ route, travelMode }) => (
  <div className="polyline-info-window">
    <div className="content">
      <div className="title">
        <Image type={travelMode} color="#212121" />
        <b>{formatDuration(route.duration)}</b>
      </div>
      <div className="distanceMeters">
        <p>{(route.distanceMeters / 1000).toFixed(2)} km</p>
      </div>
    </div>
  </div>
);
Just like the icon used in the origin and destination markers, we use inline SVGs (<Image type={travelMode}/>} to switch between the car or two wheeler icon to indicate the travelMode.
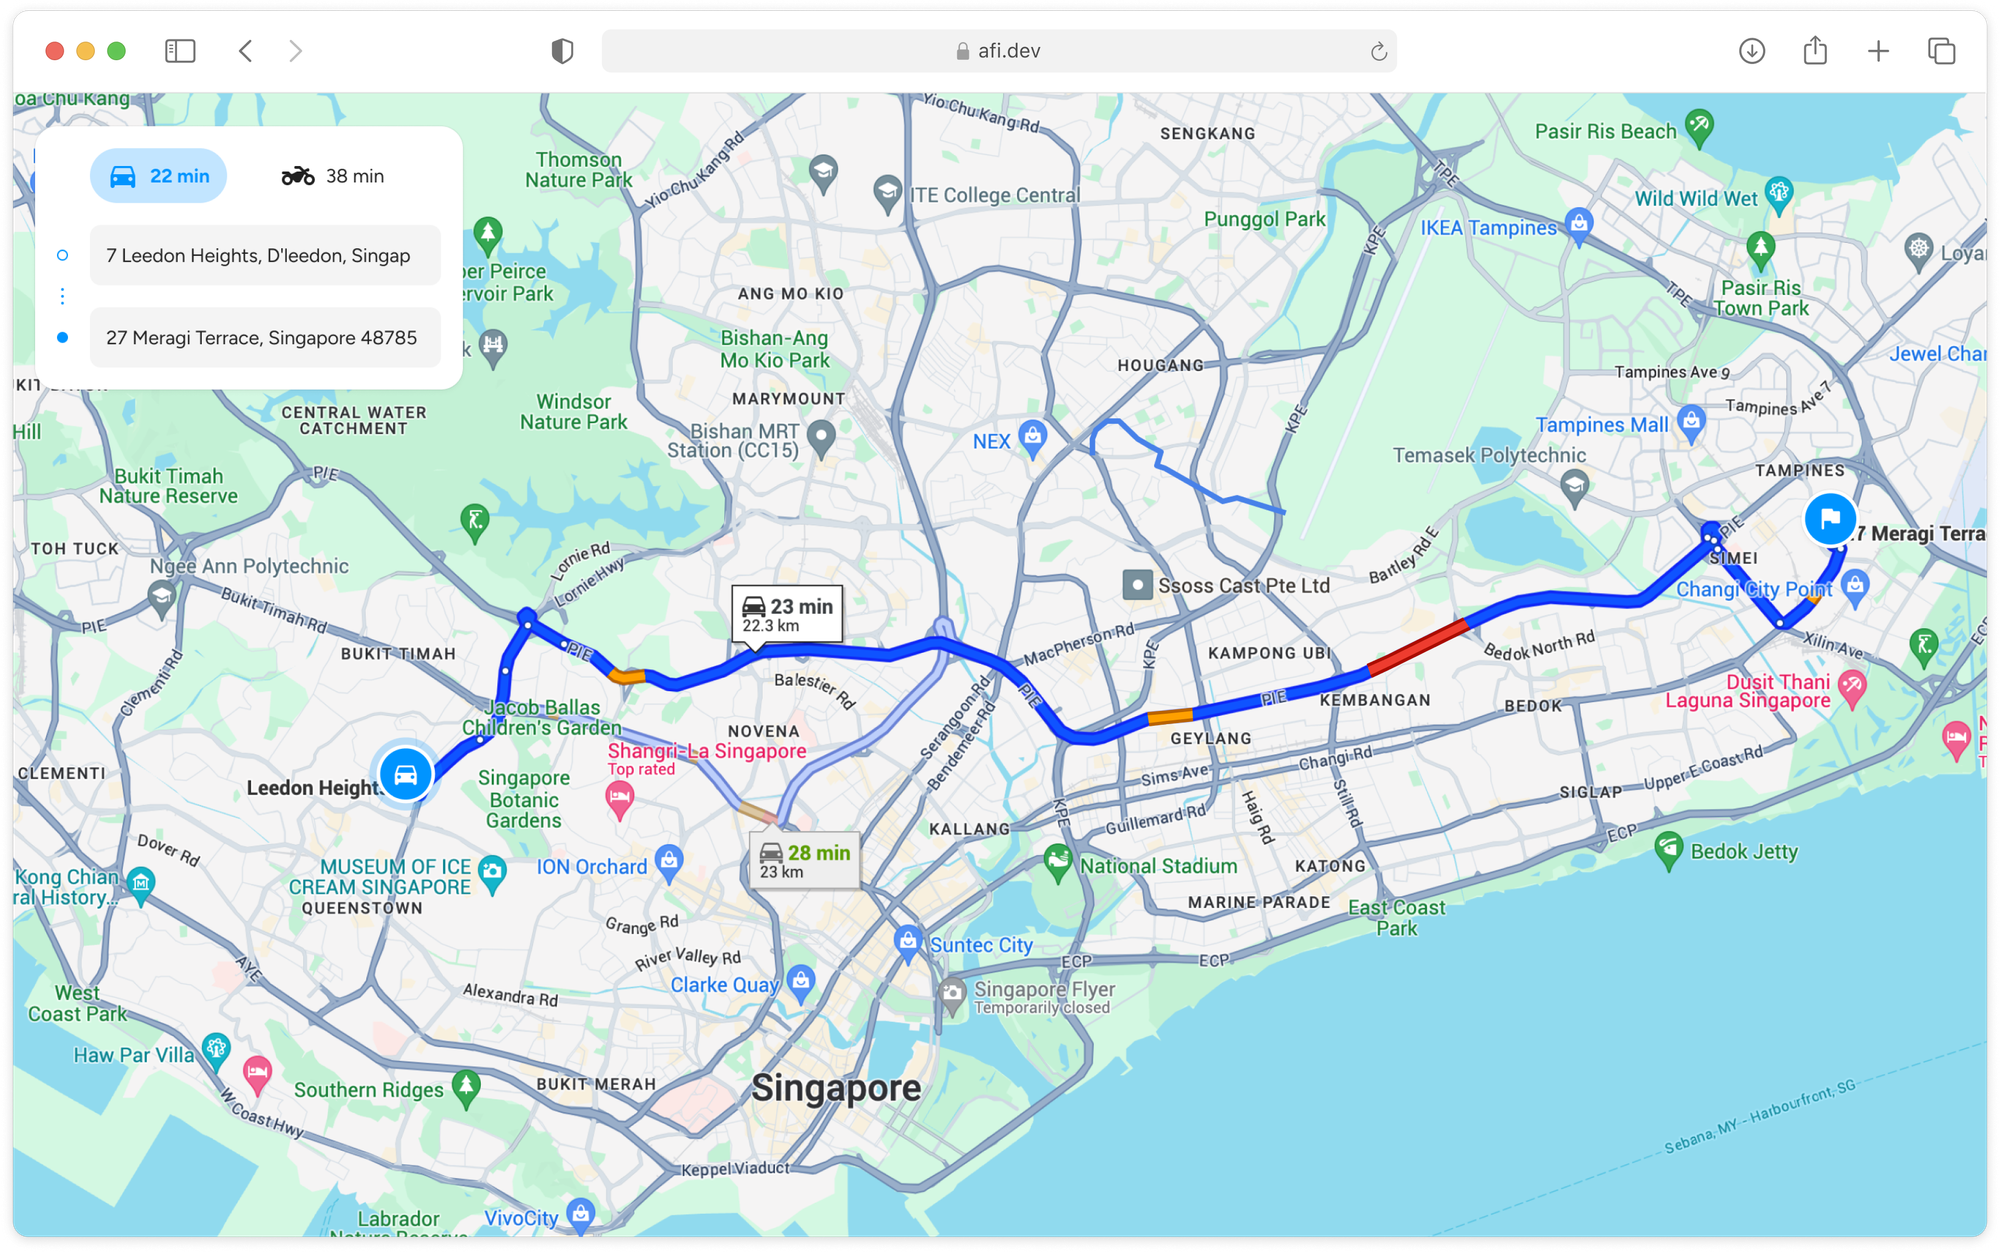
To test the app, visit https://routes-api-demo.afi.dev/ and enter an origin and destination, just like you would on Google Maps.
To run the app locally:
- Fork the routes_api_demo repository from GitHub.
- Run
npm installto install dependencies. - Start the app with
npm start. - Update the
.envfile with your Google Maps API key before running the app.
Coming up next in the Routes API tutorial series
In this blog post, I showed you how to use the Compute Routes endpoint of the Routes API to get the fastest route between two points, as well as distances, travel times, and driving directions. In our next post, we'll explore the Route API's Compute Route Matrix endpoint, which calculates travel times and distances for multiple origin-destination pairs, and use this to build a basic taxi dispatch system that assigns passengers to the nearest available vehicle.
👋 As always, if you have any questions or suggestions for me, please reach out or say hello on LinkedIn.
Part 3: Using the Google Distance Matrix API for taxi dispatch