Google ODRD: Navigation SDK
Add in-app turn by turn navigation to your driver app with the Google Nav SDK.

The Google Navigation SDK, also known as the Google Nav SDK, enables developers to seamlessly integrate turn-by-turn navigation into their driver apps. Once exclusive to major ride-sharing platforms like Uber and Go Jek, the Nav SDK is now available to any company signed up with Google Mobility. It brings the familiar and trusted Google Maps navigation experience to your app, and allows you to fully customize the user interface and choose what data to display, giving you complete control over the driver experience to ensure it aligns with your brand and business goals.
In this blog post, I’ll explain why the Nav SDK is kind of a big deal, what types of companies might benefit from it, discuss pricing, and help you get started by running the Google Navigation SDK Android App locally on your computer.
Part 1: Google Mobility: An introduction to Google ODRD, LMFS and Cloud Fleet Routing APIs
Part 2: Google ODRD: Routes Preferred computeRoutes API
Part 3: Google LMFS: Routes Preferred ComputeRouteMatrix API
Part 4: Google Cloud Fleet Routing: OptimizeTours API
Part 5: Google ODRD: Navigation SDK (this article)
What is the Google Navigation SDK?
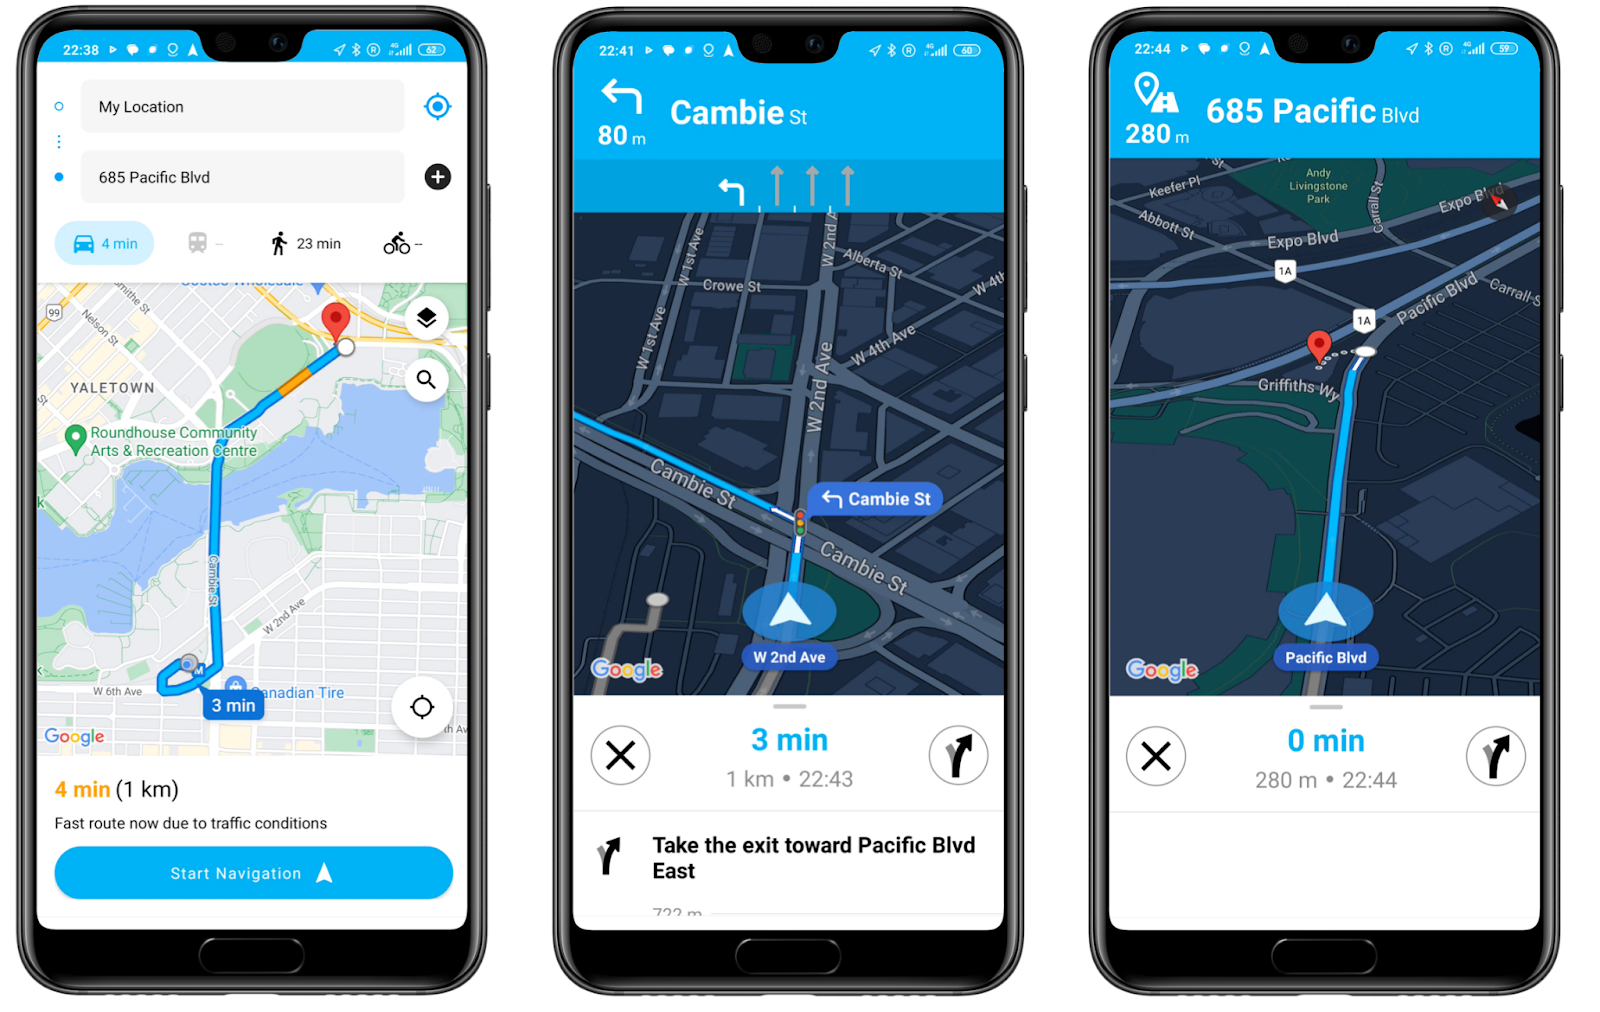
The Google Navigation SDK is a set of libraries, documentation, and code samples that allow developers to integrate Google Maps turn-by-turn navigation features directly within their own app without switching to the Google Maps app. It provides 3D route planning and navigation with real-time traffic updates, voice-guided directions, and lane guidance, making it useful for any app that relies on accurate driver navigation, such as ride sharing and logistics applications.
To be fair, Google isn't the first, nor the only, company offering in-app turn-by-turn navigation in a developer-friendly package. In fact, they’re about ten years behind competitors like Tom Tom, HERE Maps and Mapbox, which have been selling similar solutions for years. However, Google's key advantage is that tens of millions of people already rely on Google Maps for driving directions. Users trust Google's real-time traffic data and want the same dependable experience integrated into their own apps.
How do you enable in-app navigation without the Navigation SDK?
Before Google launched the Nav SDK, the only way to use Google Maps for turn-by-turn navigation in your app was via Maps URLs. You would need to add a [Navigate] button to your app and clicking that button launches a specific URL embedded with the address you want to navigate to e.g.
https://www.google.com/maps/search/?api=1&query=singapore+changi+airport
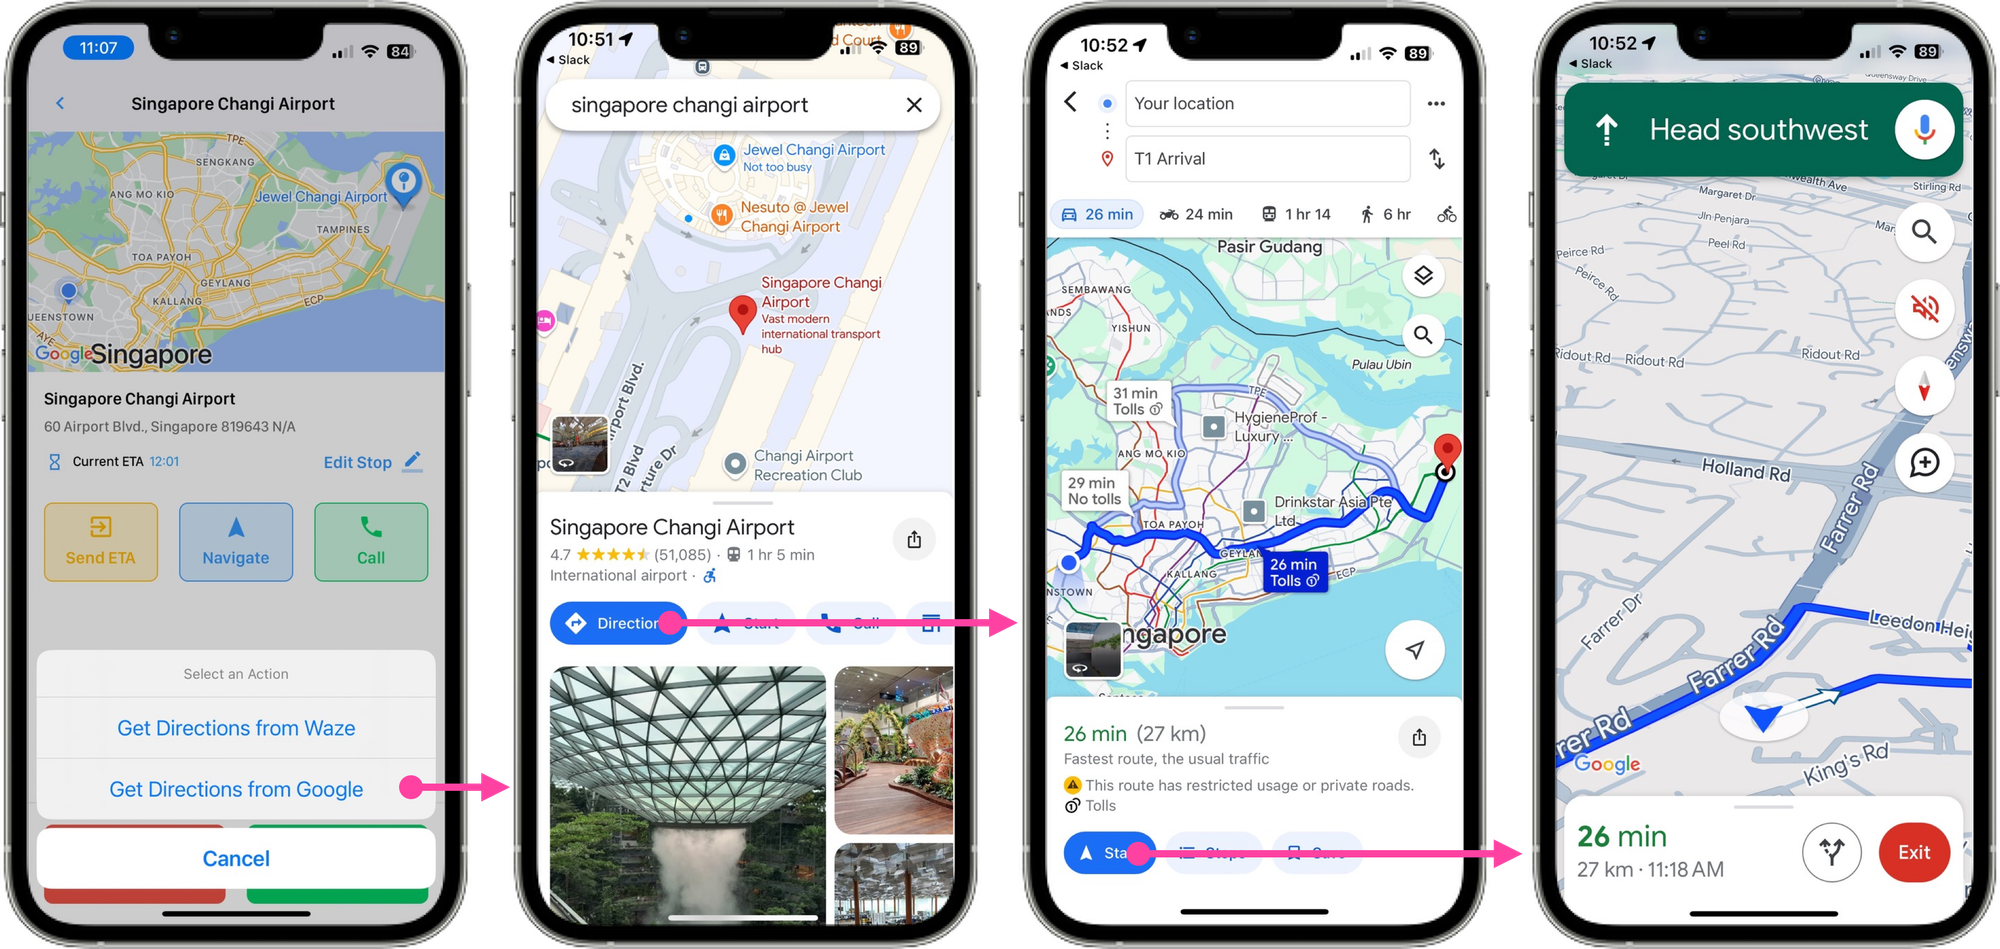
With the Maps URL method, it takes a whole three steps just to get to the turn-by-turn navigation screen. First, the Maps URL opens your browser, which then opens the Google Maps app (if you even have it installed) with the delivery address already filled in. Then, you have to tap the [Directions] button to get driving directions from your location. And finally, you still have to hit [Start] to actually begin the navigation. Considering that most of your users will be drivers navigating through traffic while racing to stay on schedule, this three step process is unacceptable.
Google Navigation SDK benefits
The first benefit of the Nav SDK that I've already alluded to is safety. Because the in-app turn by turn interface is embedded within your app, users do not have to take their eyes of the road and spend time switching between your app and Google Maps. They can also receive in-app notifications and updates seamlessly.
The second major advantage of the Nav SDK is connectivity. Both Android and iOS have made it difficult, if not impossible, to enable in-app background location tracking. This poses a challenge for apps that rely on real-time driver location updates—such as ride-sharing apps that need to match passengers with nearby drivers. Using a third-party turn-by-turn navigation app would push your app into the background, stopping location tracking. The Nav SDK solves this by allowing you to keep location tracking active within your app.
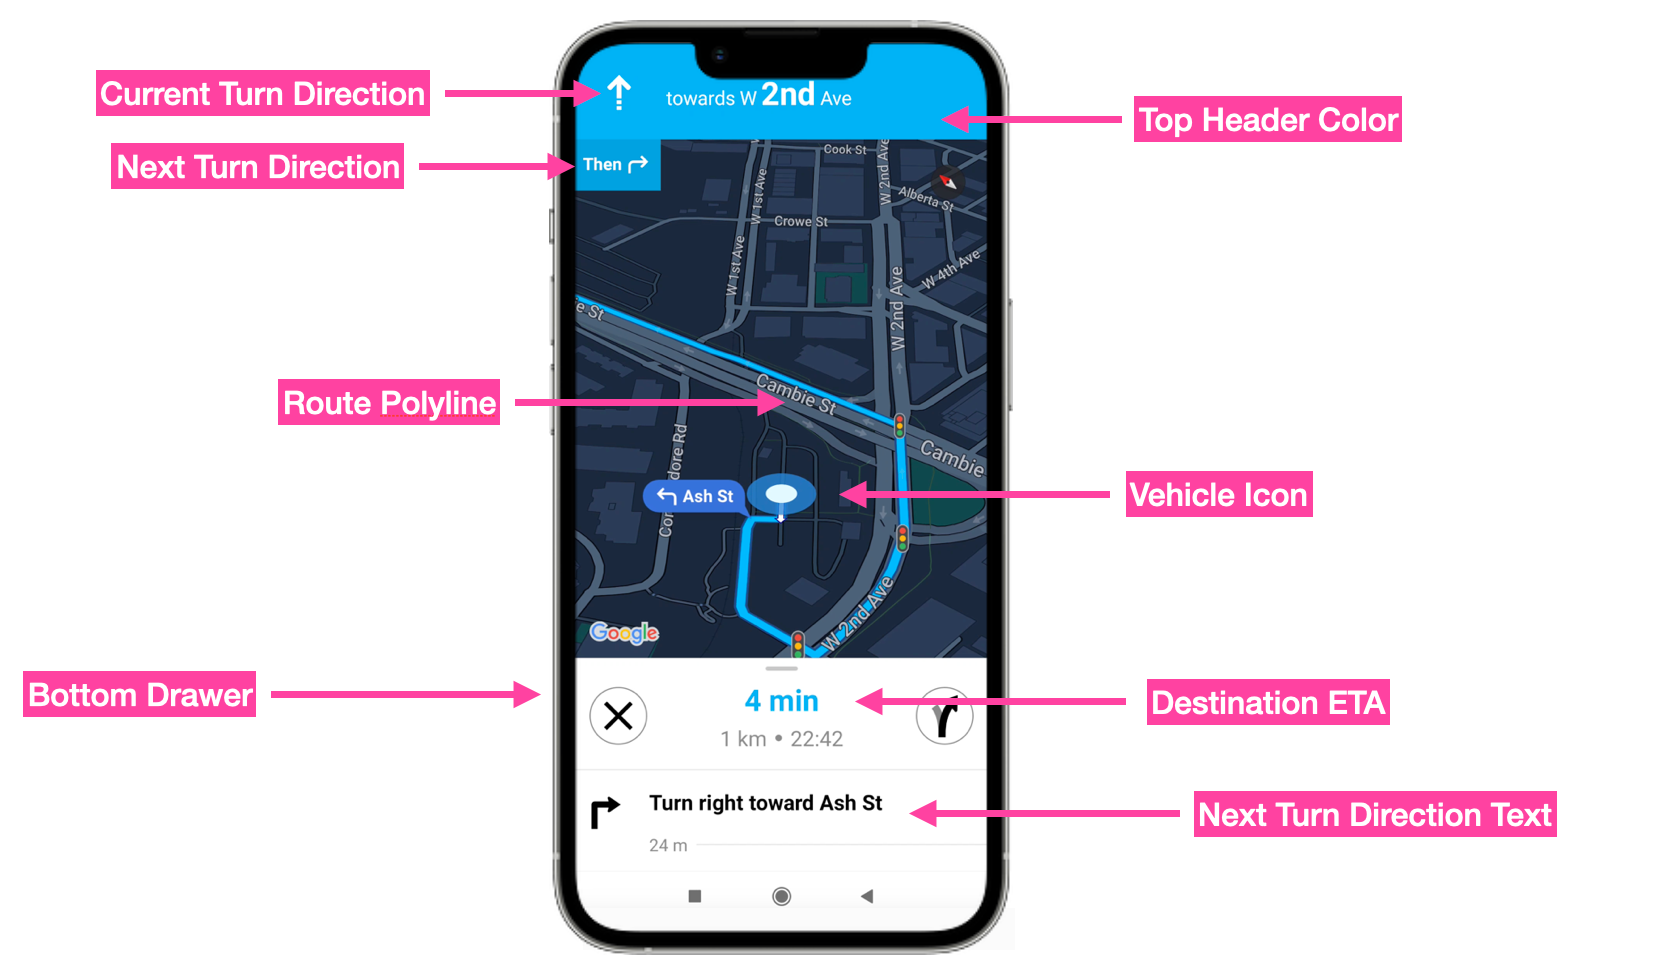
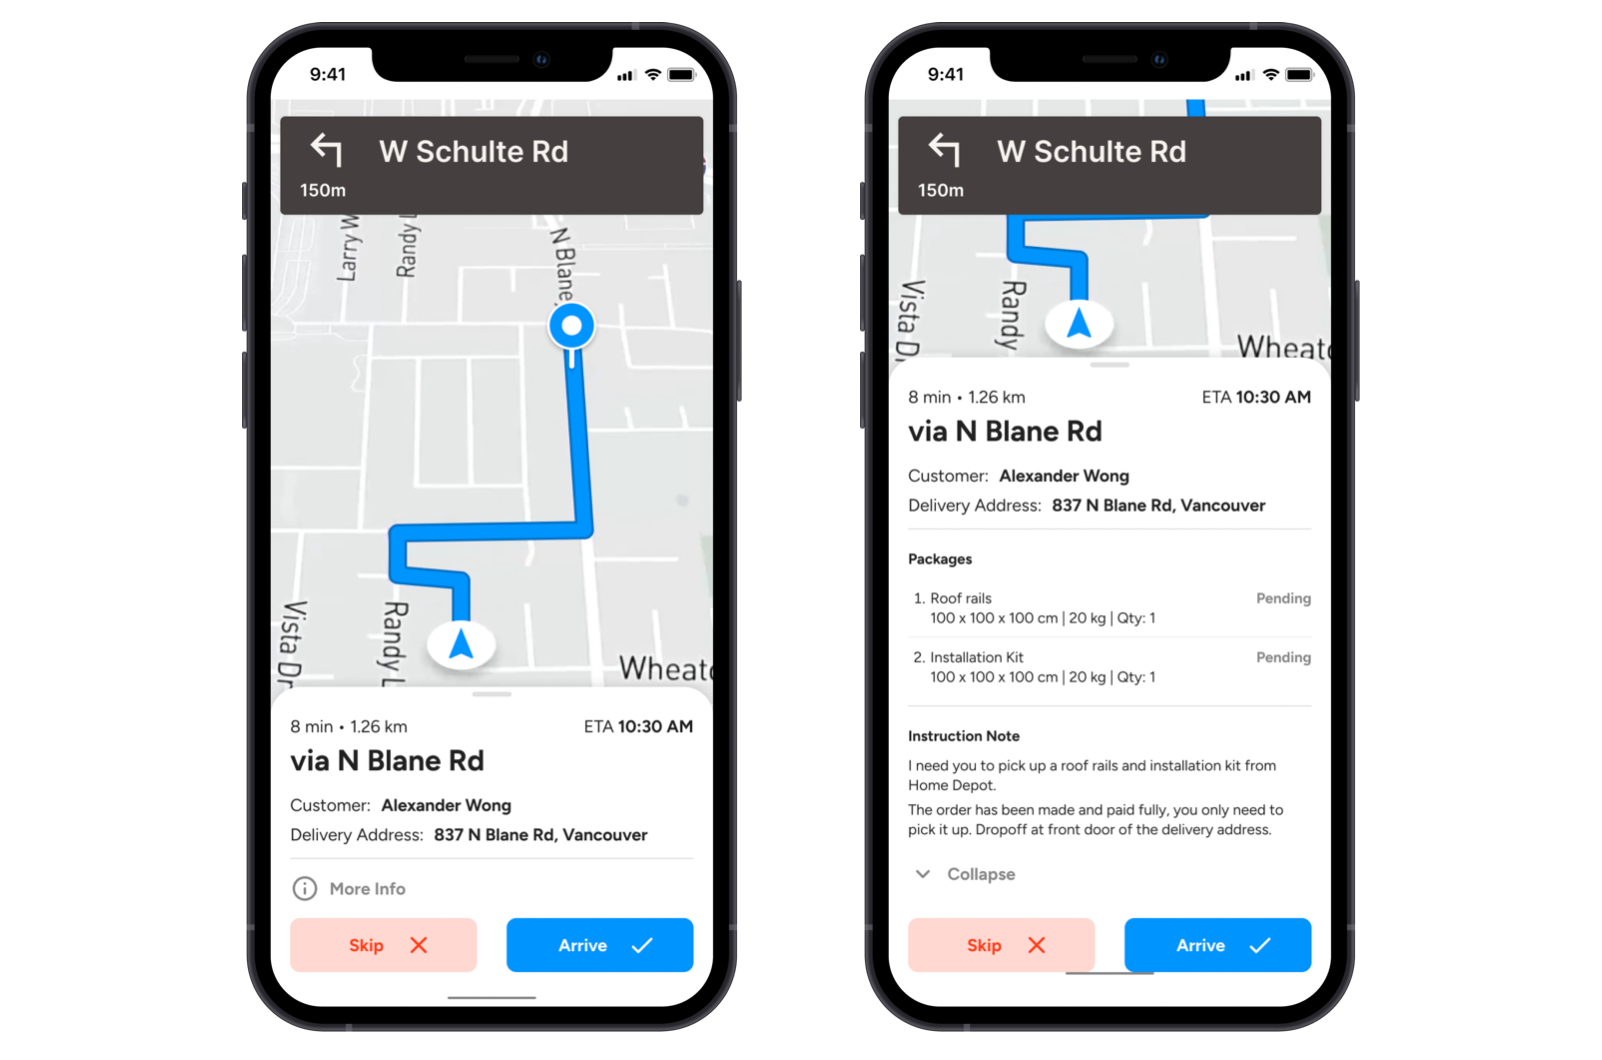
The last benefit that the Nav SDK provides is customization. By allowing developers to not only adjust the general look and feel of the in-app navigation screen, but also control the position and visibility of major UI elements, the Nav SDK lets companies create an on brand turn-by-turn navigation experience that integrates nicely with business operations.
For example, with the Nav SDK, you can overlay customer names, delivery instructions, and package details on the bottom info panel, allowing drivers to see all the necessary information without leaving the turn-by-turn navigation screen. In contrast, using the Maps URL method would force drivers to exit Google Maps and switch back to their delivery app to retrieve this information - an unnecessary distraction that most drivers can't afford.
Who should use the Google Nav SDK?
The Nav SDK is ideal for companies with dedicated driver fleets, where timely and reliable navigation is crucial to the success of the business. Two industries that come to mind are ride sharing and last mile delivery.
Ride sharing
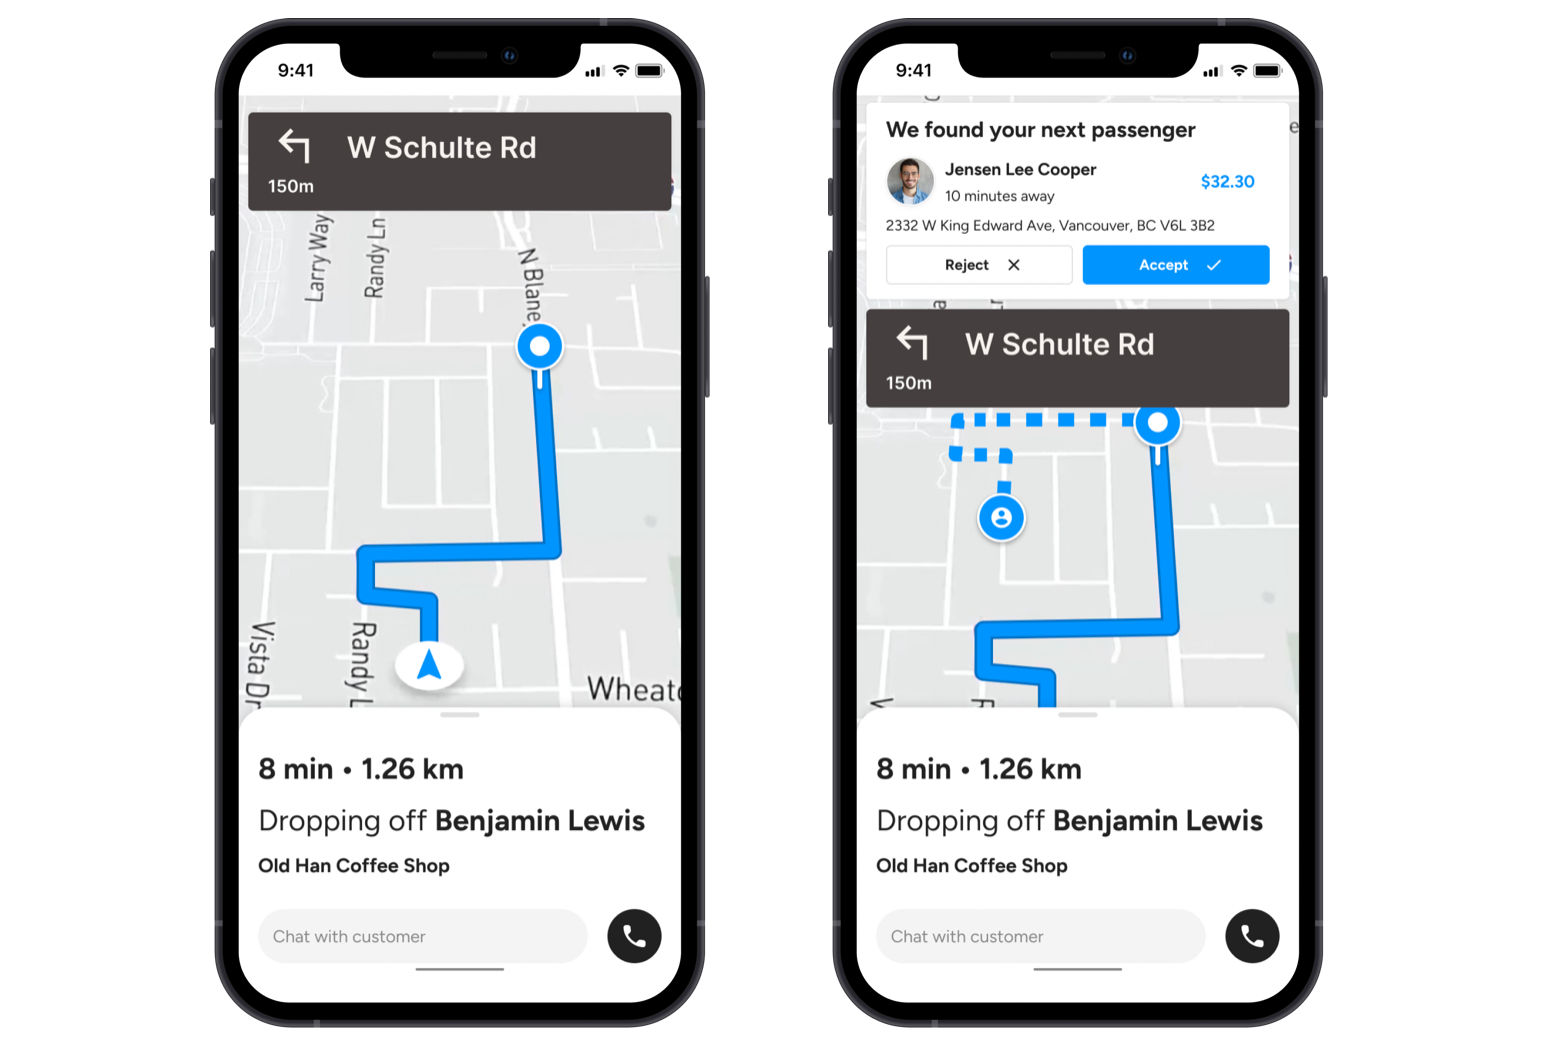
Ride share companies are the Uber and Lyfts of the world. They operate a network of driver contractors who use their platform to pick up and drop off passengers. Effective in-app navigation enables these companies to adjust routes in real-time, adding or removing waypoints to accommodate booking cancellations, new passenger assignments, or changes to a trip's destination. All of this happens directly on the turn-by-turn navigation screen, allowing the driver to stay focused on driving without having to mess around with the app.
Last mile delivery
Last-mile delivery providers are companies that transport goods from a central warehouse directly to your doorstep. They manage deliveries for any business that sells physical products online. For these companies, the ability to customize the Nav SDK's UI to help drivers complete their routes more efficiently, such as allowing drivers to check off packages for delivery at a specific address, is more important than handling route changes in real time.
Google Navigation SDK pricing
For Google Mobility customers, the Navigation SDK is included in Mobility's per-trip pricing model. The cost per completed trip typically ranges from USD $0.10 to $0.15, depending on factors like industry, usage volume, and the combination of APIs used. Each completed trip gets you 5 Nav SDK StartGuidance requests, 50 Directions API calls, 20 address autocomplete request etc (contact [email protected] for a full list of what's included). Based on typical usage, I estimate that each Nav SDK request costs just $0.01 per API call. You can push as many waypoints (destinations) to the Nav SDK as you want, so long as you don't exceed 10 waypoints at a time.
Getting started with the Google Navigation SDK
In this last section, I'll guide you through setting up a Nav SDK API key and starting the integration process with your driver app. Google has provided a significant amount of documentation and starter code, but you still need an Android, iOS, or a cross platform (React Native / Flutter) engineer to build out turn-by-turn navigation into your driver app.
Afi Labs builds custom transportation and logistics management software. From route optimization, live tracking to proof of delivery and driver apps, we've got you covered!
👋 Say Hello!
Starter code
| Platform | Github Link |
|---|---|
| iOS | https://github.com/googlemaps/ios-navigation-sdk |
| Android | https://github.com/googlemaps-samples/android-navigation-samples |
| React Native | https://github.com/googlemaps/react-native-navigation-sdk |
| Flutter | https://github.com/googlemaps/flutter-navigation-sdk |
Creating a Nav SDK API key
To set up the Nav SDK, the first thing you need to do is enable it in your Google Cloud console. If you are a Google Mobility customer, your Google Maps Partner should already have created a brand new GCP project with Mobility Billing and the Nav SDK enabled on your behalf. If not, here's what you need to do.
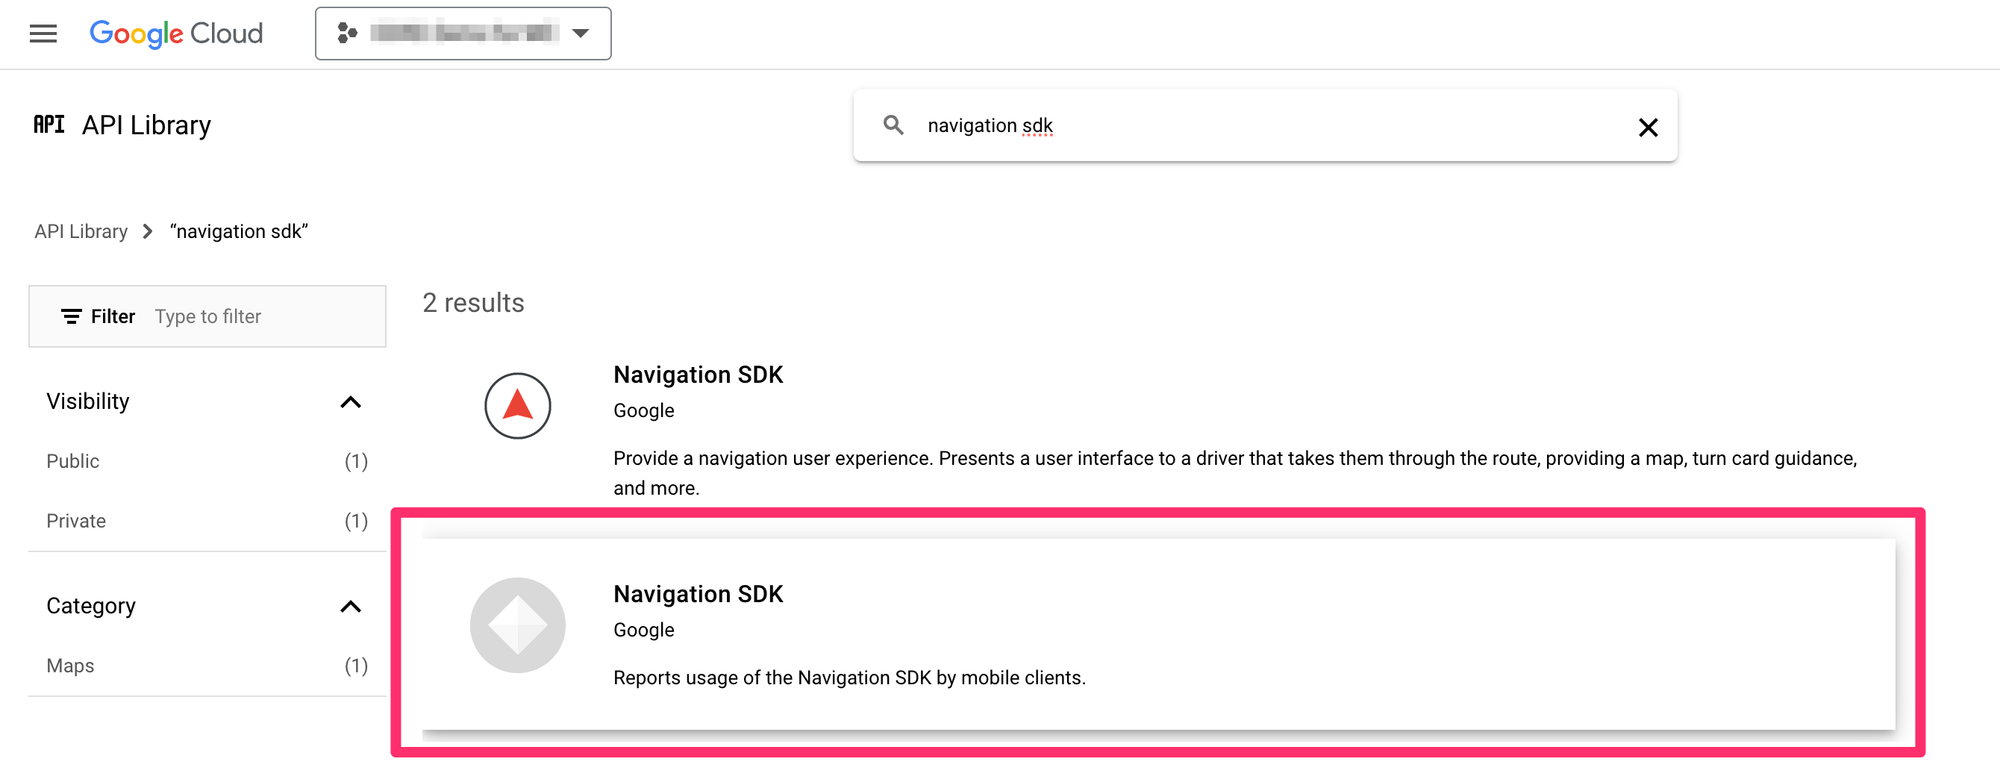
While still in the designated GCP project, navigate to to the APIs & Services page by selecting it on the left hand menu. Once there, choose [+ Enable APIs and Services] and search for the "navigation sdk". Choose the second option with the grey logo. This is the private Navigation SDK option that is only available to Google Mobility customers.
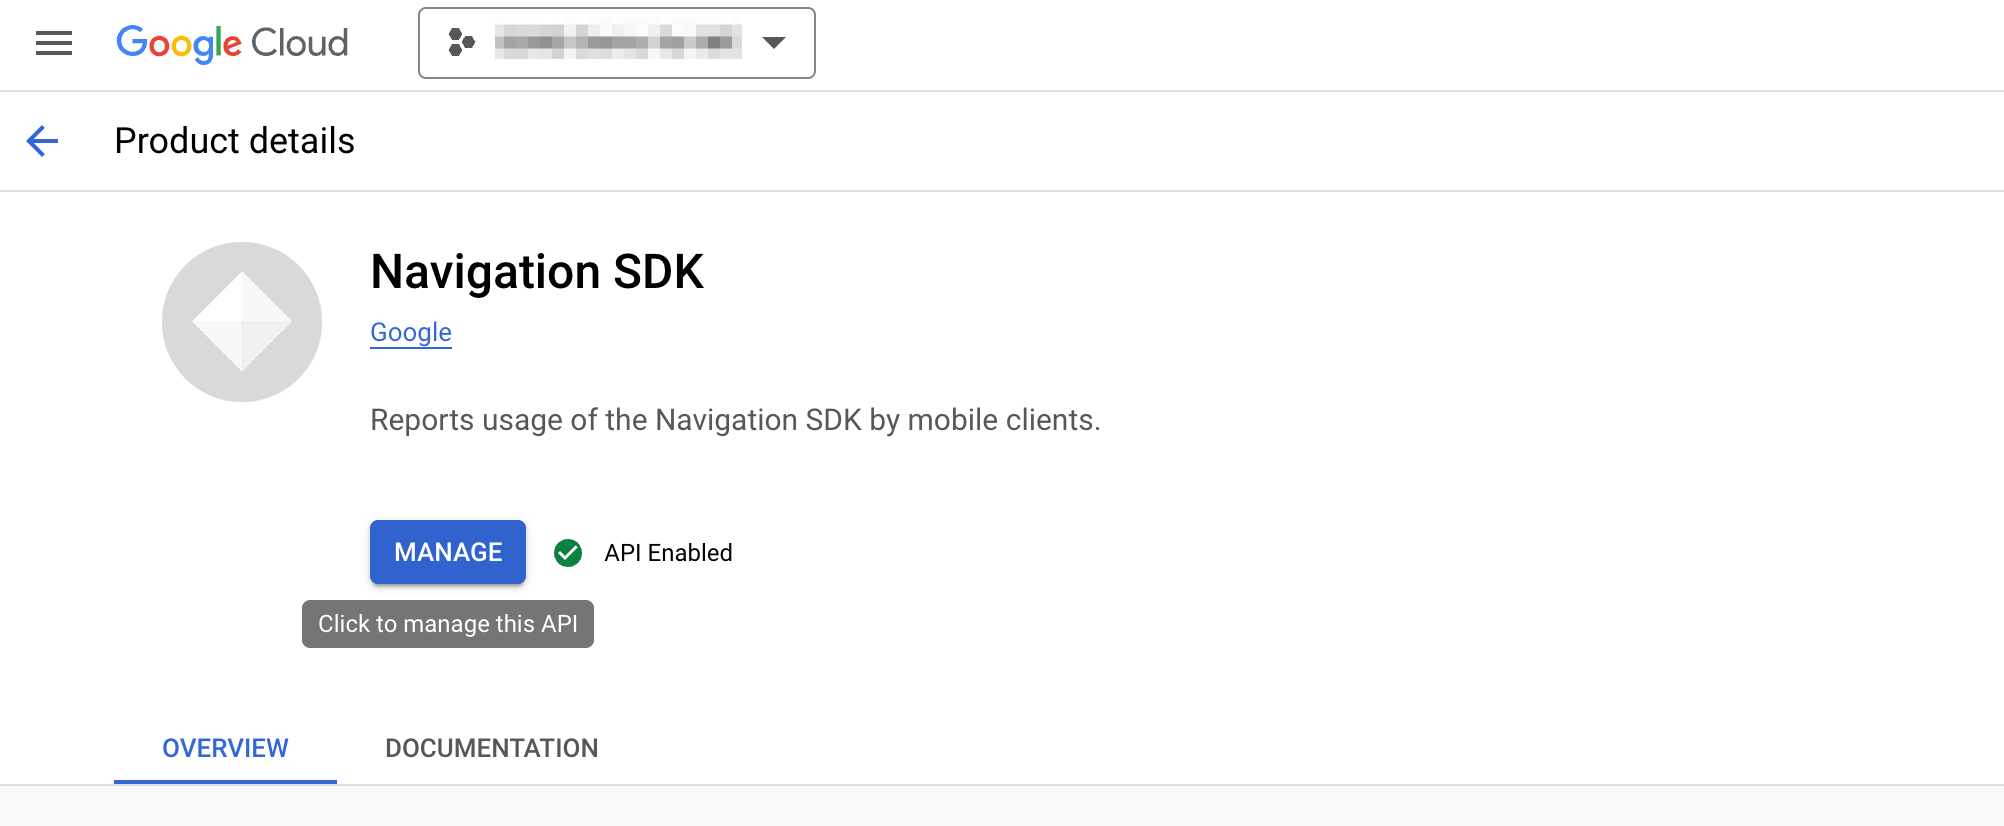
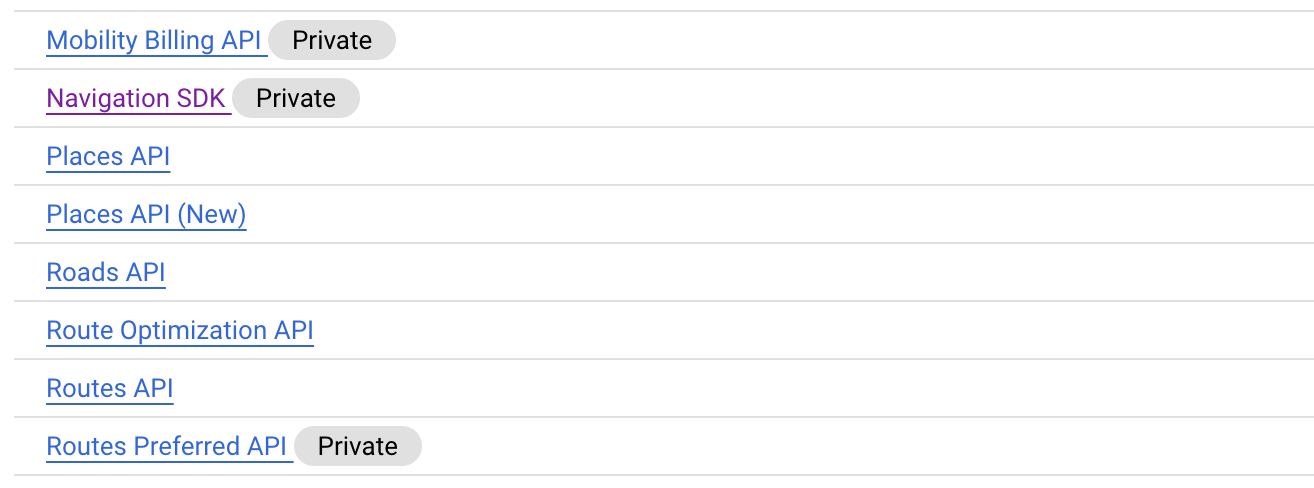
On the next page, press [ENABLE] to bind the Nav SDK to your project. To check that it's been set up correctly, click the [<-] back button to return to your project dashboard. Navigation SDK (Private) should show right below the Mobility Billing API (private) entry.
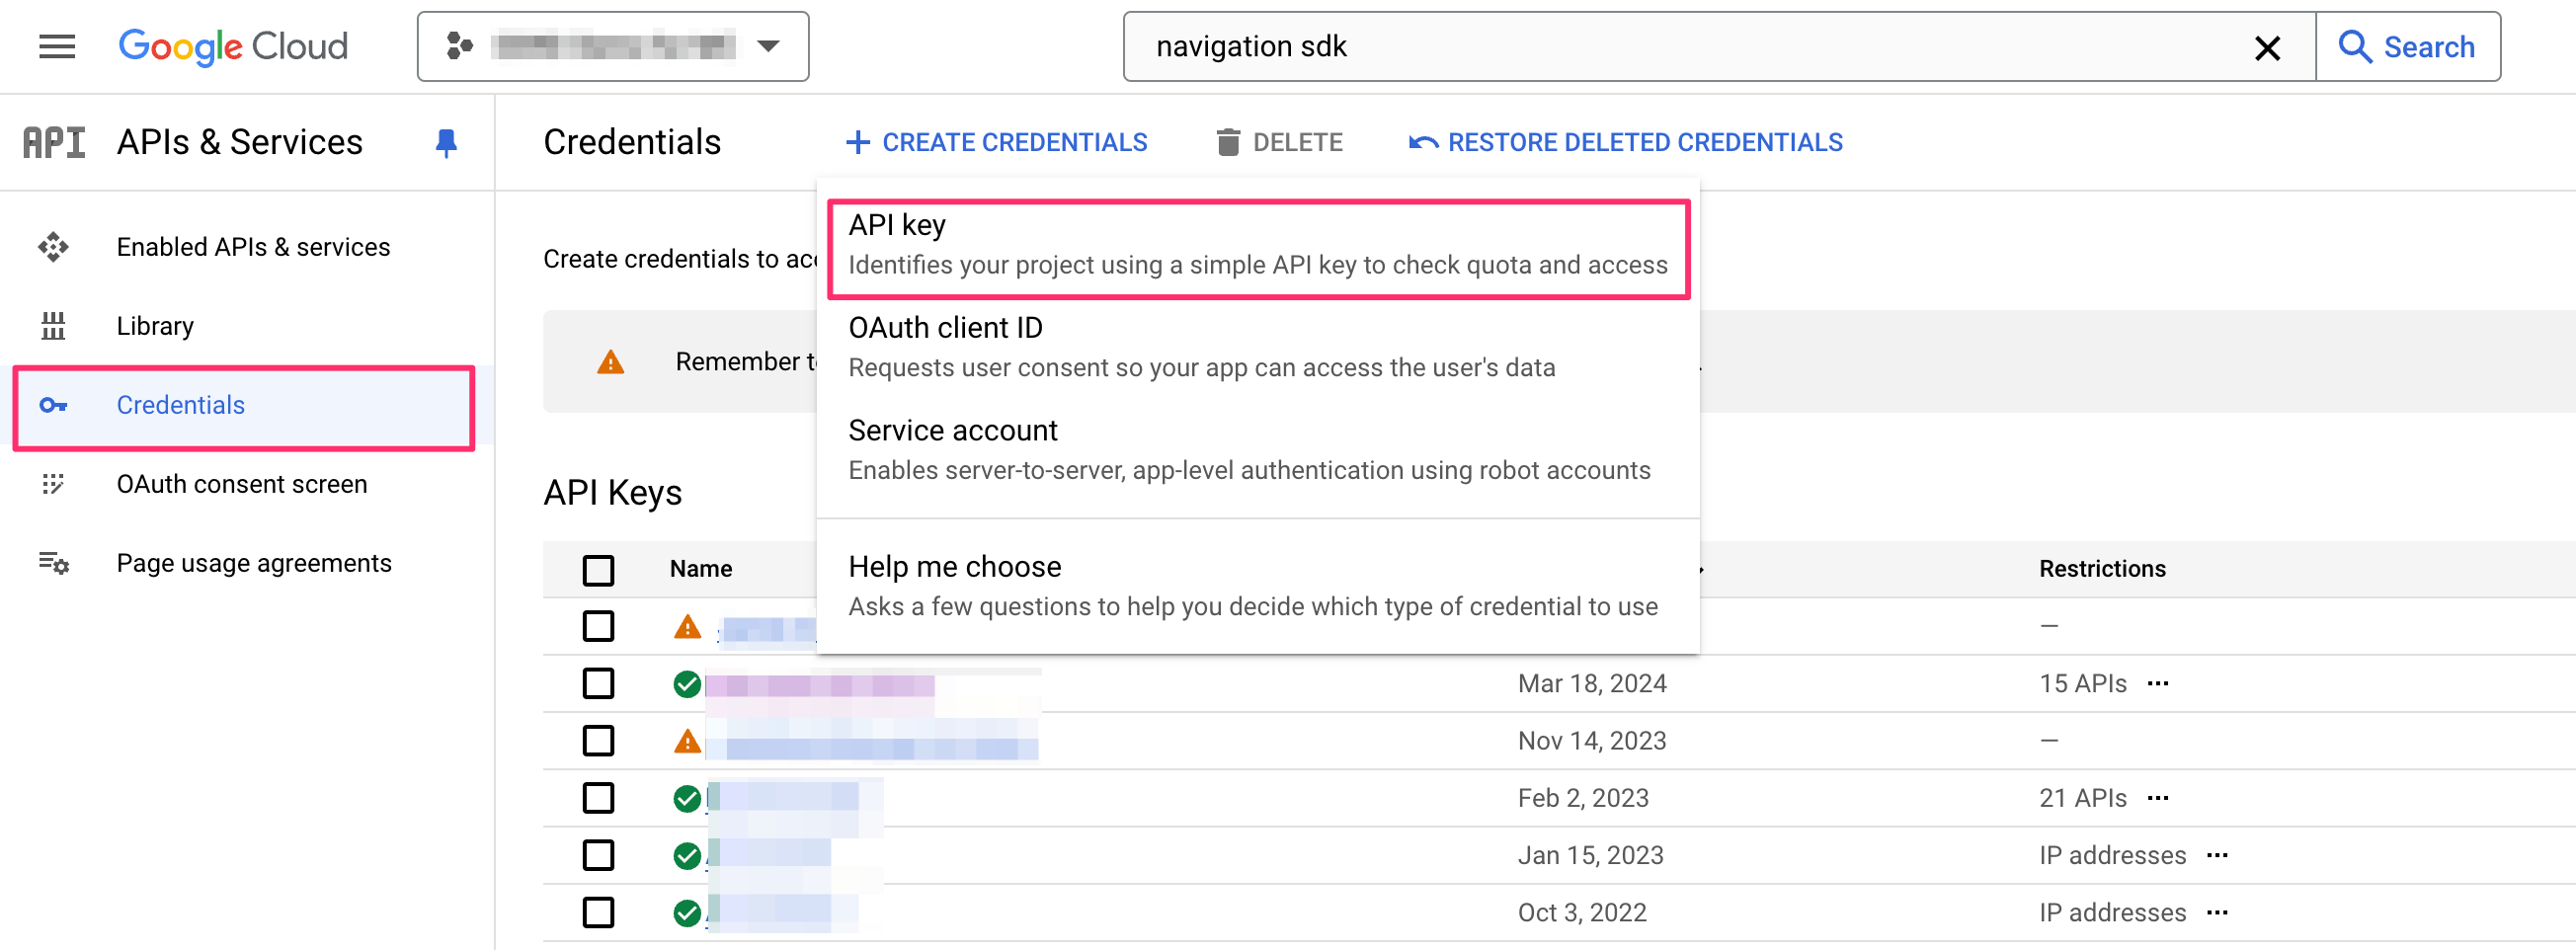
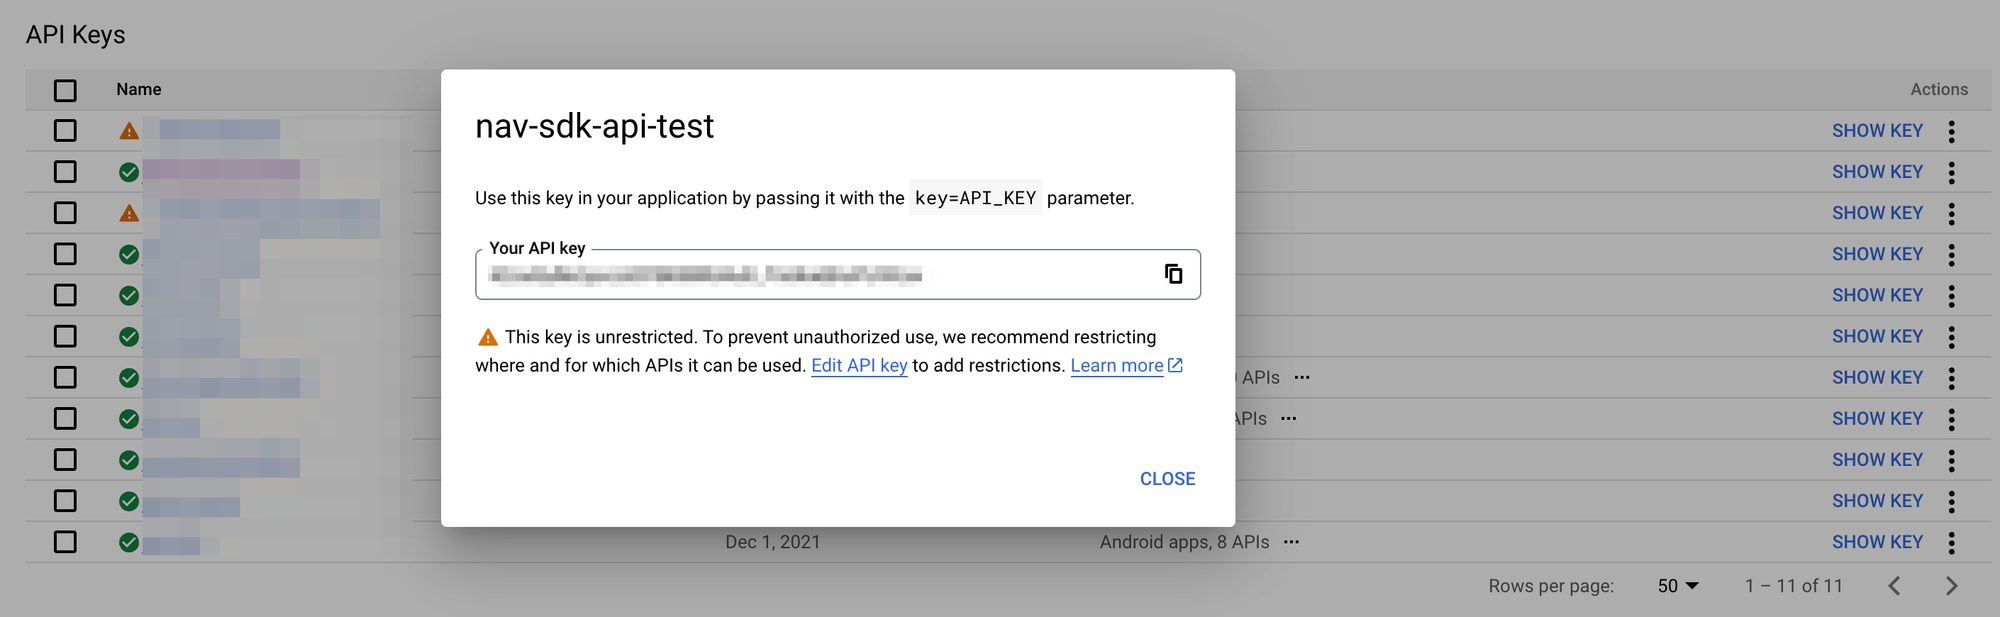
Finally, we need to create an API key. Navigate to the [Credentials] page from the link on the left hand menu and click on [+ Create Credentials]. Choose [API key], and name the key "nav-sdk-api-test".
Your new API key can be retrieved by clicking on the [Show Key] button on the right.
Downloading Android Studio and running android-navigation-samples
To run the Google Nav SDK locally on our machine, we are going to have to first download Android Studio, Google's official integrated development environment (IDE) for building Android applications.
- Go to https://developer.android.com/studio and download the appropriate version of Android Studio for your computer (Windows or macOS). Install it.
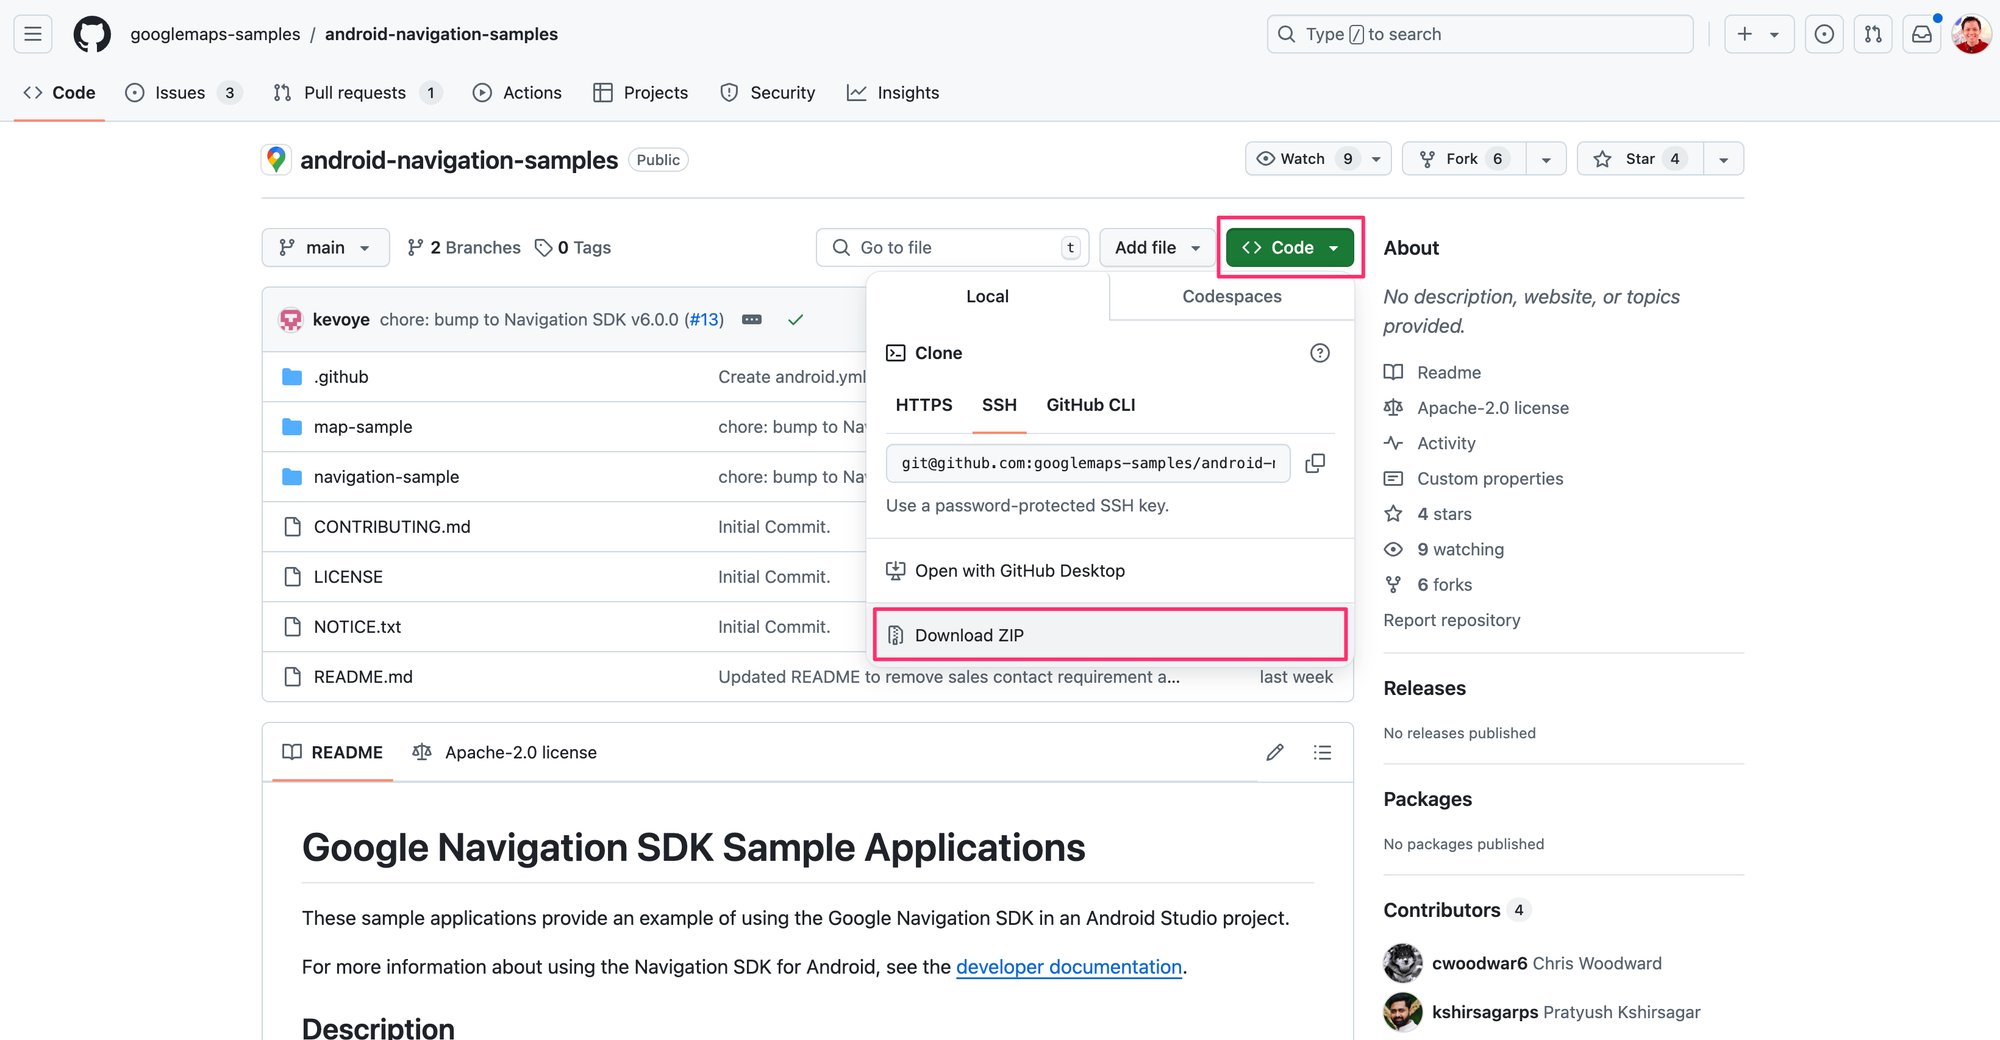
- Log into Github and open the android-navaigation-samples project page at https://github.com/googlemaps-samples/android-navigation-samples.
- Download the repo as a .zip file and unpack it.
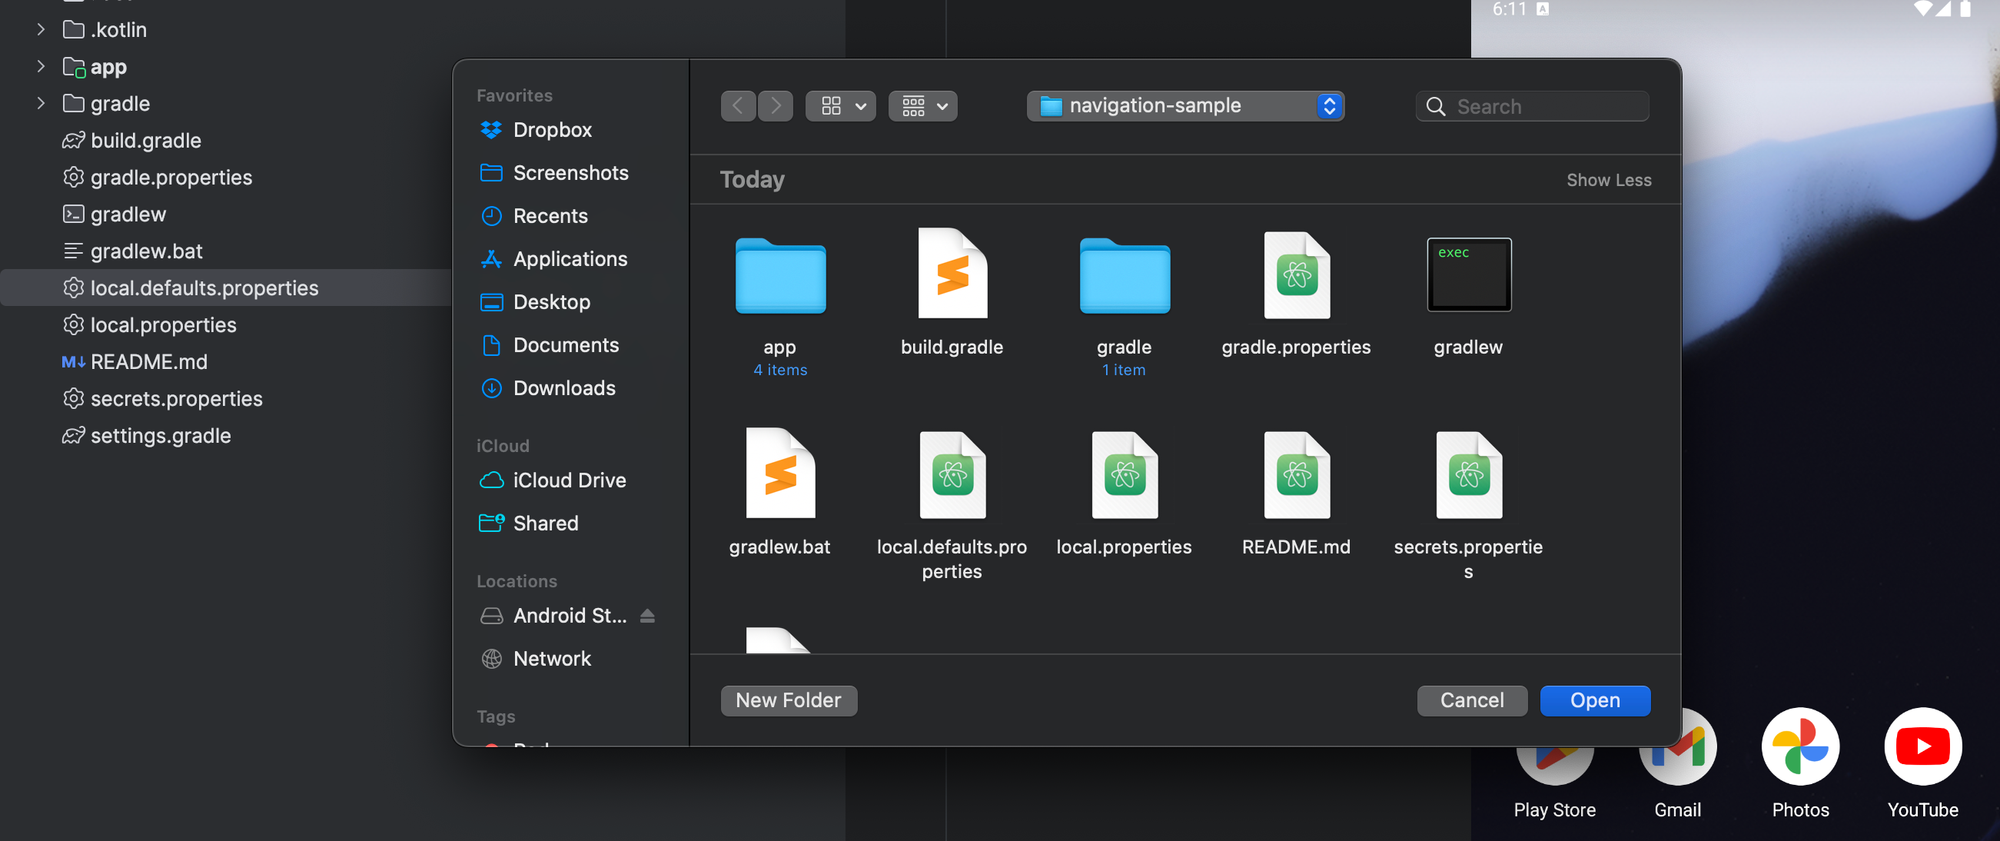
- Next, we are going to open the navigation-sample folder in Android Studio. Open Android Studio and click [File] -> [open ...] from the menu bar. Click [open].
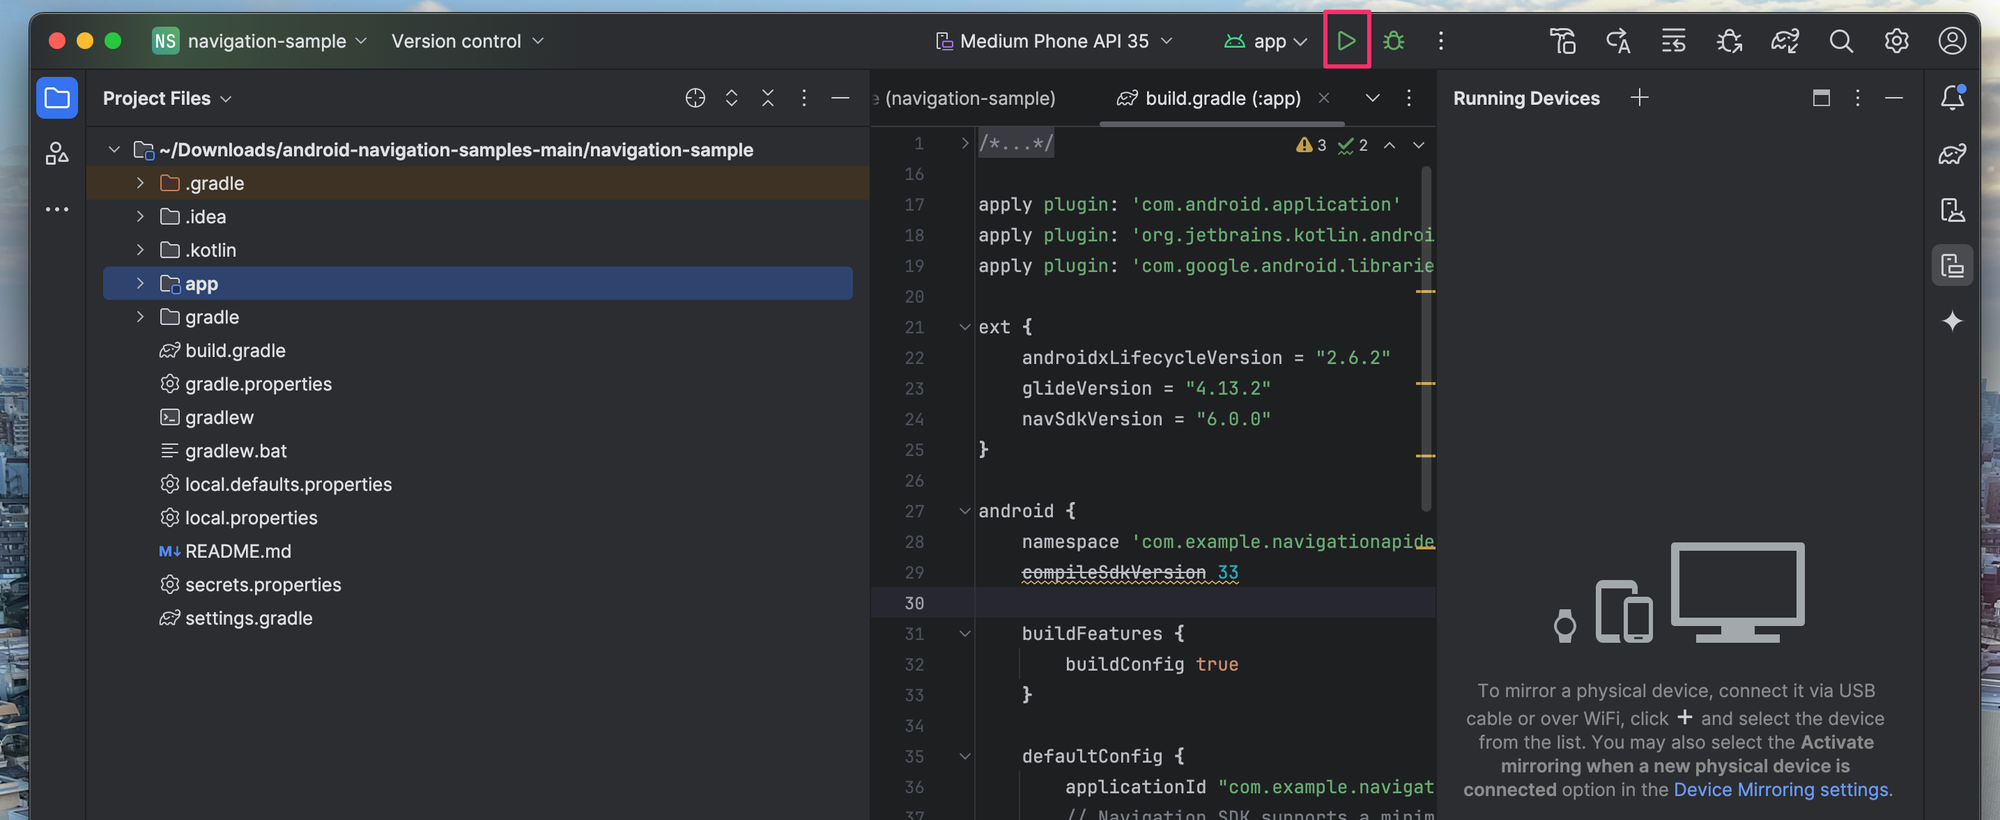
- In the navigation-sample project directory, try running the app by pressing the [play] button. It should load the app in the simulator, but the Google Maps base map won't load. This is a good sign - the app works, you just need to add the API key.
- Create a new file in the root folder of navigation-sample called
secrets.propertiesand add the lineNAV_API_KEY={GOOGLE_API_KEY}. {GOOGLE_API_KEY} is the Nav SDK API key created earlier. - Open the file
local.defaults.properties(also in the root folder of navigation-sample) and add two lines of codeNAV_API_KEY={GOOGLE_API_KEY}andMAPS_API_KEY= {GOOGLE_API_KEY}. You need theMAPS_API_KEYfor the address autocomplete feature in the sample Nav SDK app. Refer to the screenshot below to see whatlocal.defaults.propertieslooks like. - Press [play] and the app should load the map correctly, centered on Google World Headquarters at 1600 Amphitheatre Parkway in Mountain View, California.
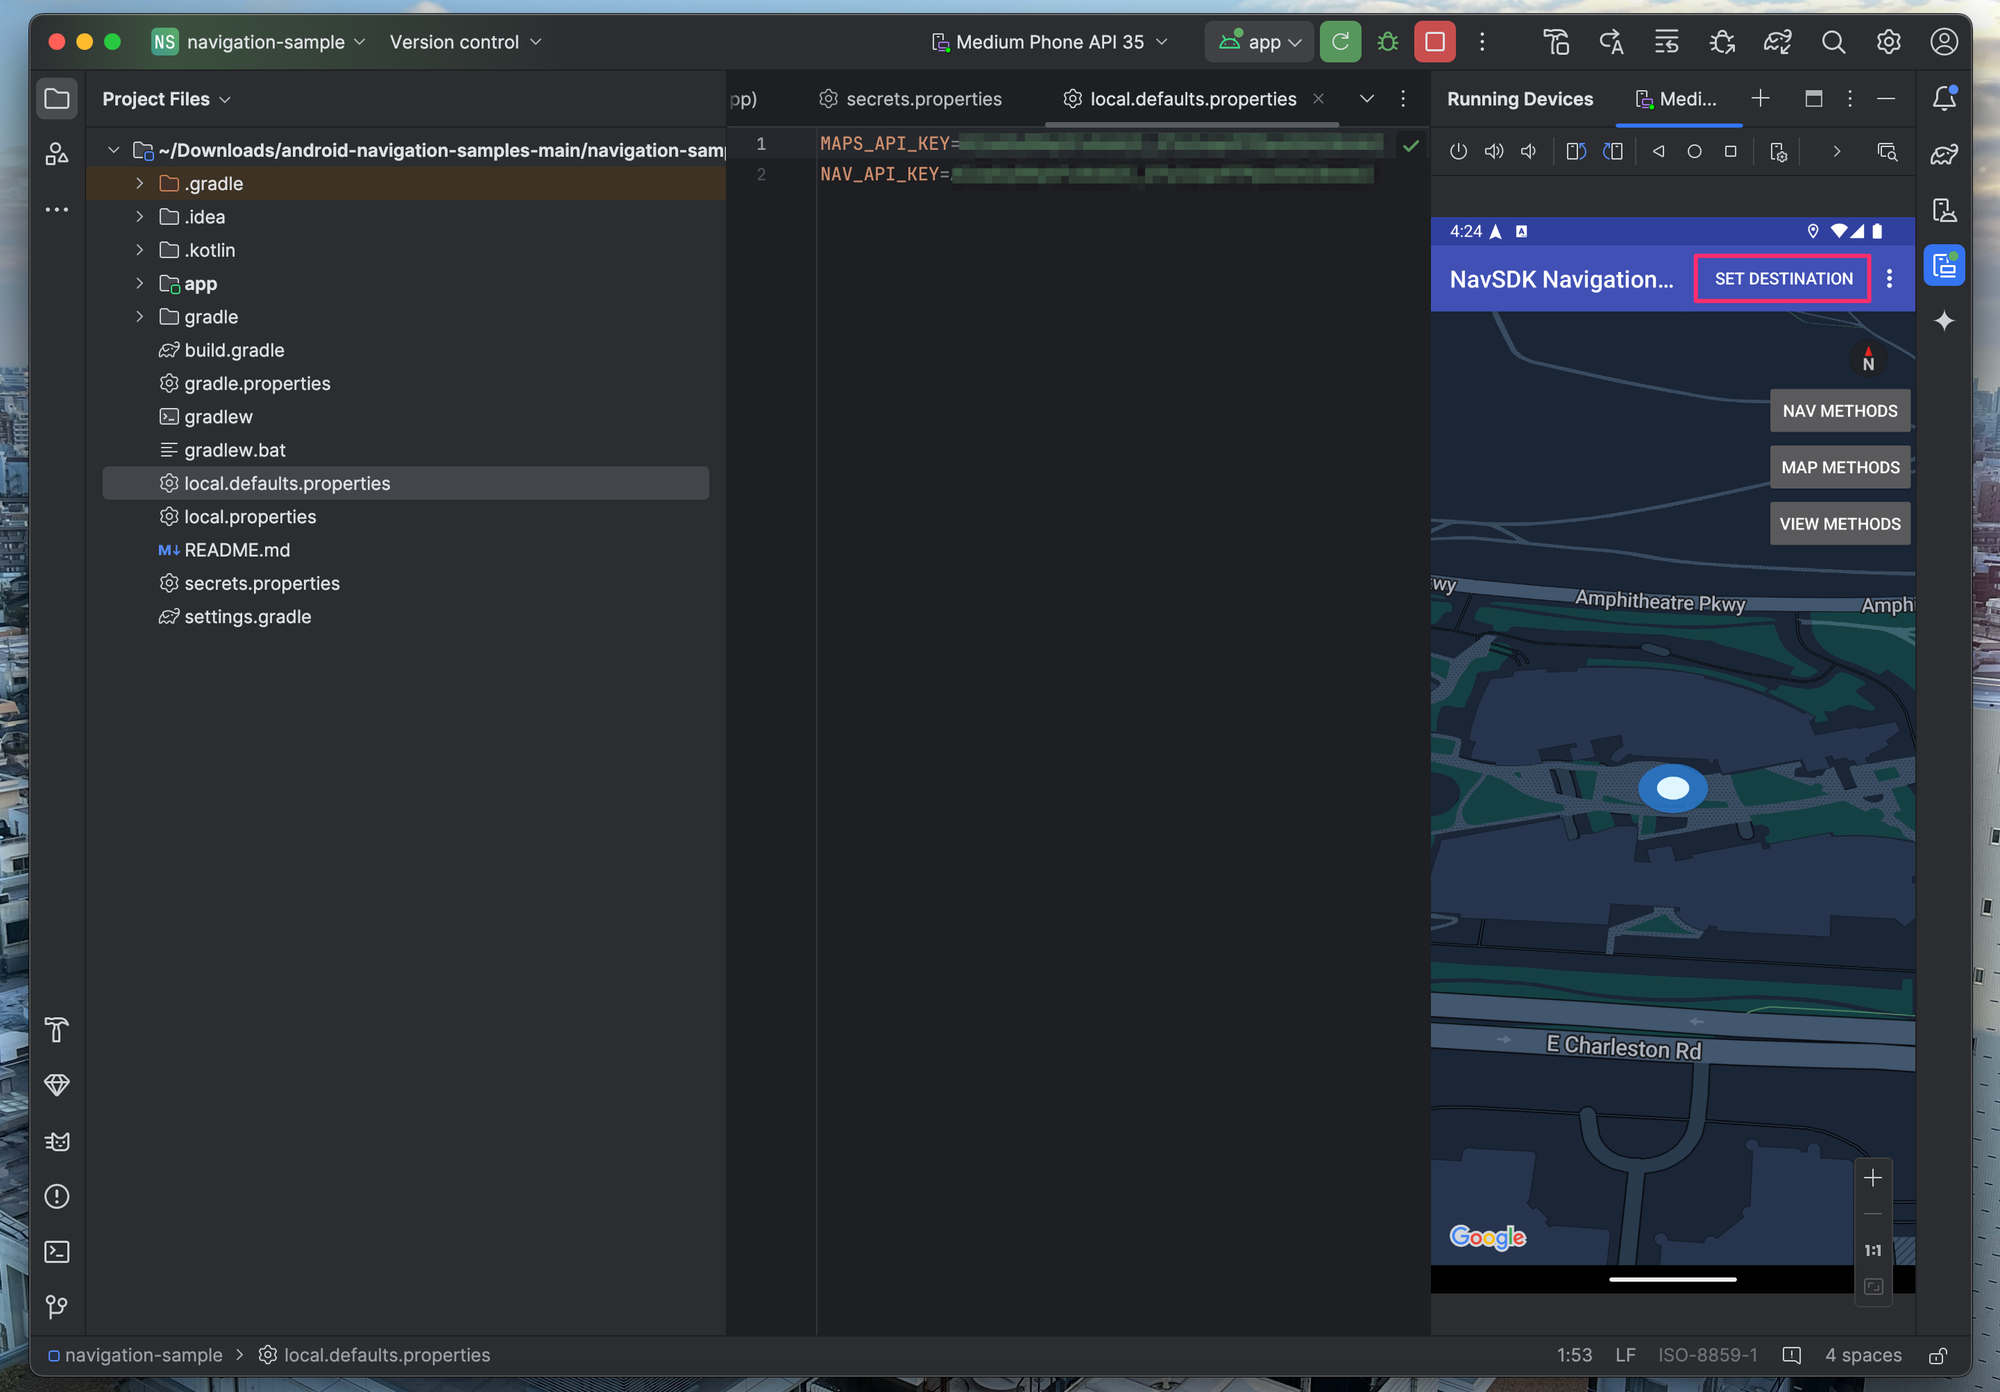
- Press the [Set Destination] button and enter "San Francisco" as the destination address. The app will now play a sped up simulation of a trip from the Googleplex to San Francisco.
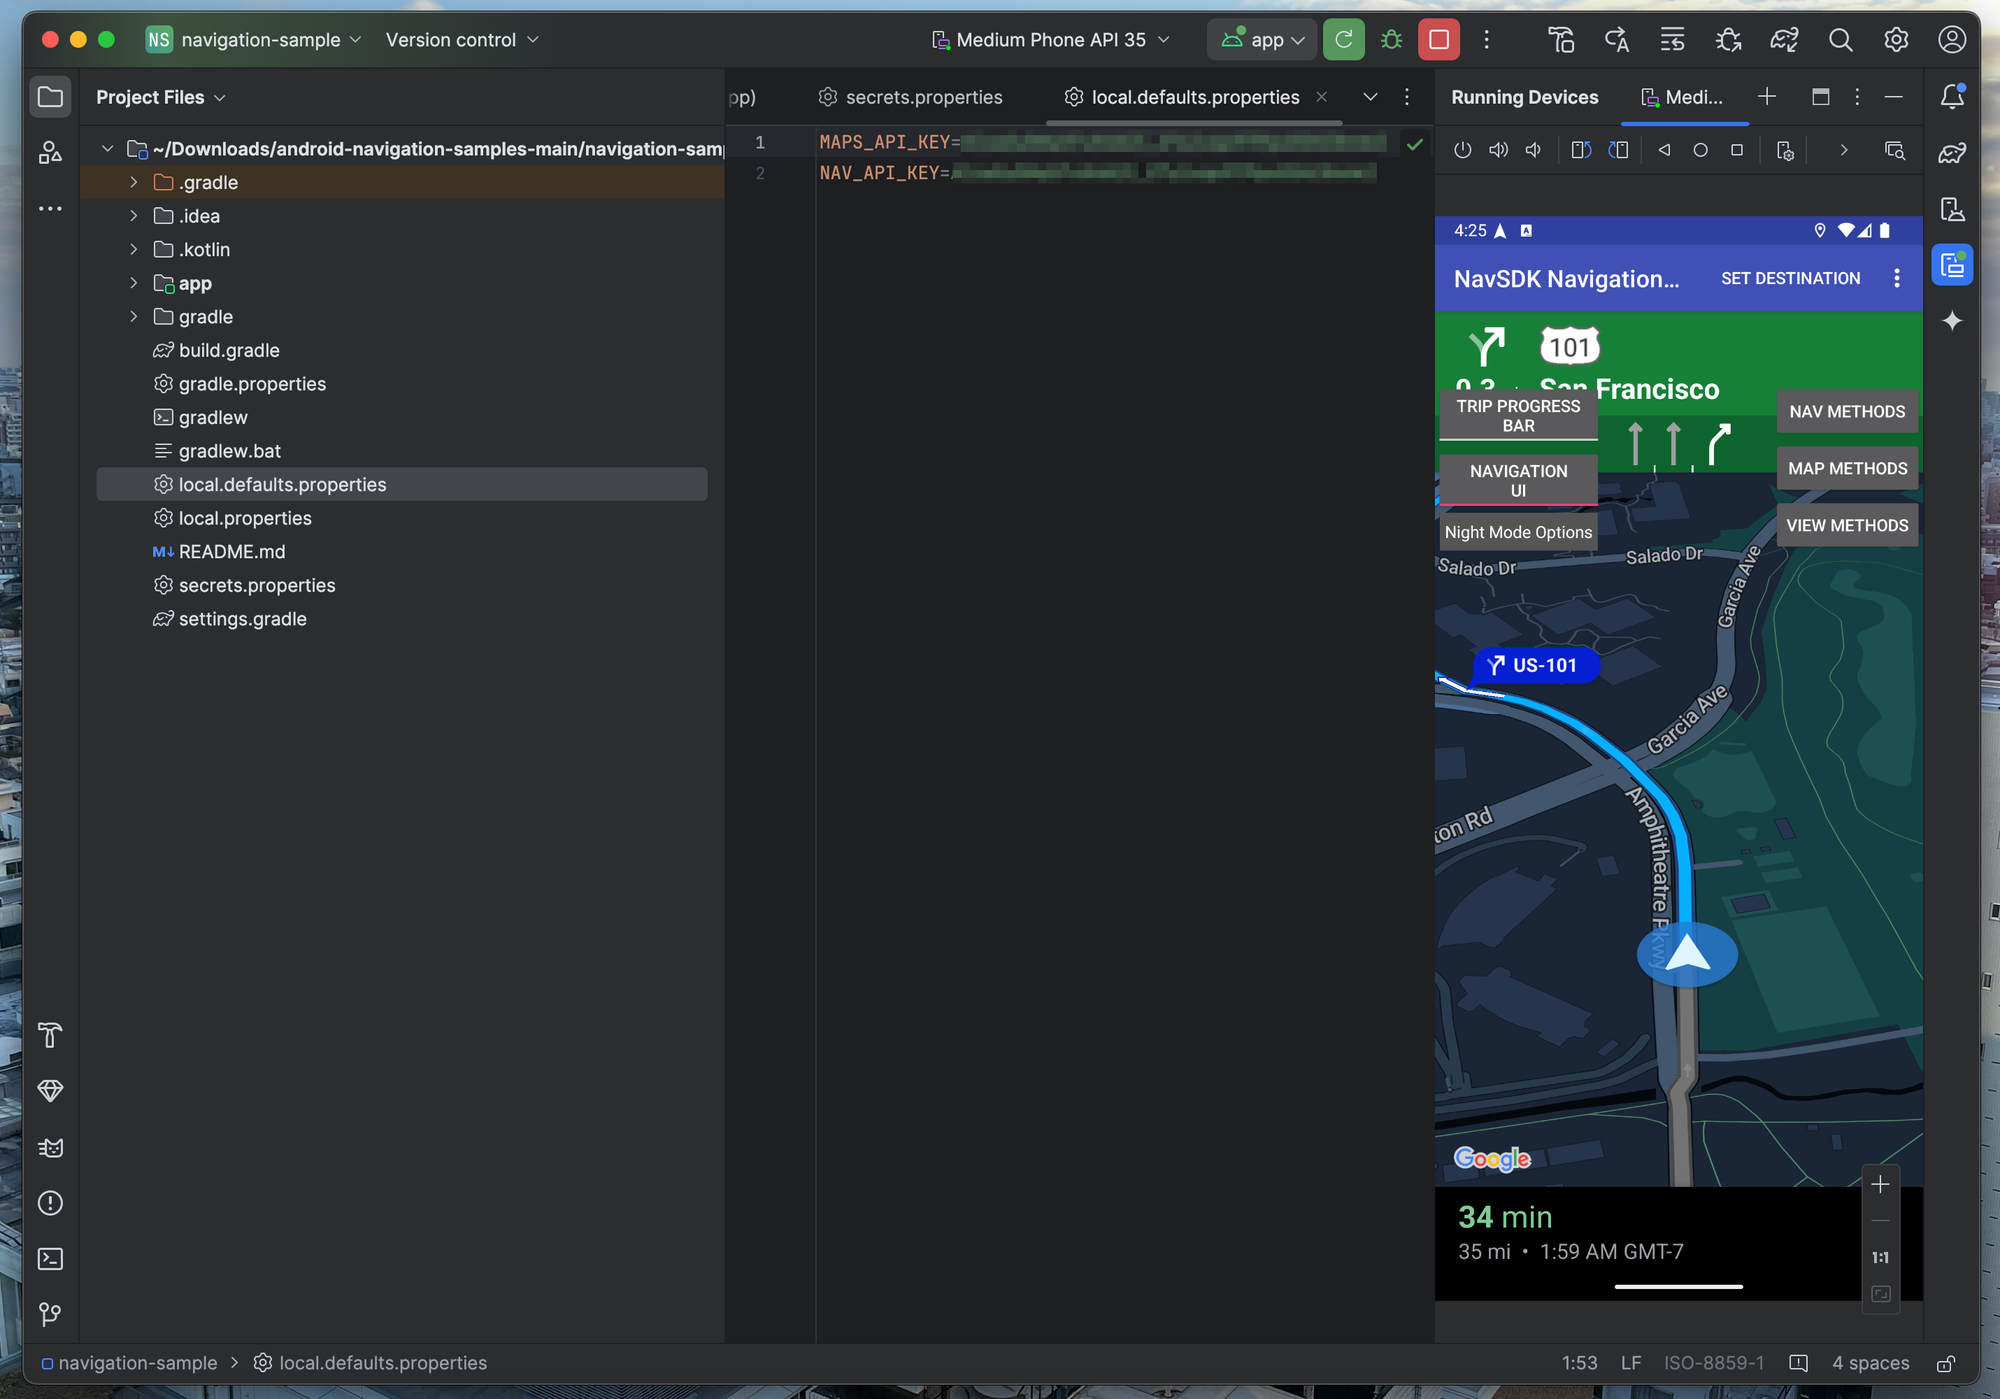
That’s it! You’ve successfully run the Navigation SDK locally on your computer. You can now use the code from the navigation-sample demo app as a starting point for integrating turn-by-turn directions into your driver app. If you need help, check out the official documentation.
What's next?
In this final blog post on Google Mobility, I covered the capabilities of the Google Navigation SDK and highlighted its immense value for companies with driver fleets. In an upcoming tutorial series, I’ll do a technical deep dive into the new standalone Nav SDK and show you how to use it to build a simple navigation app with turn-by-turn directions.
Part 1: Google Mobility: An introduction to Google ODRD, LMFS and Cloud Fleet Routing APIs
Part 2: Google ODRD: Routes Preferred computeRoutes API
Part 3: Google LMFS: Routes Preferred ComputeRouteMatrix API
Part 4: Google Cloud Fleet Routing: OptimizeTours API
Part 5: Google ODRD: Navigation SDK
👋 As always, if you have any questions or suggestions for me, please reach out or say hello on LinkedIn.