Google Maps weather along route: Weather-aware planner
Use the Forecast Hours endpoint of the Google Weather API to plan your trip and check the weather along a route.

Planning a trip? In this blog post, I'll show you how to use the Routes API and Google Weather API to build a Weather Along Route app that provides real time weather updates for every stop on your journey. Perfect for planning road trips, delivery routes, or for everyday travel.
Part 1: Meet the Google Weather API: Real time weather for maps
Part 2: Build a weather app with the Google Weather API
Part 3: Google Maps weather along route: Free route planner (this article)
Part 4: Google Maps Weather: Add a weather layer to Google Maps
It's late spring here in Vancouver, Canada. The days are getting longer and warmer, and I've started planning weekend road trips to explore different parts of beautiful British Columbia. But weather in the mountains can change suddenly, and rain at sea level could mean snow and sleet in the high mountain passes. To keep safe and stay ahead of any extreme weather, I built an app that combines the Routes API with the Google Weather API to provide real time weather updates for every point along my route, right as I’m driving through. Here's how I did it (note: we are not providing the source code for the Weather Along Route app just yet, as Afi Labs is currently developing a similar solution for a client).
How the Google Maps Weather Along Route app works
As its name suggests, the Weather Along Route app is built on two main Google Maps Platform APIs, Weather and Routes:
- The Compute Routes endpoint of the Routes API is used to draw traffic aware route polylines on the map and calculate travel times and Estimated Arrival Times (ETAs) for each stop. Users can add up to 10 waypoints, and the API will automatically adjust the route, updating the polyline, ETAs, and traffic conditions for the entire trip
- The Forecast Hours endpoint of the Weather API provides detailed predicted weather conditions for up to 240 hours (10 days), starting at the current hour. This data is combined with the ETAs from the Routes API to retrieve the weather forecast at each stop exactly when the user is expected to arrive.
Users planning a trip enter their starting point, destination, and any stops in between where they want weather updates. The app then generates the route and retrieves the forecasted weather for each stop along the way.
Using the Routes API to build a route with multiple waypoints
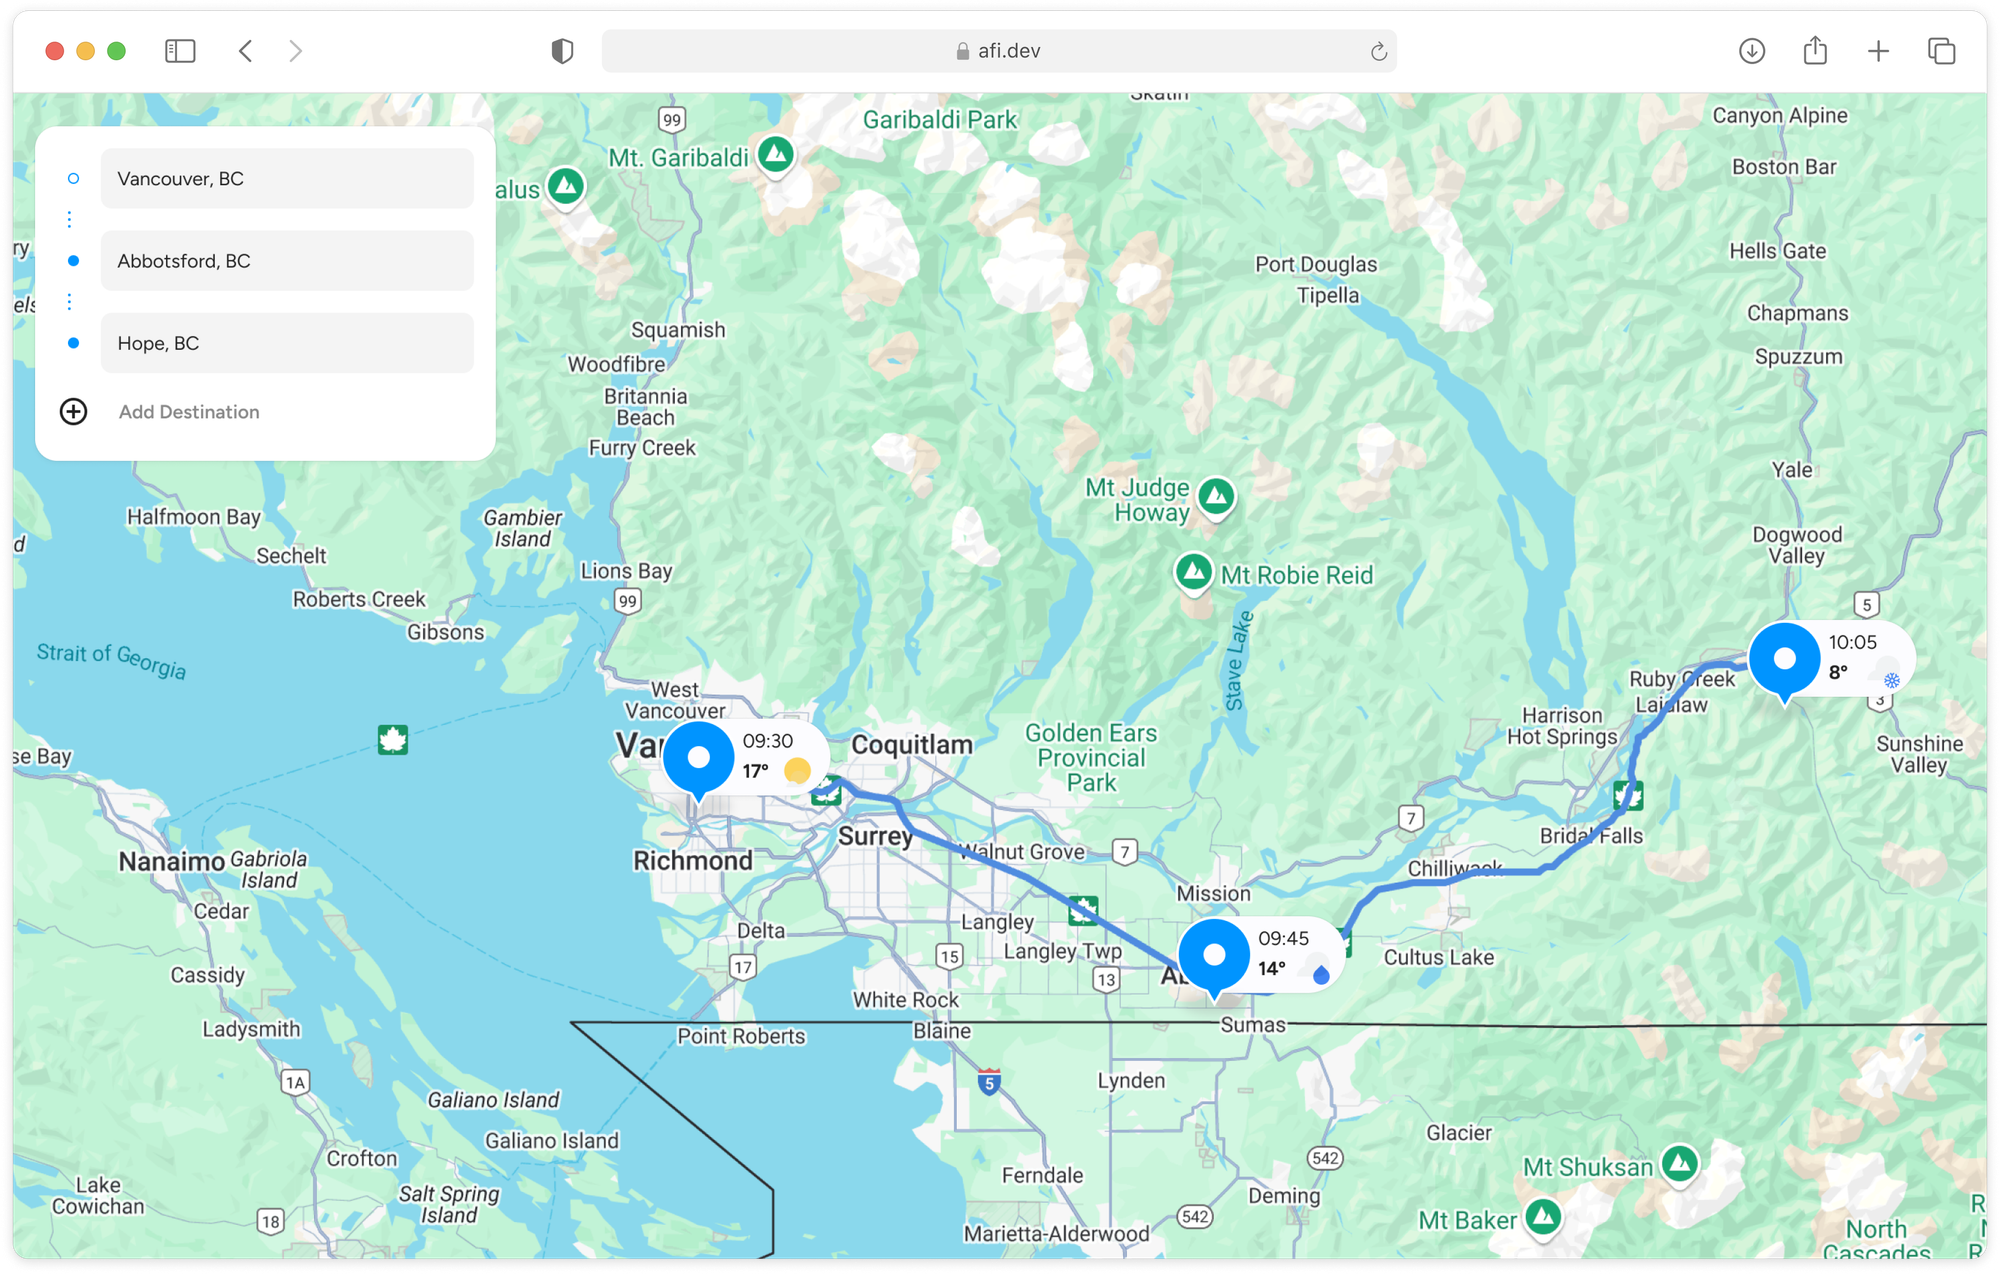
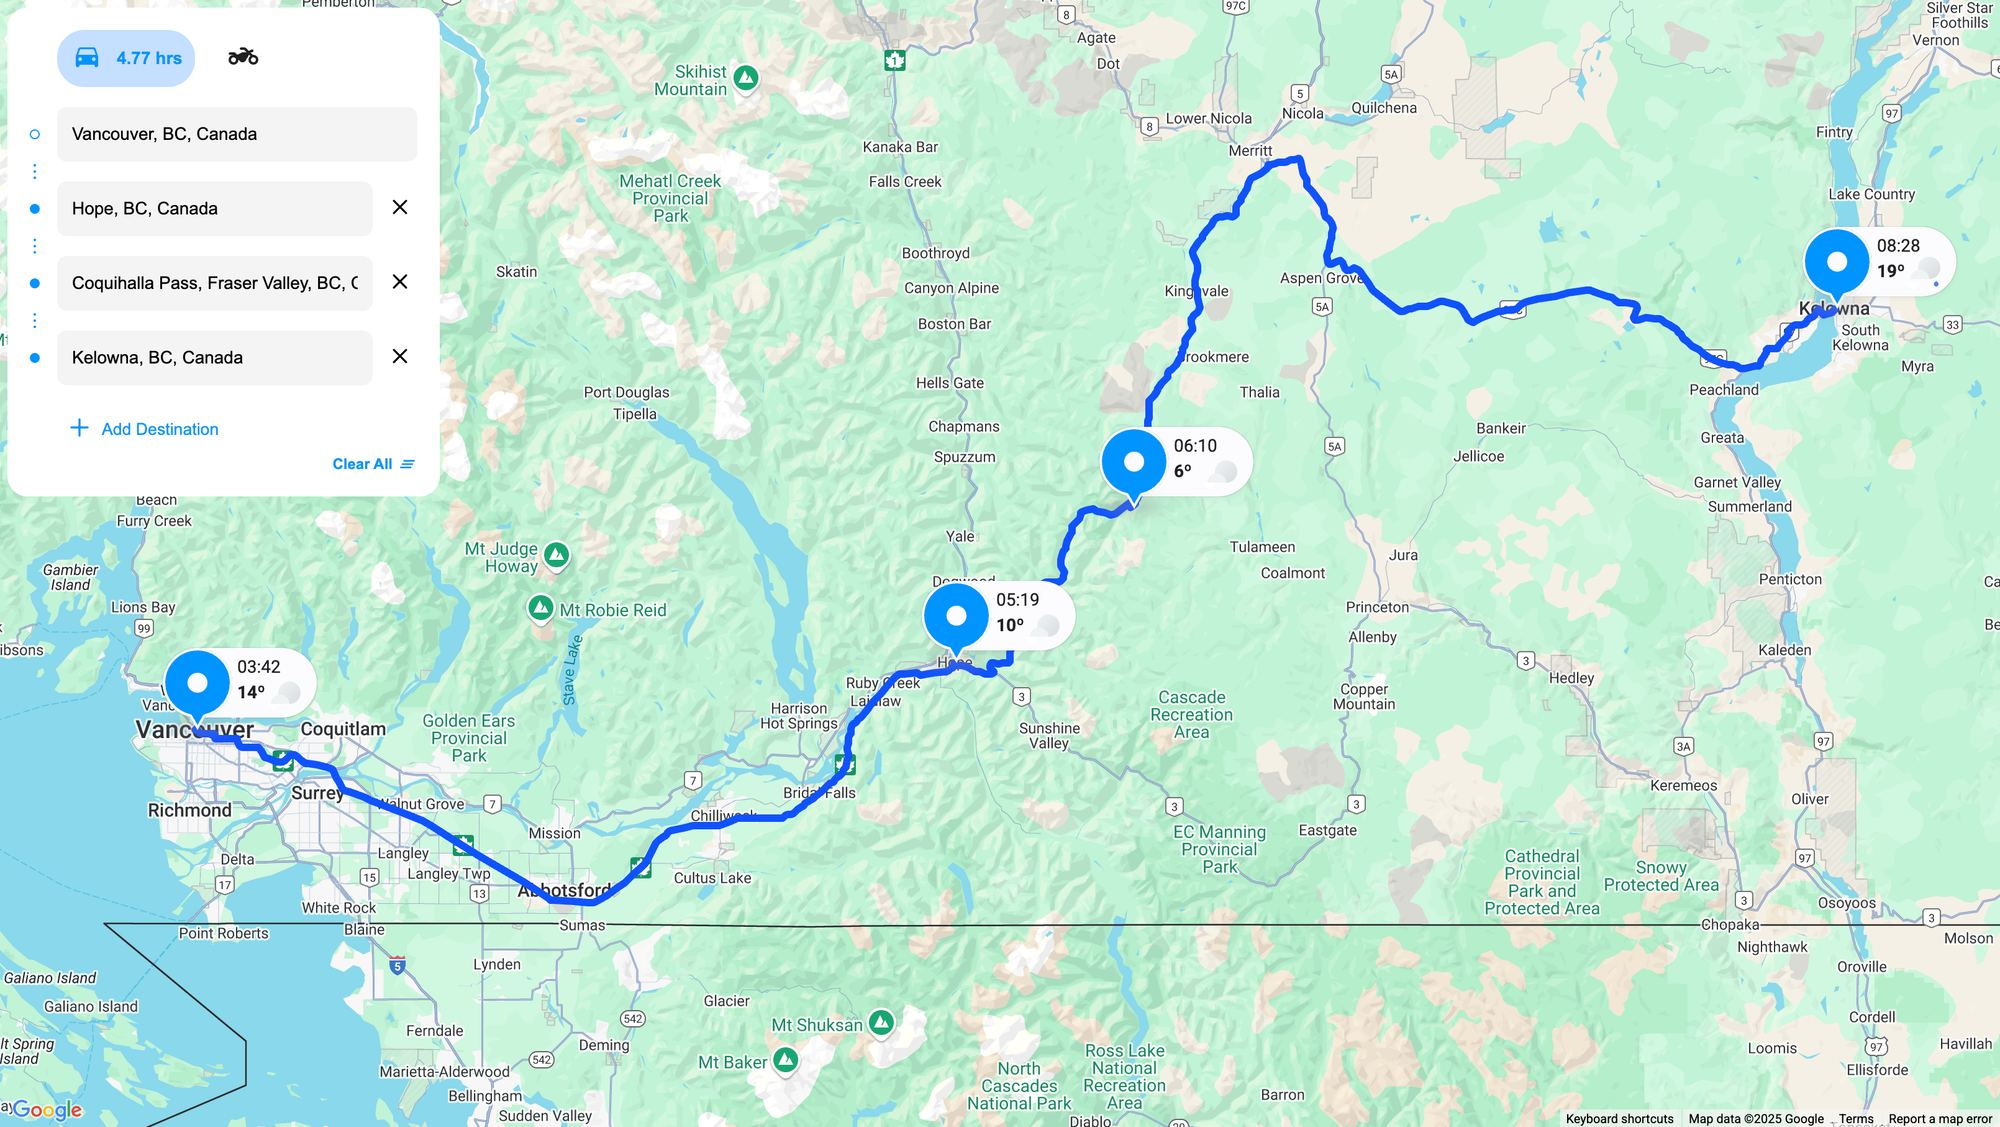
The first step is to use the Routes API to generate a route polyline that includes multiple waypoints. In the example below, the route runs from Vancouver to Kelowna, British Columbia’s wine capital and a favorite summer destination of mine, with planned stops in the town of Hope and at the Coquihalla Pass, an area known for its unpredictable weather and hazardous driving conditions.
Endpoint POST https://routes.googleapis.com/directions/v2:computeRoutes
Headers
Content-Type: application/json
X-Goog-Api-Key: YOUR_API_KEY
X-Goog-FieldMask: routes.polyline,routes.travelAdvisory,routes.legs
Request Body
{
    "origin": {
        "address": "Vancouver, BC, Canada"
    },
    "destination": {
        "address": "Kelowna, BC, Canada"
    },
    "intermediates": [
        {
            "address": "Hope, BC, Canada"
        },
        {
            "address": "Coquihalla Pass, Fraser Valley, BC, Canada"
        }
    ],
    "travelMode": "DRIVE",
    "polylineQuality": "HIGH_QUALITY",
    "extraComputations": "TRAFFIC_ON_POLYLINE",
    "routingPreference": "TRAFFIC_AWARE",
    "departureTime": "2025-09-24T01:00:00Z"
}
origin.address and destination.address define the start and end points of your route, respectively.
intermediates is an array that can hold up to 25 waypoints placed between the origin and destination. These act as intermediate stops along the route. By default, the API processes them in the order they appear in the array.
travelMode specifies the method of transportation and accepts one of the following values: "DRIVE", "WALK", "TRANSIT", or "BICYCLE".
polylineQuality determines how detailed the route path appears on the map. "HIGH_QUALITY" generates a dense polyline with many points. In contrast, "OVERVIEW" simplifies the route with fewer points, which improves load speed but sacrifices detail and accuracy in traffic segment data.
routingPreference offers three modes:
- "TRAFFIC_UNAWARE": Ignores real-time traffic and bases travel time purely on posted speed limits.
- "TRAFFIC_AWARE": Considers live traffic conditions when calculating the route.
- "TRAFFIC_AWARE_OPTIMAL": Attempts to optimize for both traffic and efficiency.
For areas with unpredictable congestion, "TRAFFIC_AWARE" is usually the best option.
departureTime becomes crucial when using "TRAFFIC_AWARE" routing. It defines the trip’s start time in RFC3339 UTC format, such as "2025-02-24T15:00:00Z". The "Z" indicates Zulu (UTC+0) time.
- If not provided, the API assumes the current time.
- Using a timestamp in the past will cause the request to fail.
Response
{
    "routes": [
        {
            "legs": [
                {
                    "distanceMeters": 152148,
                    "duration": "6898s",
                    "staticDuration": "6188s",
                    "polyline": {
                        "encodedPolyline": "}qxkHpbnnV[g@OWMU ..."
                    },
                    "startLocation": {
                        "latLng": {
                            "latitude": 49.2830332,
                            "longitude": -123.1212115
                        }
                    },
                    "endLocation": {
                        "latLng": {
                            "latitude": 49.3794854,
                            "longitude": -121.4417037
                        }
                    },
                    "steps": [
                        {
                            "distanceMeters": 116,
                            "staticDuration": "28s",
                            "polyline": {
                                "encodedPolyline": "}qxkHpbnnV[g@OWMUW_@eAeB"
                            },
                            "startLocation": {
                                "latLng": {
                                    "latitude": 49.2830332,
                                    "longitude": -123.1212115
                                }
                            },
                            "endLocation": {
                                "latLng": {
                                    "latitude": 49.283786400000004,
                                    "longitude": -123.12011309999998
                                }
                            },
                            "navigationInstruction": {
                                "maneuver": "DEPART",
                                "instructions": "Head northeast on Hornby St toward W Georgia St/BC-1A/BC-99 N"
                            },
                            "localizedValues": {
                                "distance": {
                                    "text": "0.1 km"
                                },
                                "staticDuration": {
                                    "text": "1 min"
                                }
                            },
                            "travelMode": "DRIVE"
                        },
                        // ... 12 more steps
                    ],
                    "travelAdvisory": {
                        "speedReadingIntervals": [
                            {
                                "startPolylinePointIndex": 0,
                                "endPolylinePointIndex": 7489,
                                "speed": "NORMAL"
                            }
                        ]
                    },
                    "localizedValues": {
                        "distance": {
                            "text": "152 km"
                        },
                        "duration": {
                            "text": "1 hour 55 mins"
                        },
                        "staticDuration": {
                            "text": "1 hour 43 mins"
                        }
                    }
                },
                // ... 2 more legs
            ],
            "polyline": {
                "encodedPolyline": "}qxkHpbnnV[g@OWM ..."
            },
            "travelAdvisory": {
                "speedReadingIntervals": [
                    {
                        "startPolylinePointIndex": 0,
                        "endPolylinePointIndex": 21528,
                        "speed": "NORMAL"
                    }
                ]
            }
        }
    ]
}
The response from the Routes API is easy to understand. The routes array contains one or more route objects, each with a distanceMeters field, representing the total distance traveled, and duration, which is the total time in seconds to complete the route. To determine the ETA, add the duration to the departureTime. For example, if departureTime is "2025-09-24T01:00:00Z" (6:00 PM Vancouver time on 23 September, 2025) and the duration for the first leg from Vancouver to hope is is 6,898 seconds (1 hour 54 minutes and 58 seconds), the ETA at Hope is 18:00 + 6898 seconds = 19:54:58 Vancouver time (PT).
Each route consists of one or more legs (since there are 2 waypoints in our example, there will be 3 legs i.e. Vancouver - Hope, Hope - Coquihalla Pass, and Coquihalla Pass - Kelowna). Each leg contains steps which break down the route into manageable segments, usually corresponding to a specific turn, street, or maneuver.
Adding stops to the Route with Google Maps Routes API
To build a route with multiple waypoints (stops), click [+ Add Destination] in the route builder panel located at the top left of the app.

When the [+ Add Destination] button is pressed, the handleDestinationChange() method in SearchBoxContainer.jsx is triggered.
/*** SearchBoxContainer.jsx ***/
const handleDestinationChange = async (address, index) => {
  const locationWithWeather = await getLocationWithWeather(address);
  const newDestinations = [...destinations];
  newDestinations[index] = locationWithWeather;
  dispatch(setData({ destinations: newDestinations }));
};
handleDestinationChange() takes two parameters as input:
address: The new destination address retrieved from the Google Place Autocomplete when you click [+ Add Destination].index: The index of the destination in thedestinationsarray that is being updated. This index is retrieved from the route builder user interface using thekeyattribute (see above screenshot) of the<PlaceAutocompleteInput/>component.
Inside the method, we append 24 hour weather data for the given address with the line: const locationWithWeather = await getLocationWithWeather(address);.
Then, we make a shallow copy of the destinations array (destinations is retrieved from the Redux store): const newDestinations = [...destinations];
Next, we add the new destination to the end of the newDestinations array and update the app's state by dispatching the updated array to Redux.
newDestinations[index] = locationWithWeather;
dispatch(setData({ destinations: newDestinations }));
Finally, in the useEffect() method of SearchBoxContainer.jsx, we call the Google Routes API with the following parameters: the origin (retrieved from the Redux store), the destination (the last entry in the destinations array), and the intermediates (all addresses except the last one in the destinations array).
/*** containers/SearchBoxContainer.jsx ***/
const { travelMode, routes, origin, destinations } = useSelector(
  (state) => state.map.data,
);

// Some code omitted

useEffect(() => {
  const fetchDirections = async () => {
    // Get the final destination (last point)
    const finalDestination = validDestinations[validDestinations.length - 1];

    // Create intermediate points from all destinations except the last one
    const intermediatePoints = validDestinations.slice(0, -1).map((dest) => ({
      address: dest.formattedAddress,
    }));

    const res = await getDirections({
      origin: { address: origin.formattedAddress },
      destination: { address: finalDestination.formattedAddress },
      intermediates: intermediatePoints,
      travelMode: mode,
      routingPreference: "traffic_aware",
      extraComputations: ["TRAFFIC_ON_POLYLINE"],
    });
  };
}, [origin, destinations, dispatch]);
The new route is saved to Redux and is re-rendered each time a destination is added, removed or changed.
Using the Weather API to get the weather along a route
The second step is to get the hourly forecast at each stop from the Weather API. For example, here's the 10 day hourly weather forecast for our starting point in Vancouver, Canada (49.24629,-123.116226 - which you can get from the Geocoding API).
Endpoint: GET
https://weather.googleapis.com/v1/forecast/days:lookup?key={YOUR_API_KEY}
&location.latitude={LATITUDE}
&location.longitude={LONGITUDE}
&hours={HOURS}
{YOUR_API_KEY} is the is your Google Maps API key with the Google Weather API enabled.
{LATITUDE} is latitude coordinate of the location you want to get weather for.
{LONGITUDE} is the longitude coordinate of the location you want to get weather for.
{HOURS} is the number of hours you want to get the forecast for. If you don't set it, it defaults to the maximum of 240 hours (10 days).
Endpoint: GET
Response
{
    "forecastHours": [
        {
            "interval": {
                "startTime": "2025-05-25T23:00:00Z",
                "endTime": "2025-05-26T00:00:00Z"
            },
            "displayDateTime": {
                "year": 2025,
                "month": 5,
                "day": 25,
                "hours": 16,
                "minutes": 0,
                "seconds": 0,
                "nanos": 0,
                "utcOffset": "-25200s"
            },
            "weatherCondition": {
                "iconBaseUri": "https://maps.gstatic.com/weather/v1/cloudy",
                "description": {
                    "text": "Cloudy",
                    "languageCode": "en"
                },
                "type": "CLOUDY"
            },
            "temperature": {
                "unit": "CELSIUS",
                "degrees": 18.2
            },
            "feelsLikeTemperature": {
                "unit": "CELSIUS",
                "degrees": 18.2
            },
            "dewPoint": {
                "unit": "CELSIUS",
                "degrees": 10.4
            },
            "heatIndex": {
                "unit": "CELSIUS",
                "degrees": 18.2
            },
            "windChill": {
                "unit": "CELSIUS",
                "degrees": 18.2
            },
            "wetBulbTemperature": {
                "unit": "CELSIUS",
                "degrees": 13.6
            },
            "precipitation": {
                "probability": {
                    "type": "RAIN",
                    "percent": 10
                },
                "snowQpf": {
                    "unit": "MILLIMETERS",
                    "quantity": 0
                },
                "qpf": {
                    "unit": "MILLIMETERS",
                    "quantity": 0
                }
            },
            "airPressure": {
                "meanSeaLevelMillibars": 1013.8
            },
            "wind": {
                "direction": {
                    "cardinal": "SOUTHWEST",
                    "degrees": 215
                },
                "speed": {
                    "unit": "KILOMETERS_PER_HOUR",
                    "value": 6
                },
                "gust": {
                    "unit": "KILOMETERS_PER_HOUR",
                    "value": 14
                }
            },
            "visibility": {
                "unit": "KILOMETERS",
                "distance": 16
            },
            "iceThickness": {
                "unit": "MILLIMETERS",
                "thickness": 0
            },
            "isDaytime": true,
            "relativeHumidity": 61,
            "uvIndex": 2,
            "thunderstormProbability": 0,
            "cloudCover": 100
        },
        // ... 23 more entries
    ],
    "timeZone": {
        "id": "America/Vancouver",
        "version": ""
    },
    "nextPageToken": "ChcKEgkaogp_hp9I..."
}
The response is an array, forecastHours, where each entry represents the hourly forecast record at a given location. Within each forecastHour object (see docs):
intervalprovides thestartTimeandendTimefor the hourly forecast. For example, in Vancouver, Canada (which is in the Pacific Time Zone, PT), the first interval in the example above is "2025-05-25T23:00:00Z" to "2025-05-26T00:00:00Z". When converted to Pacific Time, this corresponds to 4:00 PM PT to 5:00 PM PT on April 25, 2025. This is going to come in handy later on when we need to match the ETAs returned by the Routes API with the corresponding hourly weather forecast.displayDateprovides a human-readable date (year,month, andday) that you can use to determine the day of the week and display in a weather app.weatherConditionhelpfully supplies us with a human readabledescriptione.g. "Cloudy" that can easily be added to a weather app as well as aiconBaseUrithat can be used to retrieve the corresponding weather icon. To display the icon, append the file type extension (.png or .svg) to this URI.temperatureshows the expected temperature value at that specific hour. By default, the Google Weather API returns temperatures in degrees Celsius. To get temperatures in degrees Fahrenheit instead, appendunitsSystem=IMPERIALto the request URL string.
The API also returns a helpful timeZone field, which provides the time zone of the requested location in IANA time zone format. This is especially useful for converting timestamps returned by the Weather API into the correct local time. For example, you could use the Weather Along Route app to get the weather for a route in Sydney, Australia, and have the ETAs at each stop displayed in Australian Eastern Standard Time (AEST) or Australian Eastern Daylight Time (AEDT), depending on the date.
By default, the Forecast Hours endpoint provides 24 hours of forecast data. If the response contains multiple pages, it will include a nextPageToken. To retrieve the following page, include this nextPageToken value in your request’s pageToken parameter like so:
Using the Forecast Hours endpoint of the Google Weather API to retrieve the 24 hour weather forecast at a specific location
The code that combines waypoint (stop) location data with its weather forecast can be found in the getLocationWithWeather() method of SearchBoxContainer.jsx.
/*** containers/SearchBoxContainer.jsx ***/
const getLocationWithWeather = async (address) => {
  const locationData = transformAddressToLocationData(address);
  const { weatherData, timeZone } = await getWeatherData(locationData);
  return { ...locationData, weatherData, timeZone };
};
getLocationWithWeather() takes in an address object that looks like this:
/*** address object ***/
{
    "formatted_address": "Kelowna, BC, Canada",
    "geometry": {
        "location": {
            "lat": 49.8863235,
            "lng": -119.4965917
        },
        "viewport": {
            "south": 49.77343703680909,
            "west": -119.5896030353989,
            "north": 50.02594796007349,
            "east": -119.3199561464863
        }
    },
    "name": "Kelowna",
    "place_id": "ChIJszDH47aMfVMR98S02j3l-E4",
    "html_attributions": []
}
First, we use the transformAddressToLocationData() method to refactor address and extract its latitude and longitude.
/*** containers/SearchBoxContainer.jsx ***/
const transformAddressToLocationData = (address) => ({
  name: address.name,
  formattedAddress: address.formatted_address,
  position: {
    lat: address.geometry.location.lat(),
    lng: address.geometry.location.lng(),
  },
  place_id: address.place_id,
});
This transforms the address into a locationData object, containing only the necessary information.
/*** locationData object ***/
{
    "name": "Kelowna",
    "formattedAddress": "Kelowna, BC, Canada",
    "position": {
        "lat": 49.8863235,
        "lng": -119.4965917
    },
    "place_id": "ChIJszDH47aMfVMR98S02j3l-E4"
}
Next, we pass the locationData object to the getWeatherData() method to fetch its 24-hour weather forecast and timezone (used to convert ETAs into local time).
/*** services/google.js ***/
const getWeatherData = async (locationData) => {
  try {
    const { lat, lng } = locationData.position;
    const response = await axios.get(WEATHER_API_URL, {
      params: {
        latitude: lat,
        longitude: lng,
        hours: 24,
      },
    });

    // Find the most relevant forecast hour
    const forecastHours = response.data.forecastHours;
    const weatherData = forecastHours.map((forecastHour) => ({
      interval: forecastHour.interval,
      degree: forecastHour.temperature.degrees,
      iconUrl: forecastHour.weatherCondition.iconBaseUri + ".png",
    }));

    return {
      weatherData,
      timeZone: response.data.timeZone.id,
    };
  } catch (error) {
    console.error("Error fetching weather data:", error);
    throw error;
  }
};
Finally, we return a new object (let's call it a stop) that combines the properties of locationData with the weatherData and timeZone values.
return { ...locationData, weatherData, timeZone };The stop object returned looks like this:
{
    "name": "Kelowna",
    "formattedAddress": "Kelowna, BC, Canada",
    "position": {
        "lat": 49.8863235,
        "lng": -119.4965917
    },
    "place_id": "ChIJszDH47aMfVMR98S02j3l-E4",
    "weatherData": [
        {
            "interval": {
                "startTime": "2025-05-31T15:00:00Z",
                "endTime": "2025-05-31T16:00:00Z"
            },
            "degree": 19.6,
            "iconUrl": "https://maps.gstatic.com/weather/v1/mostly_cloudy.png"
        },
        // ... 23 more entries
    ],
    "timeZone": "America/Vancouver"
}
Combining the Routes and Weather APIs to find the weather along a route
The third and final step is to go through each leg of the route returned by the Compute Routes endpoint of the Routes API, calculate the ETA for each stop, and then match each ETA to the corresponding hourly forecast from the Forecast Hours endpoint of the Weather API to get the weather at that specific time.
In google.js, the matchWeatherWithETAs() method takes in three arguments: stops, route, and timeZone.
/*** services/google.js ***/
const matchWeatherWithETAs = (stops, route, timeZone) => {
  const weatherAtStop = [];
  let originTime;
  stops.forEach((stop, stopIndex) => {
    const eta = !!route?.etas ? new Date(route.etas[stopIndex]) : new Date();
    const etaInTimeZone = new Date(eta.toLocaleString("en-US", { timeZone }));
    // Find the weather interval that contains the ETA
    const matchingWeather = stop?.weatherData?.find((weather) => {
      const startTime = new Date(weather.interval.startTime);
      const endTime = new Date(weather.interval.endTime);
      if (eta >= startTime && eta < endTime) {
        return weather; // Explicitly return the weather object
      }
    });
    let dayDiff = 0;
    if (stopIndex === 0) {
      originTime = etaInTimeZone;
    } else {
      dayDiff = etaInTimeZone.getDate() - originTime.getDate();
    }

    if (matchingWeather) {
      weatherAtStop.push({
        stopIndex,
        eta: etaInTimeZone.toISOString(),
        dayDiff,
        interval: matchingWeather.interval,
        degree: matchingWeather.degree,
        iconUrl: matchingWeather.iconUrl,
      });
    }
  });

  return weatherAtStop;
};
First, we safely retrieve the ETA of the stop and convert it into a Javascript Date object. The code below uses optional chaining (?.) to safely access the etas property of the route object and applies the ternary operator (? :) to check if !!route?.etas is true. If it is, its gets the ETA for the specific stop at index stopIndex from route.etas, and converts it into a Date object.
const eta = !!route?.etas ? new Date(route.etas[stopIndex]) : new Date();
Second, we iterate through the weatherData array and check if the eta falls within the time range defined by startTime and endTime.
const matchingWeather = stop?.weatherData?.find((weather) => {
  const startTime = new Date(weather.interval.startTime);
  const endTime = new Date(weather.interval.endTime);
  if (eta >= startTime && eta < endTime) {
    return weather;
  }
});
Both startTime and endTime are Date objects retrieved from weather.interval hourly weather forecast returned by the Google Weather API. Converting eta, startTime and endTime to Javascript Date objects allowed us to easily do comparisons using the > and < operators.
The find() array method returns the first element that satisfies the (eta >= startTime && eta < endTime) condition provided in the callback function (or undefined if no match is found). The result is assigned to the matchingWeather variable.
If matchingWeather exists i.e. there is a match, we push the weather information for that stop to the newly created weatherAtStop array. This allows us to easily retrieve the weather at e.g. the second stop (array position 1) with weatherAtStop[1].
if (matchingWeather) {
  weatherAtStop.push({
    stopIndex,
    eta: etaInTimeZone.toISOString(),
    dayDiff,
    interval: matchingWeather.interval,
    degree: matchingWeather.degree,
    iconUrl: matchingWeather.iconUrl,
  });
}
To display the ETA in the correct time zone, we convert the eta (a Javascript Date object) into a new Date object adjusted to the time zone of the route's origin. For example, if the origin is Vancouver, Canada, the time zone would be "America/Vancouver". Additionally, we calculate the dayDiff property to show a +1 if the ETA for a stop falls on the next day.
const etaInTimeZone = new Date(eta.toLocaleString("en-US", { timeZone }));
let dayDiff = 0;
if (stopIndex === 0) {
  originTime = etaInTimeZone;
} else {
  dayDiff = etaInTimeZone.getDate() - originTime.getDate();
}
Displaying the weather along route on a Google Map
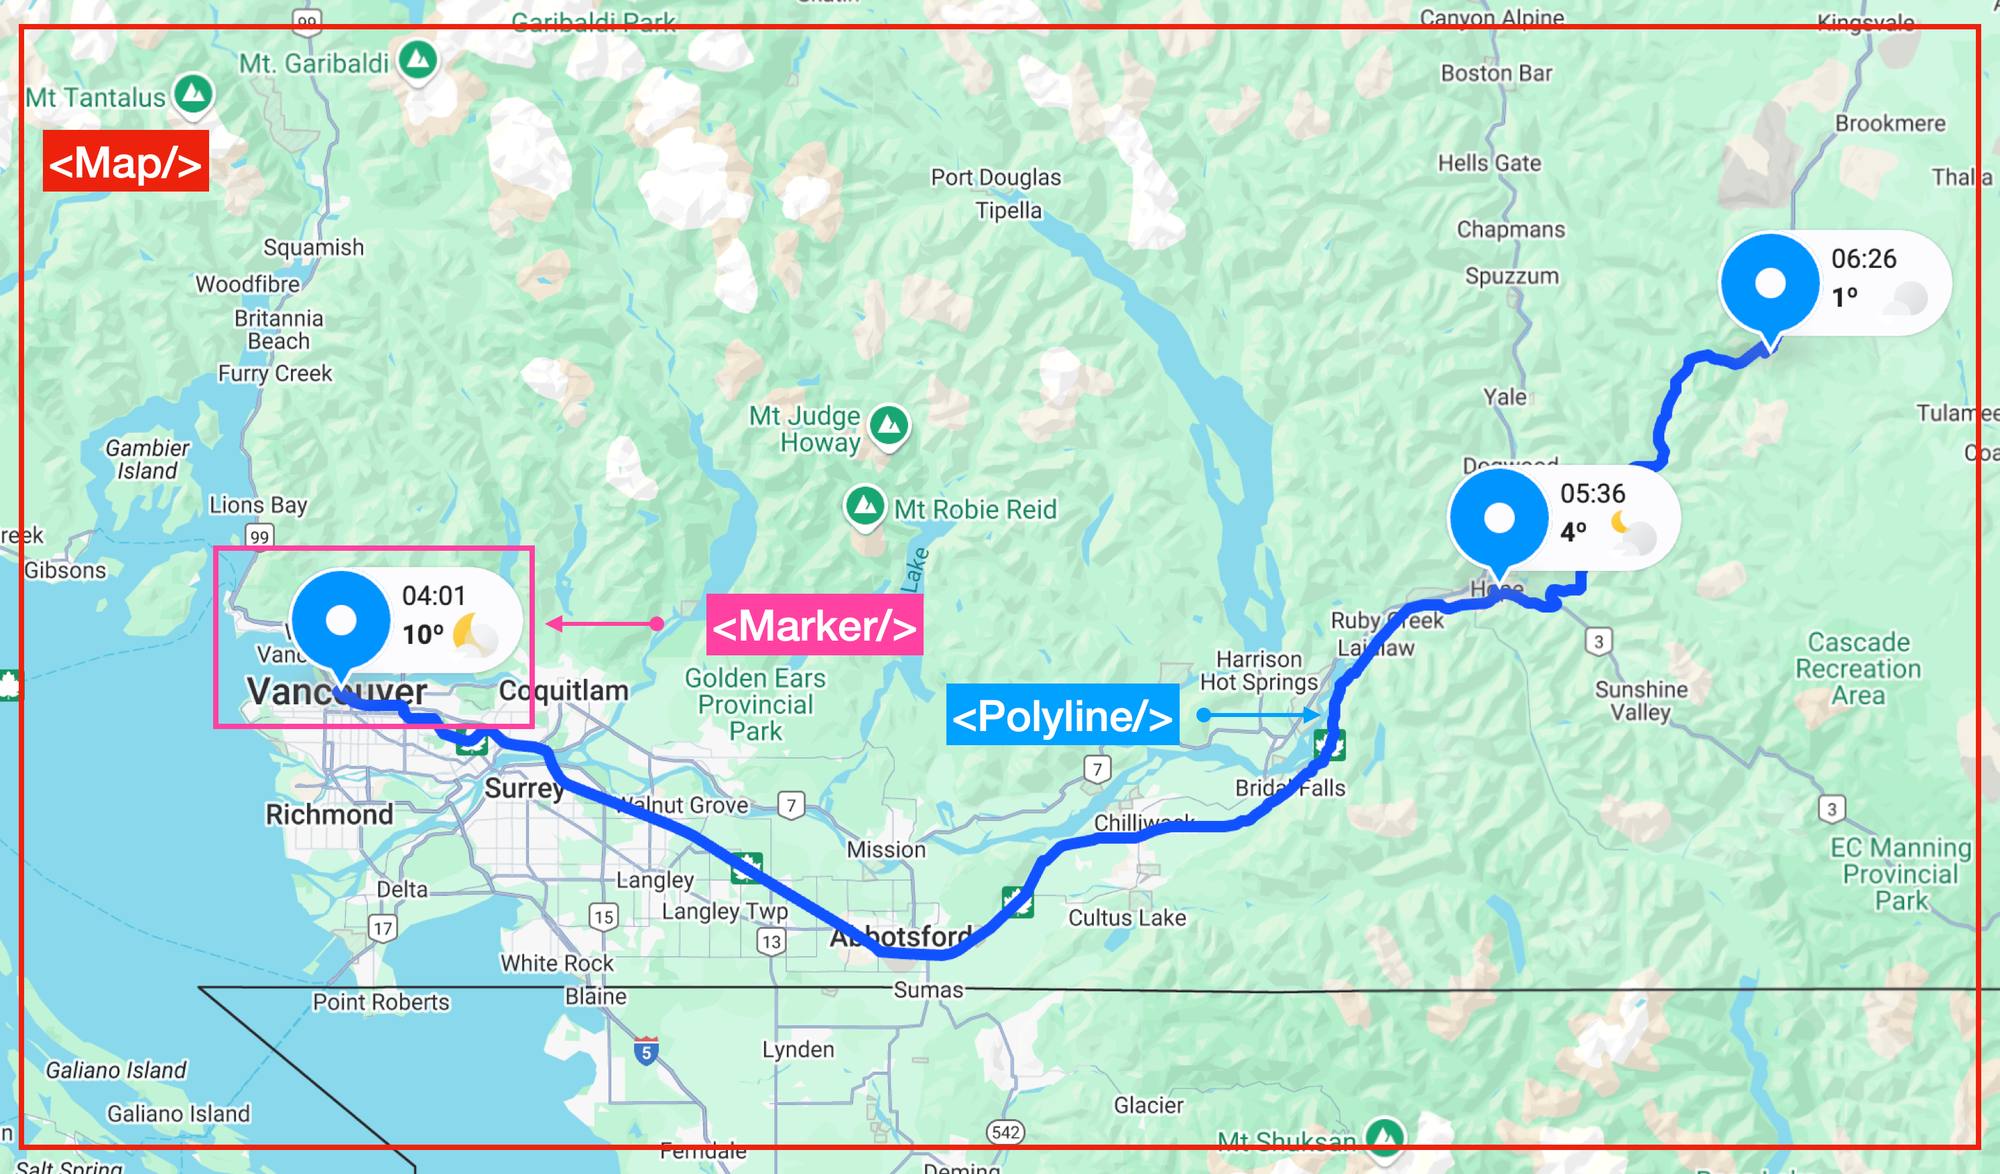
To render the weather along a route on a Google base map, three main components are required:
- Map layer:
Map/index.jsxinitializes a<Map/>component that renders a Google base map with native support for pan, zoom, and other map controls. - Route polyline:
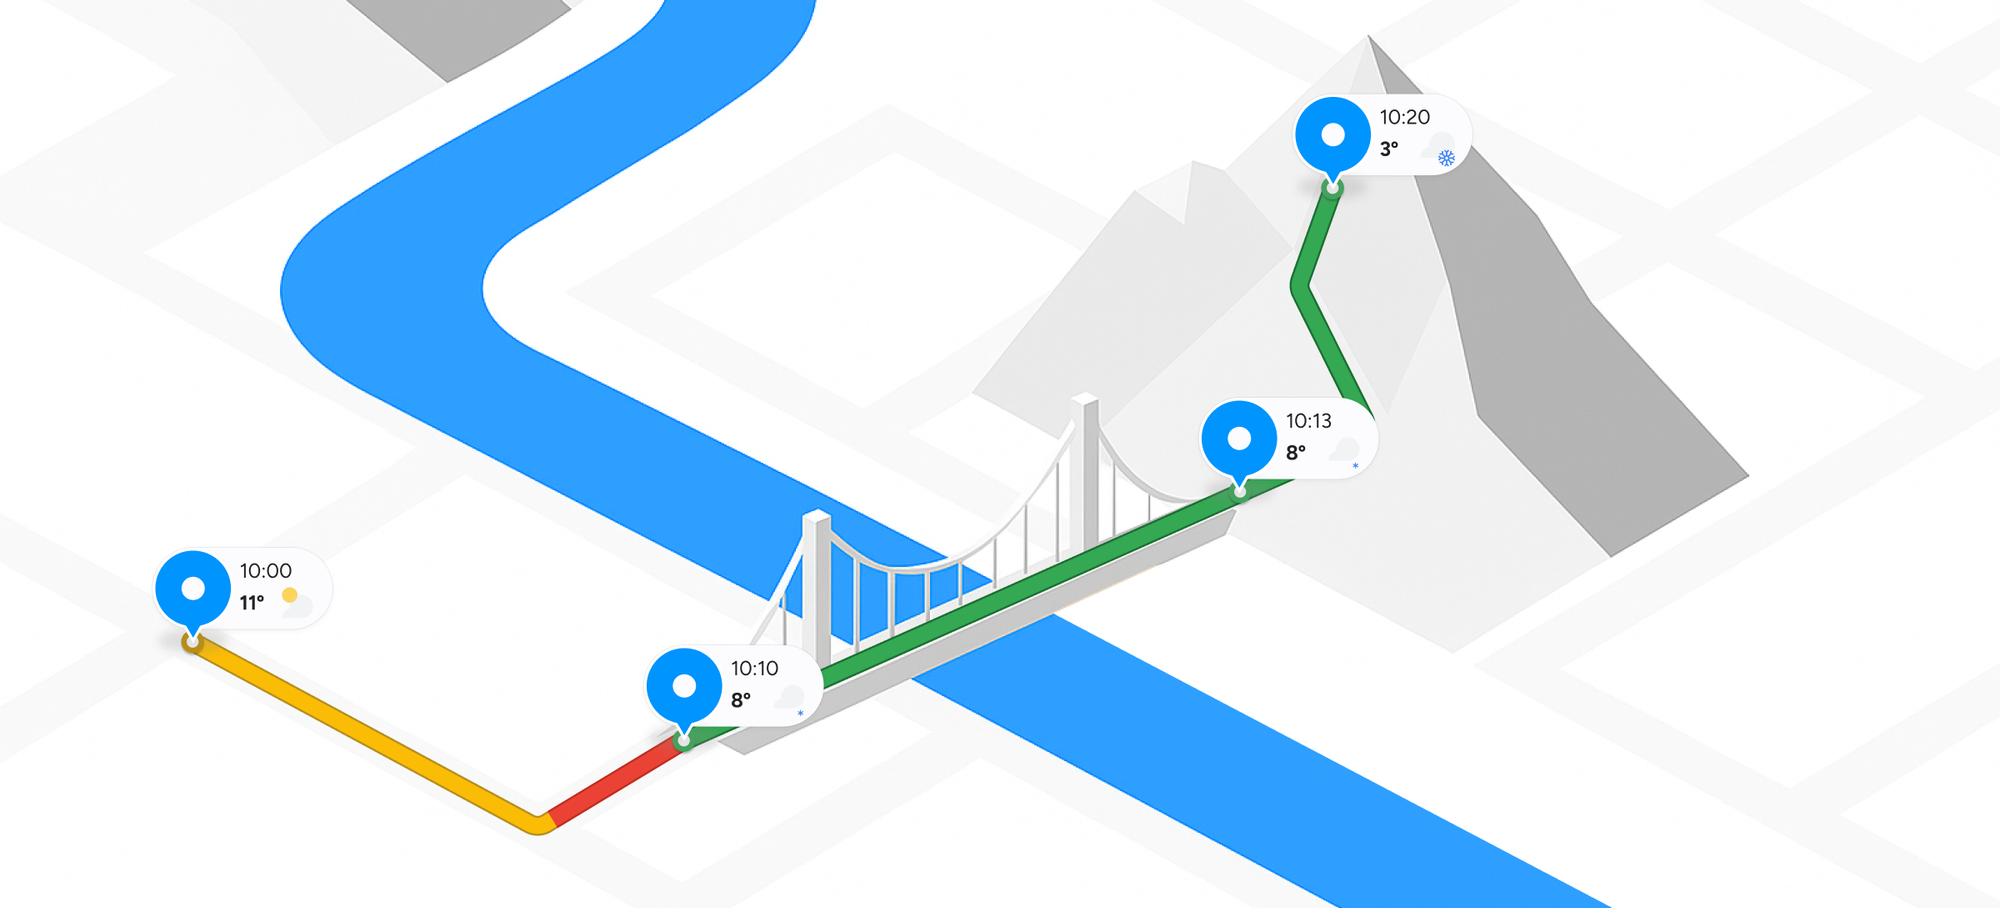
Map/polyline.jsxdisplays a<Polyline/>component, color-coded to reflect real time traffic (blue - no traffic, red - heavy traffic). - Marker:
Map/marker.jsxrenders<Marker/>, a React wrapper for Google's AdvancedMarkerElement. This lets us use SVG files to display a custom marker component
As always, we'll be using the super useful Google Maps React component library from @vis.gl/react-google-maps to quickly scaffold our app and manage map interactions and UI in a way that is consistent with React. The <Map/>, <Marker/> and <Polyline/> components are examples of this.
Map.jsx
Map.jsx (or more specifically, Map/index.jsx) renders the <Map/> or <GMap/> component, which includes the <Marker/> and <Polyline/> as child components. It takes in the following props:
origin, the start location of our route.destinations, the array of waypoints (including the final destination) on our route,timeZone, the time zone of our route start locations and,routes, the route information (including the encoded polyline string) returned by the Google Routes API.
Each of these props are retrieved from the Redux store.
/*** components/Map/index.jsx ***/
import { useMap, Map as Gmap, InfoWindow } from "@vis.gl/react-google-maps";

const Map = ({ origin, destinations, timeZone, routes }) => {
  const map = useMap();

  // ... rest of Map/index.jsx

  const stops = useMemo(() => {
    const stopsArray = [];
    const weatherData = matchWeatherWithETAs(
      [origin, ...destinations],
      routes[activeRoute],
      timeZone,
    );

    if (origin?.position)
      stopsArray.push({
        ...origin,
        type: "origin",
        weatherData: weatherData[0],
      });
    destinations.forEach((dest, index) => {
      if (dest?.position) {
        stopsArray.push({
          ...dest,
          type: "destination",
          index,
          weatherData: weatherData[index + 1],
        });
      }
    });
    return stopsArray;
  }, [origin, destinations, routes, activeRoute]);

  return (
    <Gmap
      mapId={process.env.REACT_APP_GOOGLE_MAP_ID}
      defaultZoom={DEFAULT_MAP_ZOOM}
      defaultCenter={DEFAULT_MAP_CENTER}
      gestureHandling="greedy"
      disableDefaultUI={true}
    >
      <MapHandler map={map} stops={stops} />
      {stops.map((stop, index) => (
        <Marker
          key={`marker-${index}`}
          type={"StopMarker"}
          position={stop.position}
          weatherData={
            stop.weatherData
              ? {
                  time: formatTime(stop.weatherData.eta),
                  degree: stop.weatherData.degree,
                  iconUrl: stop.weatherData.iconUrl,
                  dayDiff: stop.weatherData.dayDiff,
                }
              : null
          }
        />
      ))}
    </Gmap>
  );
};
Inside Map.jsx, the stops array utilizes the useMemo hook in React to optimize the creation of the array . origin is the first stop added, followed by the destinations (waypoints). weatherData for each stop is retrieved using the matchWeatherWithETAs() function we discussed earlier.
Inside the return statement of Map.jsx, we iterate over stops and add a <Marker/> component at each stop.position.
Marker.jsx and stop.jsx
<Marker/> is a wrapper for the @vis.gl/react-google-maps <AdvancedMarker/>, a React component that lets you add a fully customized map pin to a Google Map.
/*** components/Map/Marker.jsx ***/
import React from "react";
import { AdvancedMarker } from "@vis.gl/react-google-maps";
import StopMarker from "../../images/stop.jsx";
import "./Marker.scss";

const Marker = ({ style, position, active, onToggle, type, weatherData }) => {
  return (
    <AdvancedMarker
      position={position}
      className={`marker ${active ? "active" : ""}`}
      zIndex={active ? 2 : 1}
      onClick={onToggle}
    >
      <StopMarker type={type} style={style} weatherData={weatherData} />
    </AdvancedMarker>
  );
};

export default Marker;
By default, the marker appears as the standard red balloon pin from Google Maps. To customize it, we create a new marker (<StopMarker/>) using a Scalable Vector Graphics (SVG) file.
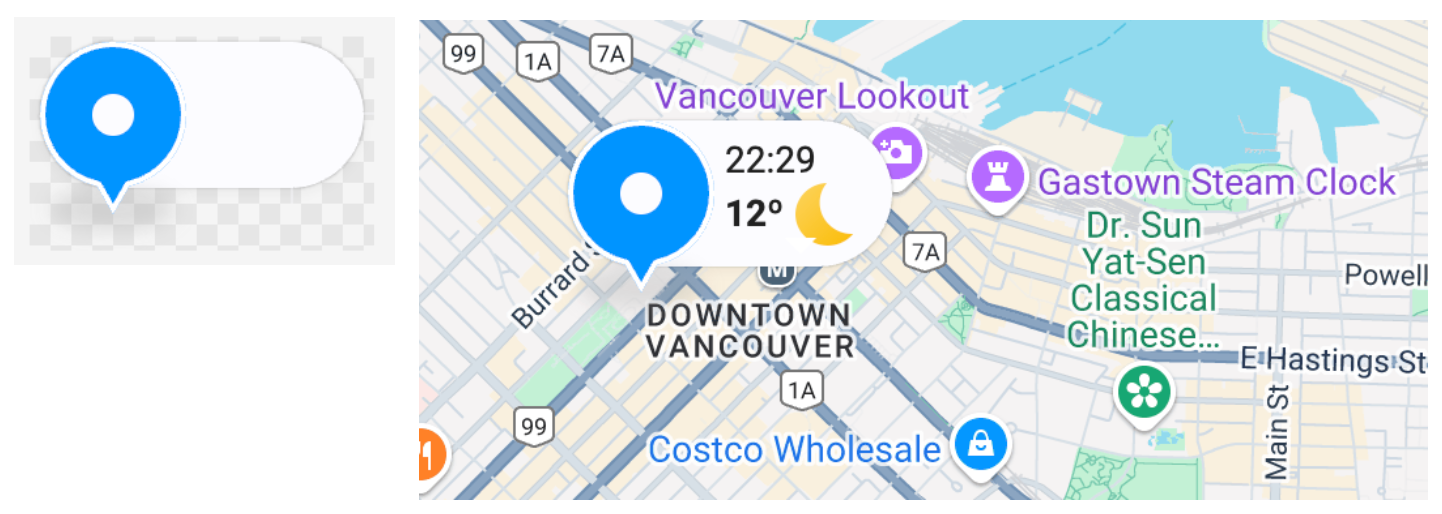
This is done by importing the SVG file directly with the following line in stop.jsx:
import { ReactComponent as StopMarker } from './stop-marker.svg';
Inside <StopMarker/>, we use CSS to correctly position the time, temperature and weather icon. All these pieces of information are passed in as props into <StopMarker/> and included in the return statement of stop.jsx.
/*** images/stop.jsx ***/
import React, { useMemo } from "react";
import { ReactComponent as StopMarker } from "./stop-marker.svg";

const images = {
  StopMarker,
};

const Image = ({ type, color, strokeColor, onClick, weatherData }) => {
  const { time, degree, iconUrl } = weatherData || {};
  const SVG = useMemo(() => {
    const SVGComponent = images[type];
    return SVGComponent ? (
      <SVGComponent
        style={{ fill: color || undefined, stroke: strokeColor || undefined }}
      />
    ) : null;
  }, [type, color, strokeColor]);

  return (
    <div className={`img-${type}`} onClick={onClick}>
      {SVG}
      {weatherData && (
        <div className="weather-info">
          <p>
            {time} {weatherData.dayDiff ? `+${weatherData.dayDiff}` : ""}
          </p>
          <p className="degree">{Math.round(degree)}º</p>
          <img className="weather-icon" src={iconUrl} alt={""} />
        </div>
      )}
    </div>
  );
};

export default React.memo(Image);
Polyline.jsx
To render the route polyline on the map with color-coded real-time traffic information, we need to add a <Polyline/> as a child of <Map/> and pass the required data as props. In the renderRoutes() method of Map.jsx, we add a <Polyline/> for each leg of the route.
/*** components/Map/index.jsx ***/
const renderRoutes = useMemo(() => {
  if (!routes || routes.length === 0) return null;

  return routes.map((route, routeIndex) => {
    // Each route may have multiple legs when there are waypoints
    const legs = route.legs || [];

    return legs.map((leg, legIndex) => (
      <Polyline
        key={`polyline-${routeIndex}-${legIndex}`}
        route={{
          ...route,
          polyline: leg.polyline,
          travelAdvisory: leg.travelAdvisory,
          duration: leg.duration,
          distanceMeters: leg.distanceMeters,
        }}
        activeRoute={activeRoute}
        routeIndex={routeIndex}
        onClick={handlePolylineClick}
      />
    ));
  });
}, [routes, activeRoute]);
<Polyline/> accepts the following props:
key: a unique identifier for the polyline (not important)route: route data that includes polyline.encodedPolyline: the index of the selected route (highlighted)
activeRouterouteIndex: the index of the route in the order it was returned by the Routes APIonClick: an event handle for the <InfoWindow/> component
When route is passed as a prop into <Polyline/>, it is decoded into an array of coordinate pairs, segmented by traffic speed, and redrawn as a color coded traffic-aware polyline.
/*** components/Map/polyline.jsx ***/
import React, { useState, useEffect } from "react";
import { useMapsLibrary } from "@vis.gl/react-google-maps";
import { Polyline as EPolyline } from "./external/Polyline";
import { SPEED_COLORS } from "../../constants";

const Polyline = ({ route, activeRoute, routeIndex, onClick }) => {
  const [polylines, setPolylines] = useState([]);
  const geometryLibrary = useMapsLibrary("geometry");

  useEffect(() => {
    if (!route?.polyline?.encodedPolyline || !geometryLibrary) return;

    const decodePath = (encodedPath) => {
      return geometryLibrary.encoding.decodePath(encodedPath).map((point) => ({
        lat: point.lat(),
        lng: point.lng(),
      }));
    };

    const polylinePoints = decodePath(route.polyline.encodedPolyline);

    let zIndex = route.travelAdvisory.speedReadingIntervals.length + 2;
    const newPolylines = route.travelAdvisory.speedReadingIntervals.map(
      (interval) => {
        const newPoints = polylinePoints.slice(
          interval.startPolylinePointIndex,
          interval.endPolylinePointIndex + 1,
        );

        return {
          path: geometryLibrary.encoding.encodePath(newPoints),
          options: {
            zIndex: 100 - routeIndex + zIndex--,
            strokeColor: SPEED_COLORS[interval.speed] || SPEED_COLORS.NORMAL,
            strokeOpacity: routeIndex === activeRoute ? 1.0 : 0.5,
            strokeWeight: 6,
          },
        };
      },
    );

    setPolylines(newPolylines);

    return () => {
      setPolylines([]);
    };
  }, [route, geometryLibrary, routeIndex, activeRoute]);

  // ... return statement of Polyline.jsx
};

export default React.memo(Polyline);
In the useEffect() method of Polyline.jsx, the speedReadingIntervals array is used to determine the startPolylinePointIndex and endPolylinePointIndex for each colored segment.
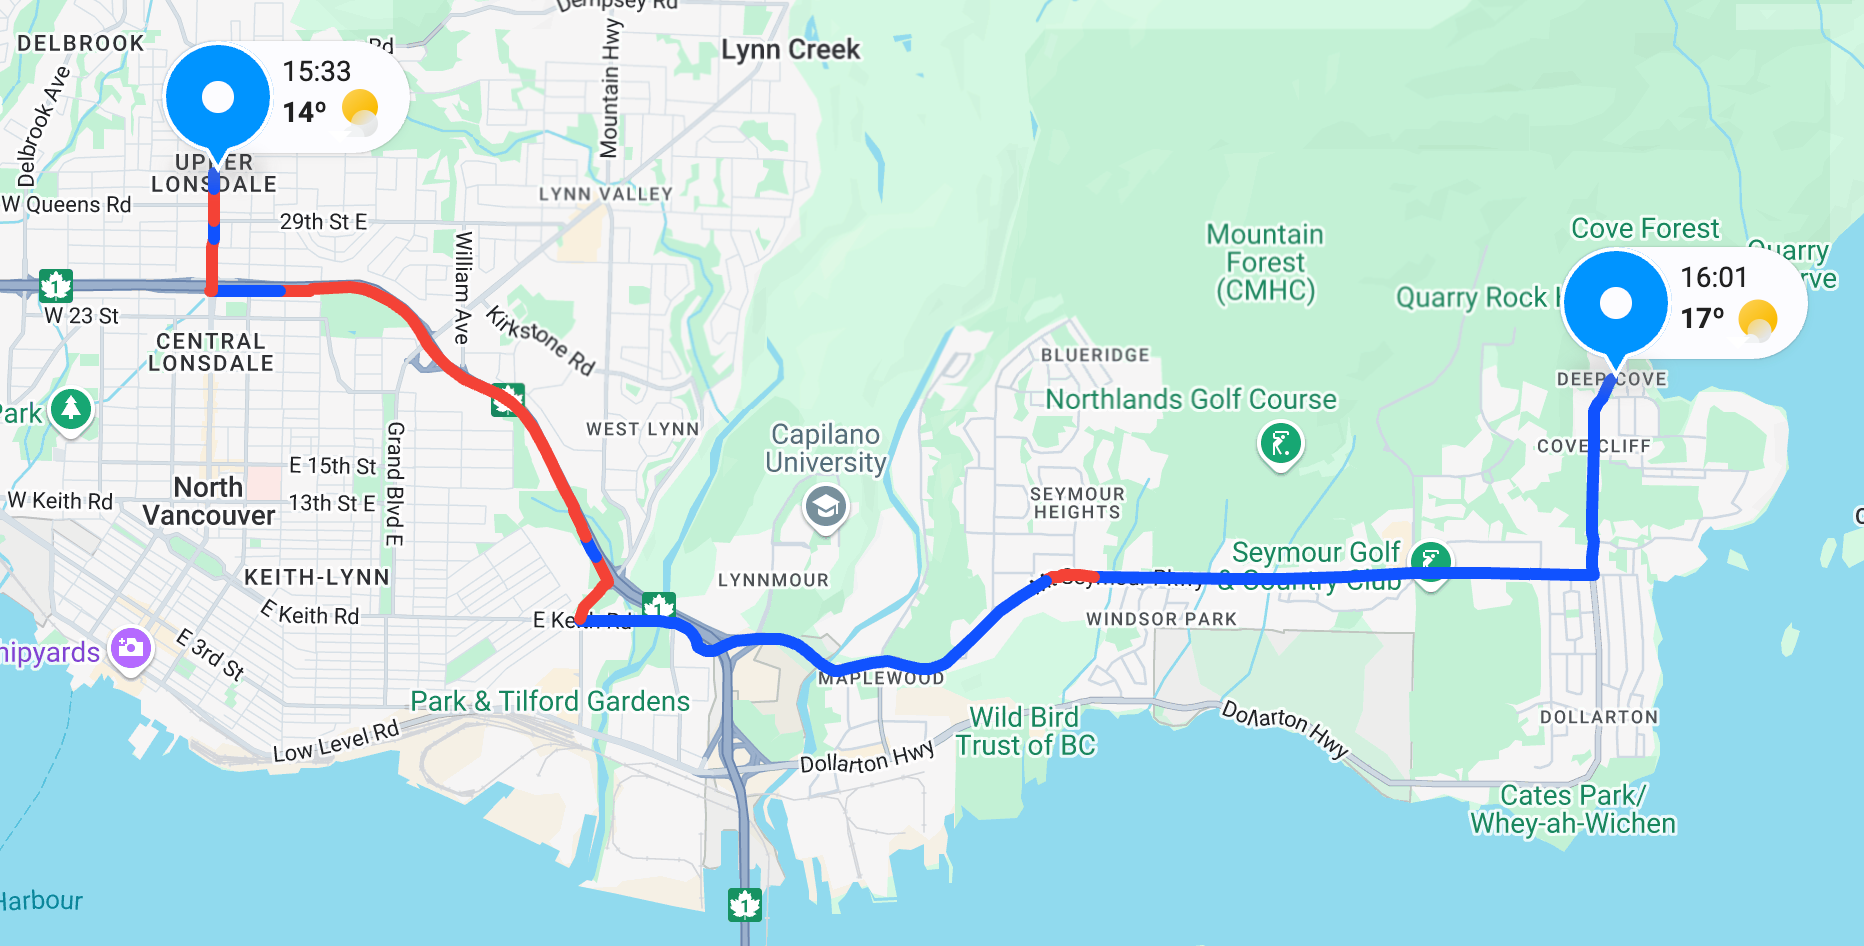
Finally, we extract the coordinates, group them into segments, and encode each segment into a shorter polyline (color-coded based on traffic), which is then rendered on the map. You can see a live demo of the Weather Along Route app at https://weather-along-route.afi.dev/.
Some thoughts on building the weather along route app.
For Google, the Weather API is both a market share play (as a drop in replacement for existing Weather APIs) and a use case play, where developers are encouraged to combine the Weather API with other Google Maps APIs to build applications that are both informative and practical. I built the Weather Along Route app to help me plan road trips, but it could just as easily be used to manage deliveries, or help any business that needs environmental context to help users adjust their travel plans based on forecasted weather conditions.
But it could have been easier. What would have been ideal is if the Routes API included a extra_computations field (just like how Building Outlines and Entrances is tagged onto the Geocoding API) that gives you the time adjusted weather conditions at a given waypoint on the route. That way, you can make just one call to the Routes API and get back both weather and route information in a single response payload.
In the next post, we'll use the Weather API to build a weather map that shows current and forecasted conditions at locations of your choosing.
👋 As always, if you have any questions or suggestions for me, please reach out or say hello on LinkedIn.
Part 4: Building a real time weather map with the Google Weather API