Using the Google Maps API to get driver ETAs
Learn how to send notifications to keep your customers informed of when their delivery will arrive.


The biggest operational expense for any last mile delivery company after fuel, vehicle maintenance and driver salaries is customer service. With the popularity of Uber and other ride sharing apps, people have gotten used to the idea of knowing exactly when their driver will arrive, and customers will not hesitate to call your support hotline demanding to know when their package will get there.
Afi Labs delivers custom software to meet your logistics needs. From vehicle routing, live tracking to proof of delivery, we've got you covered!
👋 Say Hello!
For a traditional delivery company, here's what often happens. A customer is waiting for something he bought online to be delivered. He needs to step out to run some errands, so he calls your customer service number and asks what time the driver will get there. Your customer service rep puts him on hold and calls the driver, who isn't answering because he's on the road. While all this is happening, the customer gets in his car and drives off and by chance, your driver arrives just after he leaves. Your customer never gets his package and leaves a bad review for everyone to see.
This scenario is more common than you'd think, and as your delivery volume grows, you need to continually hire and train customer service reps to deal with the corresponding increase in customer enquiries. To solve this problem and reduce your customer service load, I'll show you how to use customer notifications (triggered when the driver is about to head to the customer's address) to keep your customers informed of when their delivery will arrive.
Part 1: Using the Google Maps API to get Driver ETAs (this article)
Part 2: Using Twilio to Send ETA Notifications to your Customers
How our Code is Organized
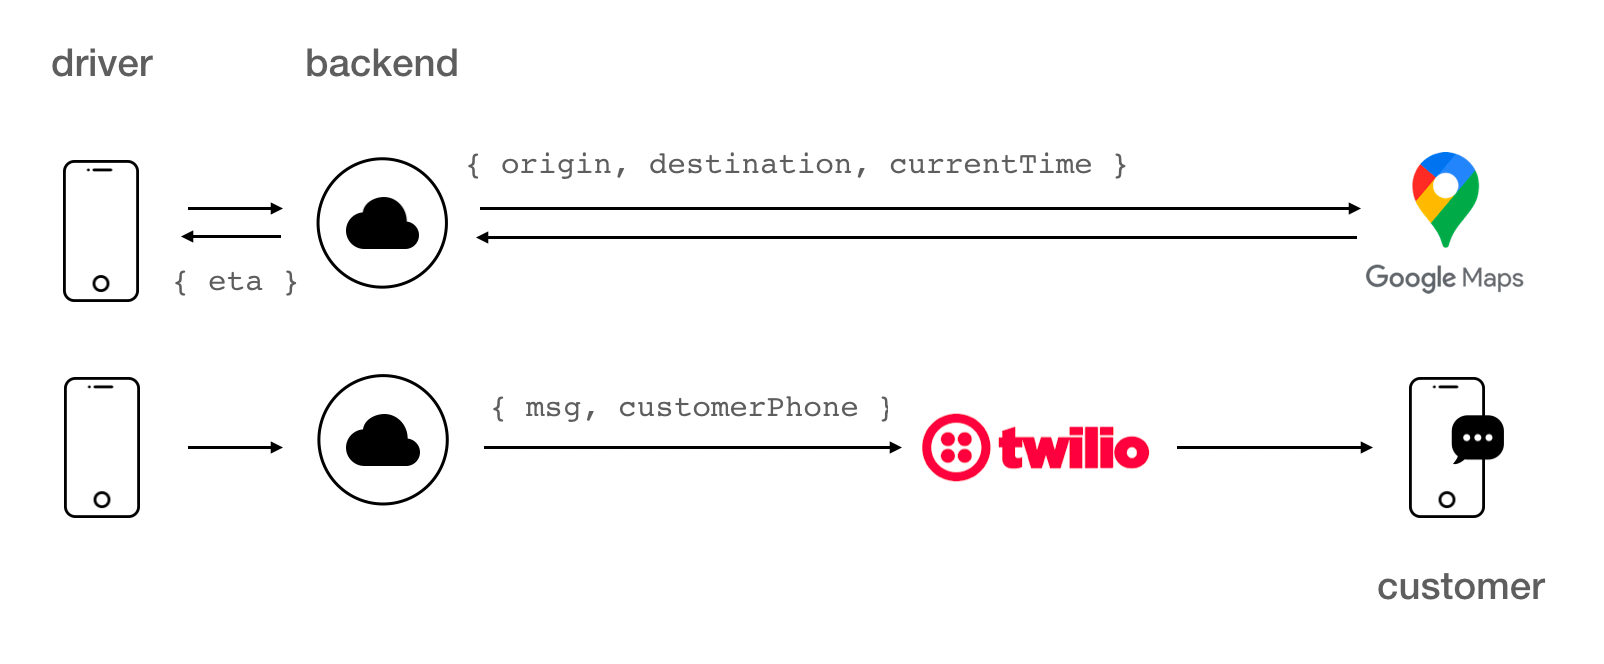
There are two main parts to this project. An iOS app frontend and a Node.js backend. The iOS app (written in Swift) lets the user specify a customer address and makes a call to the Google Maps API to retrieve the travel time it would take to get to the customer's address from the driver's current location (see our blog post on implementing driver live tracking). The ETA (estimated time of arrival) is simply the travel time added to the current time. Once the ETA is confirmed, the driver presses a button to send a text message to the customer informing him when he will arrive. The backend (written in Javascript and using the Nest.js framework) takes care of the API calls to Google Maps and Twilio. You can make API calls to Google Maps and Twilio without using a backend, but having one is useful because it allows us to securely store our API keys and swap them out if they ever become compromised.
All the code (iOS app / backend) is available under a permissive MIT license and you are free to use it in part or in whole for your own projects.
Frontend iOS App
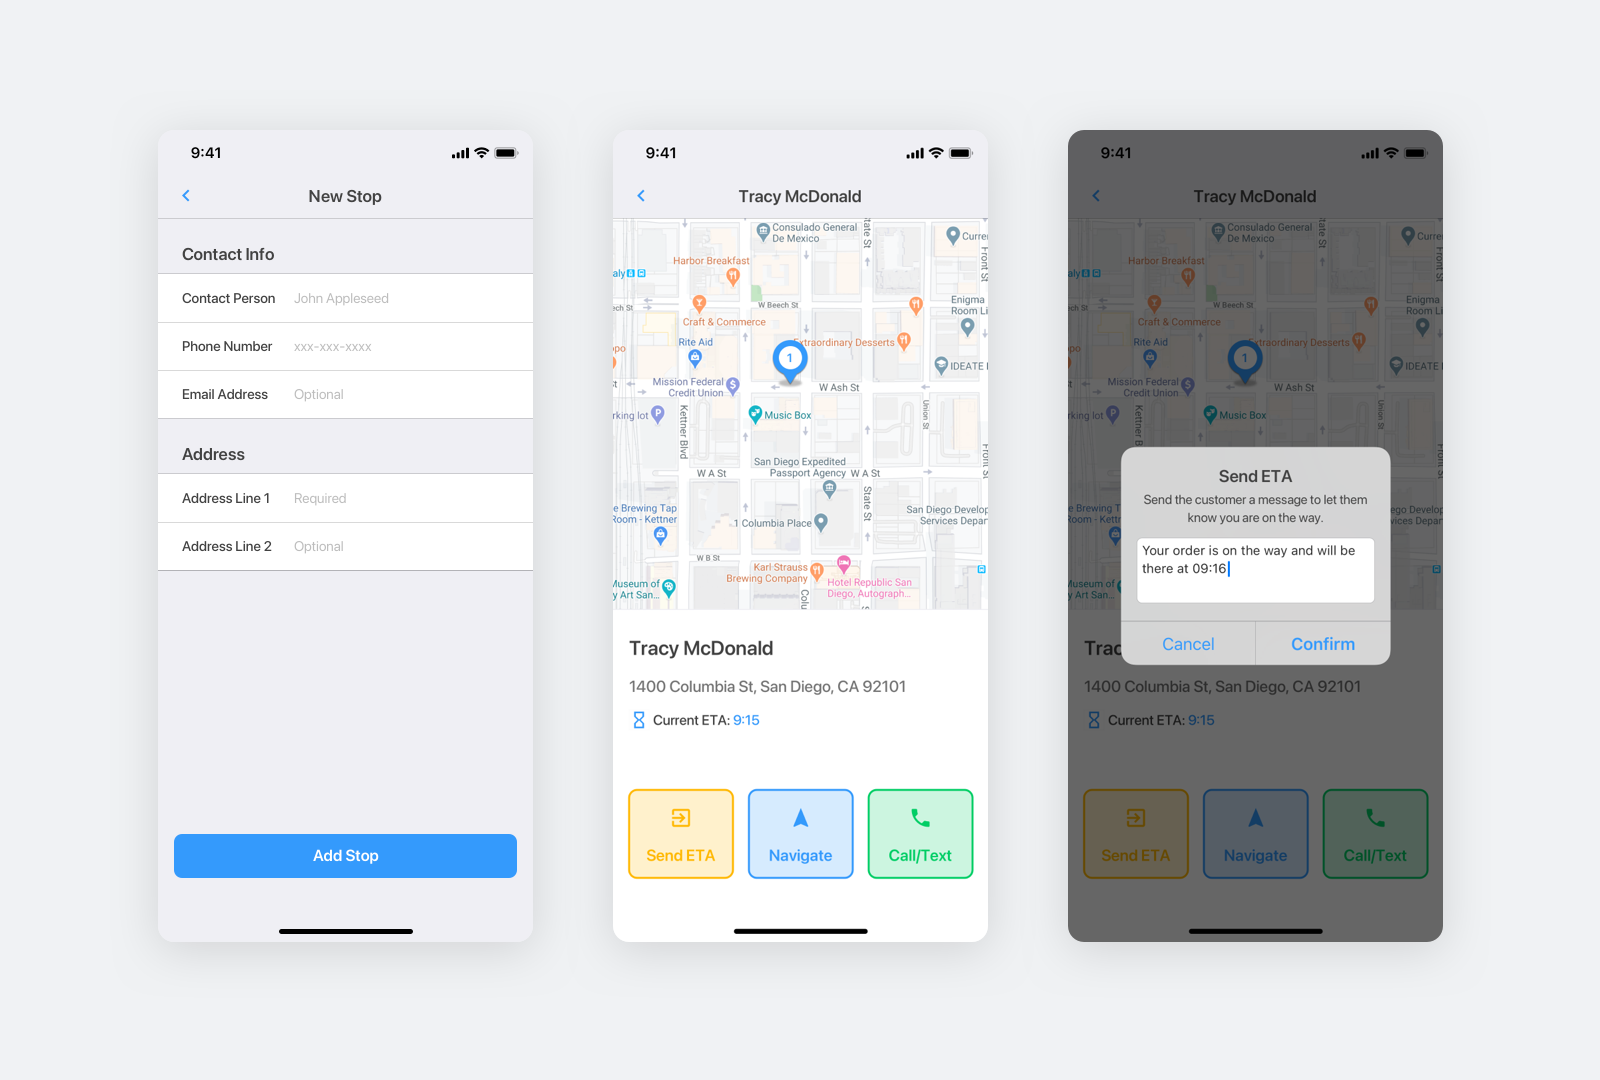
The iOS app is organized around three main screens. A stop input screen NewStopVC.swift that allows the driver to enter the name, phone number and address of the customer, a stop detail screen StopDetailVC.swift that shows the address of the customer on a map (MapViewController.swift), and a send ETA confirmation message UIAlertController that allows the driver to send a custom text message to the customer that includes his ETA. Once a stop is created, it is converted into an order (as defined in OrderModel.swift) to better represent a delivery order made by a customer.
NewStopVC.swift
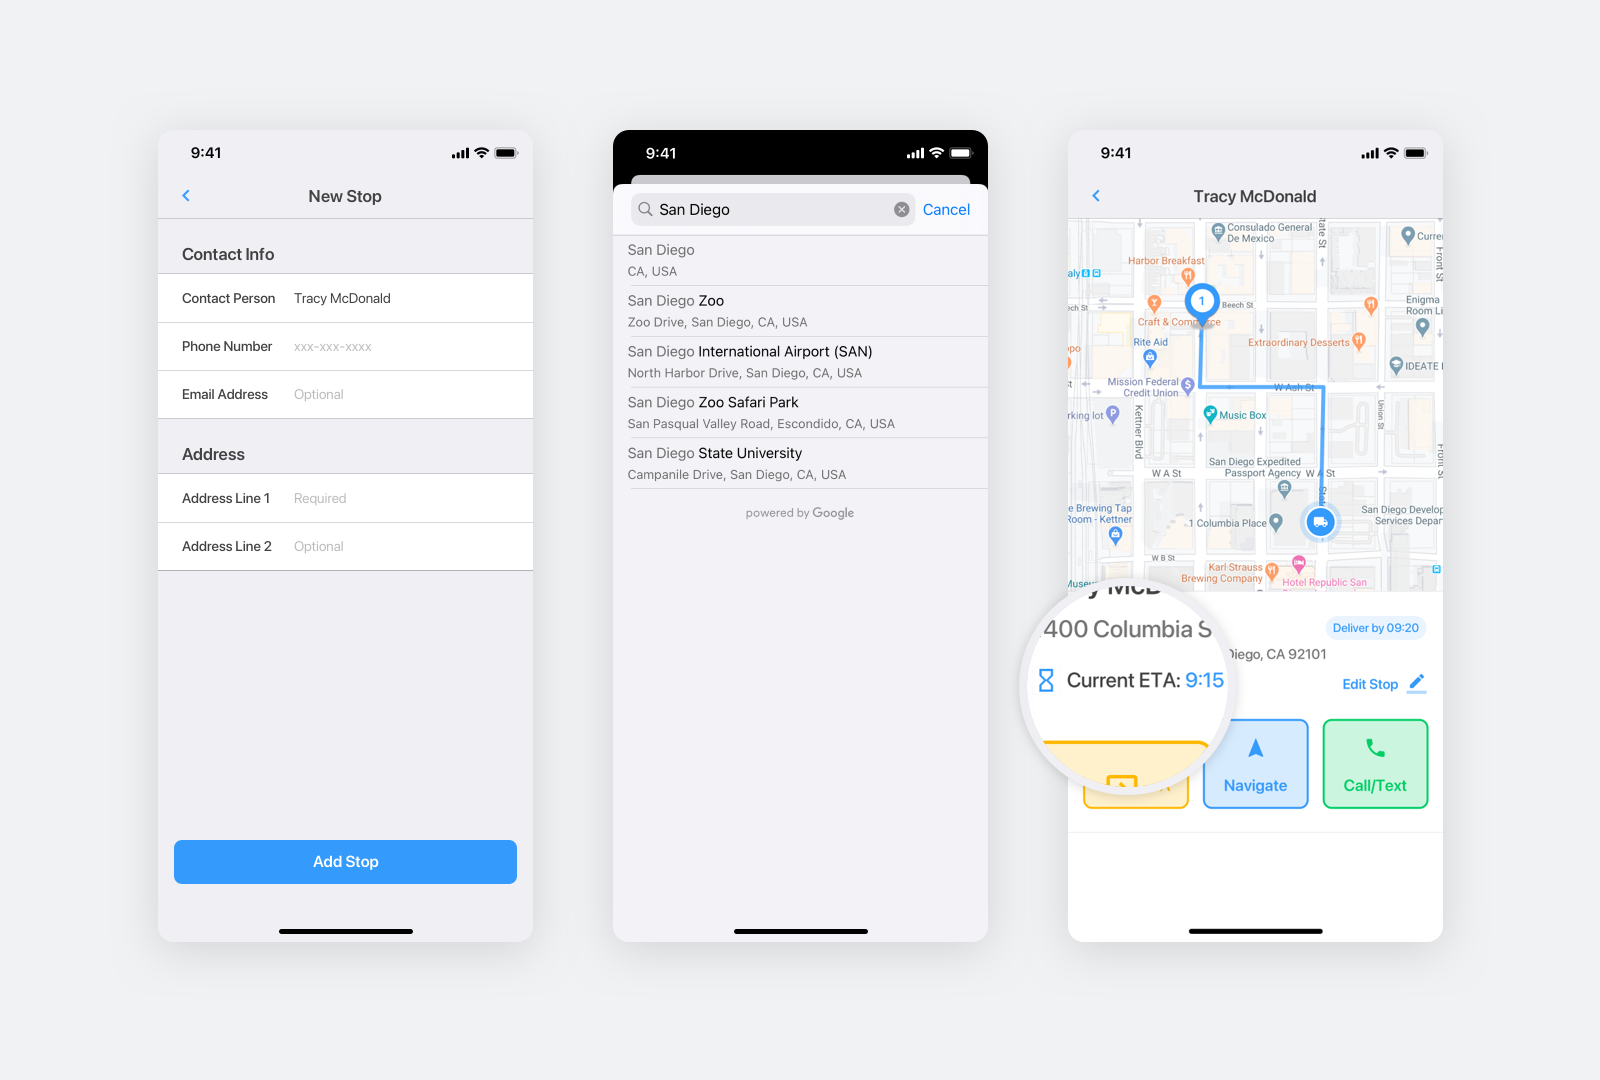
When the driver clicks "Edit Stop" to add the customer address, we load NewStopVC.swift. NewStopVC.swift uses the GMSAutocompleteViewController() method imported from the GooglePlaces SDK to provide us with an autocompleting search bar that returns suggestions for places such as businesses, addresses and points of interest. This allows the user to not only quickly find the address he is looking for, it also returns the latitude / longitude pair associated with the address, which when sent to the Google Maps API, allows us to calculate the travel time to that address.
Be sure to replace googleAPIKey in Constants.swift with your own Google Maps API key (follow these instructions to get one).
At the top of NewStopVC.swift we import the GoogleMaps and GooglePlaces libraries.
import GooglePlaces
import GoogleMaps
Next, we add the method showGooglePlaceAutocomplete().
func showGooglePlaceAutocomplete() {
    let autocompleteController = GMSAutocompleteViewController()
    autocompleteController.delegate = self

    // Specify the place data types to return.
    let fields: GMSPlaceField = GMSPlaceField(rawValue: UInt(GMSPlaceField.name.rawValue) |
        GMSPlaceField.formattedAddress.rawValue |
        GMSPlaceField.coordinate.rawValue)

    autocompleteController.placeFields = fields


    // Specify a filter.
    let filter = GMSAutocompleteFilter()
    autocompleteController.autocompleteFilter = filter

    // Display the autocomplete view controller.
    present(autocompleteController, animated: true, completion: nil)
}
This method is invoked when showGooglePlaceAutocomplete() is called upon the driver clicking on the address text field.
func tableView(_ tableView: UITableView, didSelectRowAt indexPath: IndexPath) {
    let section = indexPath.section
    let row = indexPath.row
    if (section == NewStopSection.Address.rawValue &&
        row == AddressInfoRows.Address1.rawValue) {
        showGooglePlaceAutocomplete()
    }
}
The showGooglePlaceAutocomplete() method invokes a search dialog with built-in autocomplete functionality. As the driver enters search terms, the control presents a list of predicted places to choose from. When the driver makes a selection, a GMSPlace instance is returned, which our app can then use to get details about the selected place. This happens in the GMSAutocompleteViewControllerDelegate which saves the address's latitude and longitude in stop.lat and stop.long.
extension NewStopVC: GMSAutocompleteViewControllerDelegate {
    // Handle the user's selection.
    func viewController(_ viewController: GMSAutocompleteViewController, didAutocompleteWith place: GMSPlace) {

        selectedPlace = place
        stop.address1 = place.formattedAddress
        stop.lat = place.coordinate.latitude
        stop.long = place.coordinate.longitude
        setupDataDisplay()
        tbvContent?.reloadData()
        dismiss(animated: true, completion: nil)
    }
}
When the driver clicks "Save", the updateStop() method is called and a PUT request via section.request(url, method: .put, parameters: params, encoding: JSONEncoding.default) is made to our backend to save the stop information together with driver real time location data (see our driver live tracking tutorial to see how this is done) in the cloud. Here's what we send to the backend:
{
	"name": "Tracy MacDonald",
	"driverLat": 37.785834000000001,
	"address": "Vancouver, BC, Canada",
	"driverLng": -122.406417,
	"driverTimezone": "America\/Vancouver",
	"lng": -123.15581210000001,
	"phone": "+1 (604) 819-8950",
	"lat": 49.701633899999997
}
On the backend (which we cover in the next section), we make an API request to the Google Maps API to get the driving directions and ETA from the driver's current location to the customer's address. The parsed request looks like this:
The server retrieves the eta object from the response, updates the eta property on the stop model and returns the following json to our app and:
{
	"address": "Vancouver, BC, Canada",
	"lat": "49.701633899999997",
	"lng": "-123.15581210000001",
	"driverLat": "37.785834",
	"driverLng": "-122.406417",
	"driverTimezone": "America/Vancouver",
	"email": "[email protected]",
	"eta": "17:40",
	"id": 1,
	"name": "Afian Anwar",
	"phone": "+1 (604) 123-4567"
}
The json is stored in the obj variable. We then save the data (which includes our eta property) in obj to our stop object here:
if let dictionary = obj as ? [String: Any],
    let order = Mapper < OrderModel > ().map(JSON: dictionary) {
        self?.stop = order
        NotificationCenter.default.post(name: .updateStopSuccessfully, object: order, userInfo: nil)
        self?.navigationController?.popViewController(animated: true)

    }
After stop is updated, we use the Observer pattern (via the NotificationCenter service) to update the ETA value on the frontend. Here's what's happening under the hood:
NewStopVC.swiftposts a message named.updateStopSuccessfullywith the lineNotificationCenter.default.post(name: .updateStopSuccessfully, object: order, userInfo: nil).- In the
viewWillAppear()method ofStopDetailVC.swift, we listen for that message (and it's payload,order) with the lineNotificationCenter.default.addObserver(self, selector: #selector(updateStopSuccess(notification:)), name: .updateStopSuccessfully, object: nil). - The
updateStopSuccess()method extracts the information from the notification payload and updatesstopwith the linestop = data. StopDetailEstimateCell.swiftgets passed the stop data incell.configure(delegate: self, order: stop).- On the user interface, the
lblTimeUI label inStop.storyboardis connected to theStopDetailEstimateCelloutlet. - The
lblTimelabel is updated with the ETA inStopDetailEstimateCell.swiftwith the linelblTime?.text = order?.etain theconfigure()method.
This is how estimated arrival time of the driver at the customer's address is displayed on the app, and in Using Twilio to Send ETA Notifications to your Customers, I'll show you how to send this ETA in a text message to let your customers know when their driver will arrive.
👋 As always, if you have any questions or suggestions for me, please reach out or say hello on LinkedIn.
Next: Part 2: Using Twilio to Send ETA Notifications to your Customers